How do I convert leads to accounts in CX Sales?
If your business uses net new leads where account values are entered manually using free-form text fields, then you can make the New Account field available on the Leads UI through Application Composer. This field is hidden by default, so to use it for your new leads, you must manually expose this field.
If the new lead that you enter gets converted to an opportunity, the details become available as existing account information. To have a new account created as part of the lead conversion into an opportunity, you must set up the following:
- Expose the New Account field on the Leads page as described in the
Add the New Account Field to the CX Sales Lead UIs
section:
- Create and activate a sandbox.
- Create custom layouts for the appropriate pages and add the field as required.
- Review your work in the leads pages.
- Publish the sandbox.
- Enable the default setting for the creation of an account, a contact, both an account and a contact, or none during lead conversion by setting the profile option Create Account and Contact from Lead (ORA_MKL_LEAD_ACT_CON_CREATE). The default value is Both,to but you can enter Account to suit your requirements.
- Create the Copy Map for Lead to Account file to capture the data that needs to be transferred at conversion time. This file maps objects and attributes during the creation of an account, when converting a lead to an opportunity. See the Copy a Lead to Account Map section for more information.
- Set the Lead to Account Mapping (MKL_LEAD_TO_ACCOUNT_MAPPING_NAME) profile option value from the default Standard Copy Lead To Account Map value with the exact name of the mapping file name created in Copy Maps as created in the previous step.
Add the New Account Field to the CX Sales Lead UIs
You must add the New Account field to the leads pages that salespeople use to create and qualify net new leads.
- In the Navigator, click .
-
In Application Composer, search for the Sales Lead object (callout 1 in the screenshot).
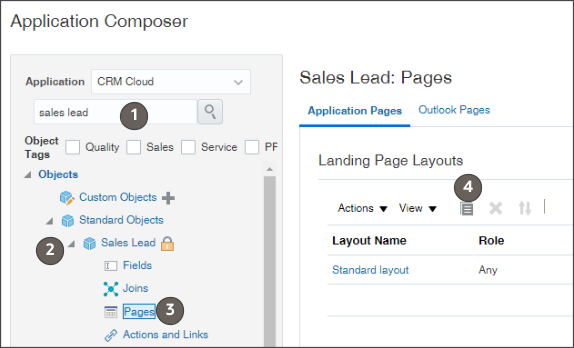
- Open the Sales Lead object (callout 2).
- Click Pages (callout 3).
- For each of the pages where you need to expose the field, do the following:
- Find the page.
- Click Duplicate (callout 4).
- In the Duplicate Layout window, enter a new name for your layout or just click Save and Edit.
- On the Layout page, click Edit (the pencil icon).
- In the Available Fields column, find the New Account field and move them to the Selected Fields column.
- Use the arrow buttons to move the fields where you want them.
- Click Save and Close.
You're returned to the Layout page, which reflects your changes.
- Click Done.
You're returned to the Application Composer page.
Copy a Lead to Account Map
Copy maps enable you to create objects by copying existing objects. For example, you can use predefined mapping files to copy lead attributes stored on a lead to the account created during lead conversion.
Here's how to copy a lead to an account map:
- Ensure that you're working in an active sandbox.
- Click .
- Select Sales to filter the object search, and in Advanced Setup, select Copy Maps.
-
On the Copy Maps page, select the Copy Lead to Account > Standard Copy Lead to Account Map.
- Create a copy of the map and enter relevant account mappings on the Edit Copy Map page.
- Click Save and Close.
-
Specify the mapping file name in the following profile option:
- Use the Lead to Account Mapping (MKL_LEAD_TO_ACCOUNT_MAPPING_NAME) profile option to specify the mapping file name created in Copy Maps. This file maps objects and attributes during the creation of an account when converting a lead to an opportunity.