Call and Web Conference Appointment Step
Here's an overview of how you create a step that prompts the salesperson to hold a call or a web conference appointment and how salespeople see and interact with that step.
Setup
- Create the step with these entries:
Field Value Step Name Enter the heading for the appointment. For example: Hold demo meeting. The step name appears in the guidance setup UI and is automatically copied over as the subject of the appointment in the properties page. Suggestion Text Add details of the recommended action. For example: Hold initial demo meeting with contacts. The text gets copied to the appointment description. Type Appointment Action Select either Call or Start Web Conference. Your selection determines what type of appointment gets created. Selecting Call, displays the Call button, which dials the customer. Selecting Start Web Conference, displays the Start Web Conference button, which launches a web conference. Note:Don't select Create Appointment.
- Click Add to save the step.
- Click Edit Properties to edit the step.
- The entries you make in the Appointment Properties page, automatically create an
appointment in the background. The appointment is created as soon as the
guidance displays the appointment step, even before the salesperson clicks the
Schedule Appointment button. If your organization has integrated Office 365,
then the appointment is also added to the calendar. Salespeople can update the
times and duration of the appointment, of course.
Field Value Subject The subject of the appointment. Your entry appears as the step heading in the Guidance panel for salespeople. Type Appointment type appears in the appointment itself. It doesn't affect guidance functioning. Start in Hours The number or hours since last step in the guidance is completed. This is the start time of the appointment created automatically by the step. Salespeople can reschedule the appointment. Duration in Minutes Suggested duration of the appointment. Salespeople can change this as well. Description Description that appears in the Guidance panel step and in the appointment itself. Attachment fields Add attachments to the appointment. Salespeople see links to the attachments in the Guidance panel on the record overview page and can open them from the appointment.
Sales Guide Select any interactive scripts (sales guide) you want salespeople to use during their meeting. Grace Period to Complete The duration of the grace period in hours. If the appointment isn't completed within the grace period after the due date, then the guidance proceeds goes to the next step on failure. Complete Objectives Select any objectives this step completes. (In the Steps tab version, this field appears at the bottom of the page.) Enter the success criteria and the next steps on success and failure.
- If you're creating the step as part of the diagram, then add a Logic node.
- If you're creating the step in the Steps tab, then you enter the information on the same page.
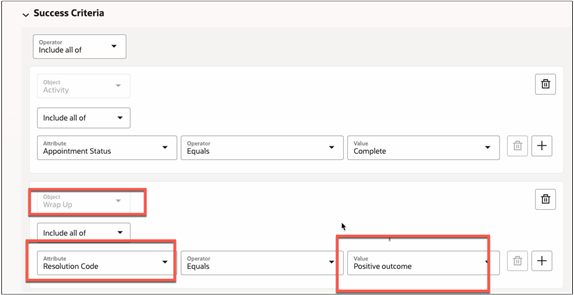
For example, enter the following criteria to specify a step as a success if the salesperson selects a positive outcome in a call wrap up:
- Object: Wrap Up
- Include all of
- Attribute: Resolution Code
- Operator: Equals
- Value: Positive outcome
 Note: The success criteria attribute names don't necessarily match the runtime field names.
- You can prevent salespeople from skipping a step by turning off Allow skipping this step option. Turning off this option removes the Skip button from the UI for the step.
- You can have the application evaluate the success criteria you entered even when salespeople click the Completed button, by turning on the Evaluate success criteria when marked as completed option. If the criteria aren't met, then the guidance goes to the next step on failure.
- Click Save.
How Salespeople Interact with an Appointment Step
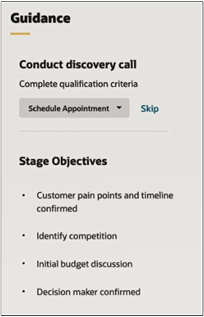
Here's what salespeople see when the step appears on an opportunity.
-
When a salesperson clicks Schedule Appointment, the application opens the edit page where you can add participants, change the start time and duration, and add schedule reminders. Salespeople can't change the type of appointment from call to web or vice versa, however. That's determined in the step setup.
Tip:As a best practice, salespeople should just save the appointment right away after the click the Schedule Appointment button. They can then go to Microsoft Outlook to add participants and find their availability. The details you enter in Outlook are automatically synced back to Sales provided you've implemented the Outlook integration. The Sales appointment functionality doesn't include availability information or provide a way to automatically add web meeting or call details.
-
When the salesperson saves the appointment, the button changes to Call or Start web conference, depending on which option you selected during setup.
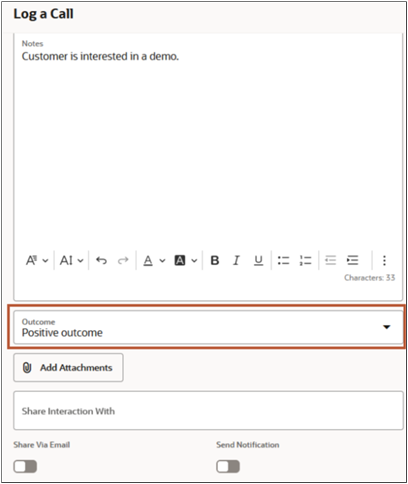
- At the appointed time, salespeople initiate the call or web conference by clicking the button. The scheduling and other details are listed in the appointment itself. Salespeople can view the appointment details in their list of activities. If you've included a sales guide, salespeople can open the interactive questionnaire during the appointment.
The appointment is considered as a success when the salesperson selects Positive outcome when logging the call.
If the appointment isn't held within the grace period or doesn't meet the success criteria, then it goes to the next step on failure.