Leads Guidance Example
Here's an example of a guidance that takes a lead through all of its stages, from Unqualified to Qualified and Converted, or from Unqualified to Retired.
Before you start:
- Create yourself as the principal contact for one of the accounts and enter your email address. This will allow you to receive emails.
- Think of a simple and short name that you will use as the name of the lead you will use for testing the guidance. You can specify the name as the criteria for testing.
Basic Details
Here's what to enter in the Basic Details page:
-
Name: <Enter a guidance name. It displays only for setup.>
-
Object: Sales Lead
-
Condition: Include all of, Lead name, Equals, <Name of the lead you will use for testing>
Unqualified Stage
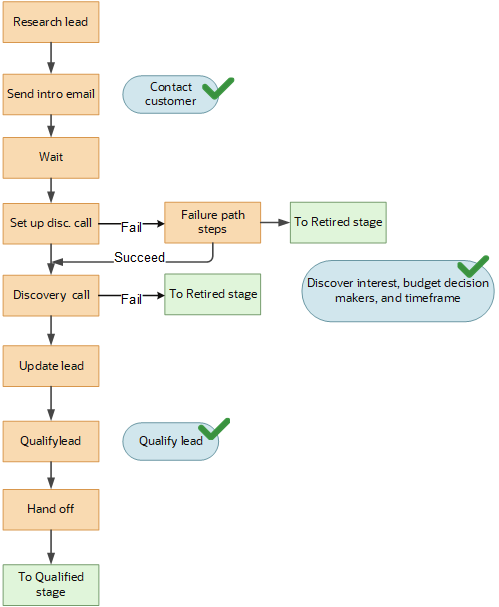
Here's the lead qualification process that the sample guidance recommends for leads in the Unqualified status:
- A salesperson starts by researching the available lead information.
- They send an introductory email to the customer. This completes the Contact Customer objective.
- The guidance waits a day and then prompts the salesperson to call the customer and set up the discovery call appointment.
- If the salesperson fails to reach the customer, then the guidance automatically sends a follow-up email and suggests additional followup calls. If any of the followup calls succeeds, salespeople schedule the discovery call. (These failure steps are detailed in the Unqualified Stage Failure Steps section).
- If none of the multiple attempts to reach the customer are successful, then the lead is automatically set to the Retired status and the guidance proceeds to recommend the steps in the Retired guidance stage.
- When the salesperson ends the discovery call, they take notes and indicate if the outcome of the call was successful or not. This completes the Discover Customer Interest, Budget Decision Makers, and Purchase Time Frame objective.
- If the outcome is set to successful, then:
- The salesperson is prompted to update the lead with any new information.
- They are prompted to qualify the lead. This completes the Qualify Lead objective.
- The salesperson then sends a hand-off email to field service.
- And the lead is automatically set to Qualified status and the guidance proceeds to recommend steps in the Qualified stage.
- If the outcome of the discovery call is anything other than successful, then the lead is automatically set to the Retired status and the guidance proceeds to recommend steps in the Retired guidance stage.
Here's a diagram that outlines the process:
Start by adding objectives for this stage:
-
Contact customer
Objective Description: Contact the customer.
-
Schedule discovery
Objective Description: Schedule the discovery call.
-
Discover interest, budget decision makers, and time frame
Objective Description: Discover customer interest, budget decision makers, and purchase time frame.
-
Qualify the lead
Objective Description: Qualify the lead.
Here's a summary of the setup for the Unqualified stage using the Diagram tab:
- Add the Task step: Send introduction email
- Add Step
- Step Name: Send introduction email
- Type: Task
- Smart Action: Send Email
- Suggestion Text: Send intro email to the prospect with collateral on product of interest, requesting time for a discovery call.
- Edit Properties
- Subject: Send introduction email
- Type: E-mail
- Due in Days: 1
- Description: Send intro email to the prospect with collateral on product of interest, requesting time for a discovery call.
- Add optional attachment.
- Use Email Template: <select email template you created>
- Receive Reply to Complete Step: Off
- Grace Period to Complete: <optional up to 23 hours>
- Success Criteria: Task status is completed. <The default>
- Objective Completed: Contact customer
- Add Step
- Add the Wait step: Wait for discovery
- Add Step
-
Subject : Wait for Discovery
- Suggestion Text: <leave blank as this doesn't show up anywhere in the run-time UI.>
-
- Edit Properties
- Wait Time in Days: <number of days to wait for the contact>
- Enter number of hours from the previous step:: <number of hours>
- Next Step on Success: <leave blank. This will be added automatically when you enter the next step.>
- Add Step
- Add the Task step: Set up discovery
call
- Add Step
- Subject: Set up discovery call
- Type: Task
- Action: Call
- Suggestion Text: Identify stakeholders and schedule discovery call.
- Edit Properties
- Subject: Setup discovery call
- Type: Call
- Due in Days: 1
- Description: Identify stakeholders and schedule discovery call.
- Sales Guide: <optional>
- Grace Period to Complete: <optional and up to 23 hours>
- Complete Objective: Schedule discovery
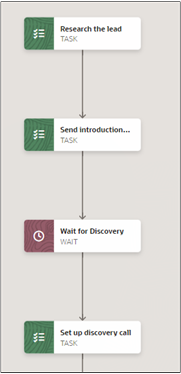
Here's how the first four steps appear in the Diagram tab.
- Add Step
- Add a Logic node.
- Click on the Failure path Add (Plus sign)
- Add the Wait to Follow Up failure step, the first of the failure steps listed in the Unqualified Stage Failure Steps section.
- Add the Appointment step: Discovery
call
- Add Step
- Step Name : Discovery call
- Type: Appointment
- Action: Start Web Conference
- Suggestion Text: On the discovery call identify the following: project budget, key stakeholders and their roles, the need, and time frame for the purchase.
- Edit Properties
- Subject: Discovery call
- Type : Web Conference
- Start in Hours: 48
- Duration in Minutes: 30
- Description: On the discovery call identify the following: project budget, key stakeholders and their roles, the need, and time frame for the purchase.
- Attachments if any.
- Sales Guide: <select a sales guide if you have created one for the call>
- Grace Period to Complete: <duration in hours up to 23>
- Complete Objectives: Discover interest, budget decision makers, and time frame
- Add Step
- Optionally, you can modify the success criteria by editing the properties of the
Logic node you added in step 5:
- Edit Properties
- Success Criteria: <You can use the default success criteria, or modify them.>
- Next Step on Success: Discovery Call <already entered>
- Next Step on Failure: Wait to follow up <already entered>
- Edit Properties
- Add a Logic node to the Discovery Call step:
- Click Add (the round plus icon) to the right of the logic
node to add the failure Next Stage step:
Retire lead
- Add Step:
- Step Name: Retire lead
- Type: Next Stage
- Suggestion Text: <leave blank>
- Edit Properties
- Stage Name: Retired
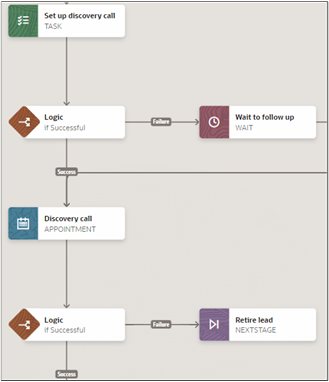
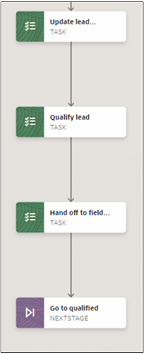
Here's a section of the diagram showing the steps that you just built:
- Add Step:
- Add the Task step: Update lead
information to the Logic node success branch.
- Add Step
- Step Name: Update lead information
- Type: Task
- Action : Update Lead <Opens the Detail View of the leads>
- Suggestion Text: Update decision date, product of interest, and budget
- Edit Properties
- Subject: Update lead information
- Type: Administration
- Due in Days: 1
- Description: Update decision date, product of interest, and budget
- Grace Period to Complete: 23 hours
- Complete Objectives: Discover interest , budget decision makers, and time frame
- Add Step
- Edit the properties of the Logic node you added to the
Discovery call step. You want to specify that the
discovery call is a success only when the salesperson selects Successful as the
call Outcome.
- Edit Properties
- Success Criteria
- Include all of
- Attribute: Outcome
- Operator: Equals
- Value: Successful
- Next Step on Success: Update lead information <already filled in>
- Next Step on Failure: Retire lead <already filled in>
- Success Criteria
- Edit Properties
- Add the Task step: Qualify lead
- Add Step
- Step Name: Qualify lead
- Type: Task
- Action : Qualify
- Suggestion Text: Verify all info and qualify the lead.
- Edit Properties
- Subject: Qualify lead
- Type: Administration
- Due in Days: 1
- Description. Verify all info and qualify the lead.
- Optional attachment.
- Grace Period to Complete: 23 hours
- Complete Objectives: Qualify the Lead
- Add Step
- Add the Task step: Hand off to field sales
rep.
- Add Step
- Step Name: Hand off to field sales rep.
- Type: Task
- Action: Send Email
- Suggestion Text: Email the field sales rep with lead details informing him with key findings.
- Edit Properties
- Subject: Hand off to field sales rep.
- Type: Administration
- Due in Days: 1
- Description: Email the field sales rep with lead details informing him with key findings.
- Optional attachment.
- Use Email Template: <select email template if you created one>
- Receive Reply to Complete Setup is off.
- Grace Period to Complete: 23 hours
- Complete Objectives: <none>
- Add Step
- Add the Next Stage step: Go to
qualified
- Add Step
- Step Name: Go to qualified
- Suggestion Text: <Leave blank.>
- Edit Properties
- Next Stage, Stage Name: Qualified
- Add Step
- Add the remaining failure steps for the Set Up Discovery Call Logic node. (Starting with step 2 in the following section.)
Unqualified Stage Failure Steps
The steps in this section detail the remedial steps that get triggered when the salesperson isn't able to connect with the customer to set up the discovery call.
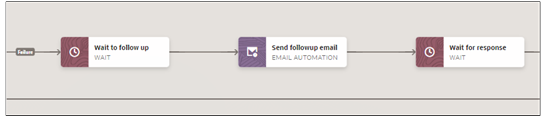
- Add the Wait step: Wait to follow
up
- Add Step
- Step Name: Wait to follow up
- Suggestion Text: <leave blank>
- Edit Properties
- Wait Time from Previous Step: 1 day
- Next Step on Success: <Leave blank when you create the next step this value gets populated with the Send Followup Email step automatically.>
- Add Step
- Add the Email Automation step: Send followup
email
- Add Step
- Step Name: Send followup email.
- Type: Email Automation
- Suggestion Text : <optional as this appears only during guidance authoring.>
- Edit Properties
- Send Email to Contacts linked with the Lead where: Attribute: Do Not Mail, Operator: Is Null
- Use Email Template: <select the email template you set up previously>
- Receive Reply to Complete Step is off
- Grace period to complete: <can leave blank>
- Add Step
- Add the Wait step: Wait for
response
- Add Step
- Step Name: Wait for response
- Suggestion text: <Leave blank>
- Edit Properties
- Wait Time in Days: 1
- Next Step on Success: <Leave blank.>
Here's the portion of the failure path showing the steps you just created:
- Add Step
- Add the Task step: Check for Response
1
- Add Step
- Step Name:: Check for Response 1
- Type: Task
- Action: <leave blank> (This is a manual task so there's no smart action. Salespeople will indicate this task is complete by clicking Complete)
- Suggestion Text: Check to see if the customer responded.
- Edit Properties
- Subject: Check for Response 1
- Type: Administration <or another task type you select. The task type shows up only on the task itself.>
- Due in Days: 1
- Description: Check to see if the customer responded.
- Optional attachment.
- Grace Period to Complete: <up to 23 hours>
- Complete Objectives: <Leave blank>
- Add Step
- Add a Logic node to the Check for Response 1 step.
- Click Add (the plus sign) for the
Logic node and add the next failure step:
Task: Call for discovery availability
2
- Add Step:
- Step Name: Call for discovery availability 2
- Type: Task
- Action: Call
- Suggestion Text: Call to see if you can reach the customer. This is the second call after a follow-up email was sent.
- Edit Properties:
- Subject: Call for discovery availability 2
- Type: Administration
- Due in Days: 1
- Description: Call to see if you can reach the customer. This is the second call after a follow-up email was sent.
- Optional attachment.
- Sales Guide: <select if you have created one>
- Grace Period to Complete: <up to 23 hours>
- Complete Objectives: <none>
- Add Step:
- Edit the properties for the Logic node you added for
Check for response 1 step:
- Edit Properties
- Next Step on Success: select Discovery Call. <This links you back to the success path and enables you to enter additional success criteria if needed.>
- Success Criteria: <you can change these default success
criteria>
- Include all of
- Attribute: Status
- Operator: Equals
- Value: Complete
- Next Step on Failure: Call for discovery availability 2
Here's a screenshot of the steps you just created on the Diagram tab:

- Edit Properties
- Add a Logic node to the step Call for discovery availability 2.
- Click Add (the plus sign) for the Logic node and add the
next failure step, the Wait step: Wait for 1
day:
- Add Step
- Step Name: Wait for 1 day
- Suggestion Text: <Leave blank>
- Edit Properties
- Wait Time from Previous Step: 1 day
- Next Step on Success: <leave blank>
- Add Step
- Edit the properties for the Logic node you added to the
step Call for discovery availability 2:
- Edit Properties
- Next Step on Success: select Discovery Call. <This links you back to the success path and enables you to enter additional success criteria if needed.>
- Success Criteria: <you can change these default success
criteria>
- Include all of
- Attribute: Status
- Operator: Equals
- Value: Complete
- Next Step on Failure: Wait for 1 day
- Edit Properties
- To the step Wait for 1 day step add the
Task step: Followup call 3
- Add Step:
- Step Name: Followup call 3
- Type: Task
- Action: Call
- Suggestion Text: Last followup call before lead is retired.
- Edit Properties:
- Subject: Followup call 3
- Type: Call
- Due in Days: 1
- Description: Last followup call before lead is retired.
- Optional attachment.
- Sales Guide: <select if you have created one>
- Grace Period to Complete: <up to 23 hours>
- Complete Objectives: <none>
- Add Step:
- Add a Logic node to step Followup call 3.
- Click Add (the plus sign) for the Logic node and add the
last failure step, Next Stage: Retire
Lead
- Add Step:
- Step Name: Retire lead
- Type: Next Stage
- Suggestion Text: <leave blank>
- Edit Properties
- Stage Name: Retired
- Add Step:
- Edit the properties of the Logic node you added to the
step Follow-up call 3:
- Next Step on Success: select Discovery Call. <This links you back to the success path and enables you to enter additional success criteria if needed.>
- Success Criteria: <you can change these default success criteria>
- Include all of
- Attribute: Status
- Operator: Equals
- Value: Complete
- Next Step on Failure: Retire lead

Qualified Stage
- The salesperson coverts the lead to an opportunity by clicking on the Convert Lead button.
- This completes the Covert the Lead objective.
- The lead is automatically set to the Converted status.
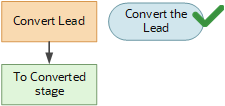
- Objective Name: Convert the lead
- Objective Description: Convert the lead.
- Add the Task step: Convert the
lead
- Add Step
- Step Name: Convert the lead
- Type: Task
- Action: Convert
- Suggestion Text: Verify all information and convert lead.
- Edit Properties
- Subject: Convert the lead
- Type: Administration
- Due in Days: 1
- Description: Verify all information and convert lead.
- Optional attachment.
- Grace Period to Complete: 23 hours
- Complete Objectives: Convert the lead
- Add Step
- Add the Next Stage step: Go to
Converted
- Add Step
- Subject: Go to Converted
- Suggestion Text: <leave blank>
- Edit Properties
- Next Stage, Stage Name: Converted
- Add Step
Converted Stage
The guidance stops. No objectives are required as there are no actions by the salesperson.- Add the Stop step: Stop
- Add Step
- Step Name: Stop
- Suggestion Text: <Leave blank>
- Add Step
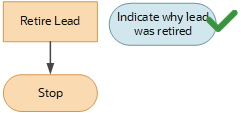
Retired Stage
- The salesperson retires the lead by noting in a task why the lead was retired.
- This completes the objective: Indicate why lead was retired.
- The guidance comes to a stop.
Add objective:
- Objective Name: Indicate why lead was retired.
- Objective Description: Indicate why lead was retired.
- Add Task step: Retire lead
-
- Subject: Retire lead
- Type: Task
- Action: Retire
- Suggestion Text: Retire the lead with adequate description of reasons.
- Edit Properties
- Subject: Retire lead
- Type: Administration
- Due in Days: 1
- Retire the lead with adequate description of reasons.
- Optional attachment.
- Grace Period to Complete: 23 hours
- Complete Objectives: Indicate why lead was retired
-
- Add Stop step: Stop
- Add Step
- Step Name: Stop
- Suggestion Text: <leave blank>
- Add Step