Define Survivorship Rules
This example demonstrates how to create a survivorship rule. Survivorship rules enable intelligent creation of the best version record, especially from multiple source systems, by specifying criteria for selecting the record to be retained during a merge operation.
Create A Survivorship Rule
To create a survivorship rule:
-
In the Setup and Maintenance work area, go to the following:
-
Offering: Customer Data Management
-
Functional Area: Customer Hub
-
Task: Manage Survivorship Rules
-
-
On the Manage Survivorship Rules page, click Add from the Actions menu.
-
Enter the sample information provided in the following table on the Create Survivorship Rule page.
Field
Value
Rule Name
PickPersonMasterRule
Description
Select the master person record based on original source system of the record.
Rule Type
Set master record
Note:Note: You can create the following two types of survivorship rules: Set Master Record and Set Attribute Value. You can use predefined templates to create the Set Attribute Value rules.
Object Type
Person
Note:You can create a survivorship rule for the following two types of party records: Person and Organization.
-
Click Apply. The Define Survivorship Rules: Select Master Record page appears.
Specify Criteria for Selecting the Master Record
The following are the steps to specify criteria for selecting the master record:
-
Navigate to the Define Survivorship Rules: Select Master Record page.
-
Enter the information provided in the following table as IF/THEN rules condition in the Define Survivorship Rules: Select Master Record page.
Rule Condition
Value
IF Condition
IF PersonParty is a TCHFactTypeDictionary.PersonPartyVO and there's a case where {OrigSourceSystem} != null and OrigSourceSystem.OwnerTableId == PersonParty.PartyId and OrigSourceSystem.OrigSystem == "GSI"}THEN Condition
THEN Assert new Result (name:"masterId", value:"PersonParty.PartyId)Note the following specification in the Define Survivorship Rules: Select Master Record page.
-
Click the + icon to add additional patterns to include additional conditions
-
Click the Surround with Parenthesis option to add more features to the conditions
-
Select the + Simple Test option to add additional clauses
The following figure shows the Define Survivorship Rules: Select Master Record page with the Surround icon highlighted. 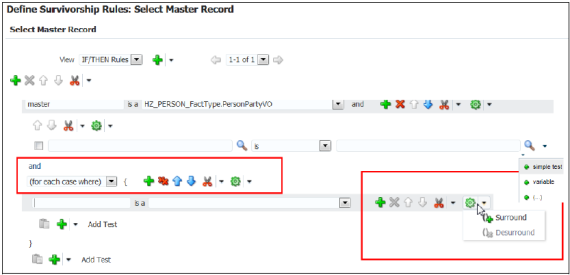
-
-
Click the Advanced Settings button to verify the effective date of the rule that you're going to create.
The following figure shows Advanced Settings icon on the Define Survivorship Rule: Select Master Record page. 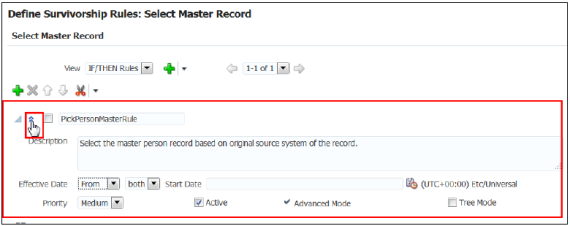
-
Select an effective date, as appropriate. The default effective date is Always. You can select an Effective From or Effective To date, or you can select an Effective Date range.
-
Select a priority for the rule, as appropriate.
The default priority of the Survivorship rules is Medium. These rules get executed in the order of their priority.
-
Ensure that the Rules Active option is selected.
The following figure shows how the survivorship rule looks like when fully defined. The details include the rule name and the IF and THEN conditions for determining the master. 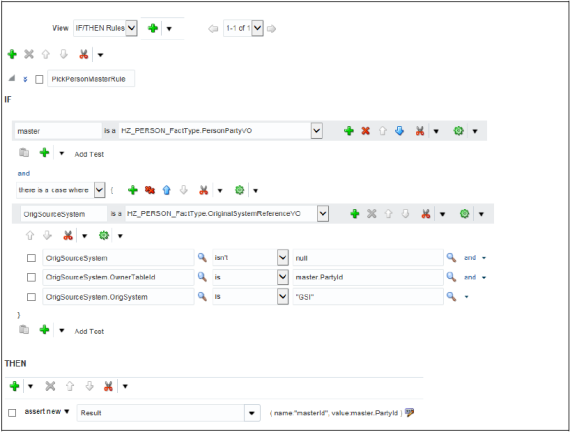
-
Click Save and Close. You can view the newly created rule in the Manage Survivorship Rules page by searching for it.
-
Click Submit.
Tip:To activate the rule you must click Submit. You may have selected the Active mode, but that doesn't activate a rule unless submitted.