Create the Accounting Calendar
You usually create a single accounting calendar as part of your implementation. The accounting calendar defines the time periods used in the applications. When you create the calendar, you specify the exact dates for each period.
These defined periods, often called enterprise periods, are used for many purposes in the applications. Examples include:
-
Reports that provide amounts by enterprise period, such as a sales pipeline analysis
-
Metrics calculations by period for territory analysis
-
The ability to adjust forecast amounts by time period
-
Distribution of quota amounts by time period
Here are the high-level steps:
-
Plan your calendar periods and start year. See the Implementation Considerations section in this topic for more information.
-
Create the first-year calendar periods and generate the periods for each additional year. See the Create the Calendar section in this topic for more information.
-
Set the accounting calendar profile option. See the Set the Calendar Profile Option section in this topic for more information.
-
Run a scheduled process. See the Run the Time Dimension Process section in this topic for more information.
Implementation Considerations
Since you can't change the calendar after it's in use, ahead of time, you need to:
-
Plan which periods your calendar will use.
-
Decide which year you want the calendar to start. consider setting the date to the first date that your company was created. Then you can upload historical data later, if necessary.
Period frequency is an important decision for your calendar, because the period frequency set in your fiscal calendar is the shortest period you can use. Here are some examples:
-
Let's say you set the period frequency to yearly. Then, your reports and activities can be for each year, but can't be broken down by month.
-
If you set the period frequency to monthly, then you can break down activities and reports by month and summarize by quarter and year.
-
Say you want to set the period frequency to weekly. In this case, then you can perform activities and reports by week, quarter, and year, but not by month because the number of weeks per month varies.
Create the Calendar
When you create the accounting calendar, you're establishing the exact start and end dates for each period, for each year. Here's a procedure that uses the fictitious Vision Corporation to guide you through the steps:
-
In Setup and Maintenance, go to the following:.
-
Offering: Sales
-
Functional Area: Company Profile
-
Task: Manage Accounting Calendars
-
-
On the Manage Accounting Calendars page, click Create.
-
In the Create Accounting Calendar: Calendar Options page:
-
Name your calendar, for example,
Sales Calendar. -
Leave the Adjusting Period Frequency set to None.
-
For Start Date, Vision Corporation uses
1/1/10. -
For Period Frequency, select the shortest time period you want to use for reports and activities. Vision Corporation is using Monthly. The period starts on the first of the month and ends on the last day of the month, regardless of the number of days or weeks in each month.
-
Vision Corporation selects None for the Separator.
-
Select the Format to use for period names.
-
-
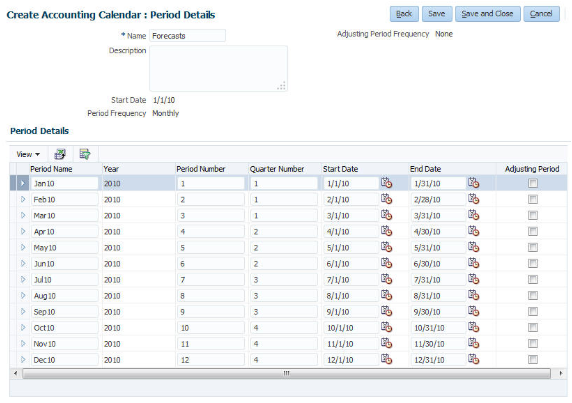
Click Next. The Create Accounting Calendar: Period Details page appears, showing the generated periods. The image shows multiple columns, including:
-
Period name, which is month name, one for each month of the year
-
Year, which is 2010
-
Period number, one for each month
-
Quarter number for each period, assuming four quarters in the year
-
Start and end dates for the periods
-
A check box used to indicate whether a period is an adjusting period
Here's an example of the Create Accounting Calendar: Period Details page: 
-
-
If you need to, manually change the details for each period.
-
Click Save and Close.
-
Now you need to generate the periods for each additional year, including the current, or coming year. Open the calendar.
-
Click Add Year.
-
Click Save and Close.
-
Repeat the last three steps for each year you want to add.
-
Click Done.
Set the Calendar Profile Option
After you finish creating your calendar, set the accounting calendar profile option. This profile option setting tells the applications which calendar to use. Use these steps:
-
In Setup and Maintenance, go to the following:.
-
Offering: Sales
-
Functional Area: Company Profile
-
Task: Manage Calendar Profile Option
-
Option: Manage Calendar Profile Option
-
-
Select the Accounting Calendar Default profile option.
-
In the Profile Values table, click New.
-
For Profile Value, select Site.
-
Click the Profile Value list, and select the name of the calendar you created.
-
Click Save and Close.
Run the Time Dimension Process
You need to run the Refresh Denormalized Time Dimension Table for BI process to make calendar time periods available for analytics and reports. Use these steps:
-
Click .
-
In the Scheduled Processes page, click Schedule New Process.
-
In the Schedule New Process dialog box, click the menu next to the Name field and click Search.
-
In the Search dialog box, enter
%Refresh%, and click Search. -
Select the Refresh Denormalized Time Dimension Table for BI process in the results that are returned and click OK.
-
Click Ok again, if needed.
-
In the Process Details window, click Submit.