Example of Modifying the Lead to Opportunity Copy Map
Copy maps are a declarative way to specify what fields are copied among objects. This worked example shows you how to modify an existing mapping file to create an opportunity from a lead.
The functionality for converting a lead to an opportunity uses the predefined Copy Lead To Opportunity Map copy map feature. Predefined mapping files are available to you as part of your sales application. You can use copy maps to:
-
Map objects and attributes during the creation of an account and the creation of a contact when converting a lead to an opportunity.
-
Create leads and opportunities from responses
-
Copy opportunities and create opportunities from deal registrations
In this example, you want to:
-
Modify the copy lead to opportunity map
-
Add a field to an opportunity
-
Verify your changes
Modify the Copy Lead To Opportunity Map
To modify the Copy Lead to Opportunity Map:
-
Sign in as a user with Application Composer access and verify that you have an active sandbox.
-
Access Application Composer by selecting Application Composer from the Navigator menu, under the Configuration category.
-
Under Advanced Setup, select Copy Maps. The Copy Maps window appears.
-
Select the Copy Lead To Opportunity Map. The Edit Copy Map window appears.
-
In the Entity Mappings region, highlight the row that contains From: Sales Lead and To: Opportunity.
-
In the Attribute Mappings region, select the Add icon to add a new row.
-
From the To: drop-down list, select Comments.
This value represents the Comments field in opportunities that contains the value.
-
In the From Expression field, enter this Groovy expression:
return "Copy Map executed for Lead: "+nvl(LeadNumber,"");The expression uses text and the
LeadNumberas the value to set into the opportunity Comments field. -
Click Save and Close.
Add a Field to an Opportunity
The Comments field isn't displayed by default on the Opportunities UI. Use Application Composer to add the Comments field to the opportunity header region as follows:
-
From Application Composer, expand and select Objects, Standard Objects, and then Opportunity.
-
Click Pages and then select the Application Pages tab.
-
On the Details Page Layouts section, edit any custom layout. If none exists, then duplicate the standard layout and edit the resulting custom layout.
-
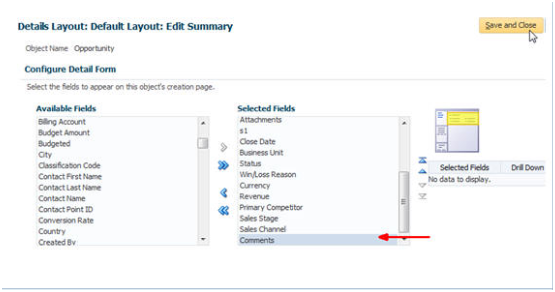
Edit the Summary region.
-
Select the Comments field from the list in the Available Fields region and move it to the Selected Fields region.
-
Click Save and Close.
-
Verify that the Summary region list contains the Comments field.
-
Click Done.
Verify Your Changes
-
Navigate to the Application Composer UI with the same user access and sandbox details used to complete the Modify Lead to Opportunity Copy Map task.
-
Navigate to Leads and click Create Lead.
-
Enter Autumn Lead as the Name and select Pinnacle Technologies as the Account. Accept all other defaults values for the remaining fields.
-
From the Actions drop-down list, select Convert to Opportunity.
-
Click the Opportunities icon.
-
Locate the newly created opportunity. It must have the same name as the lead that was originally created.
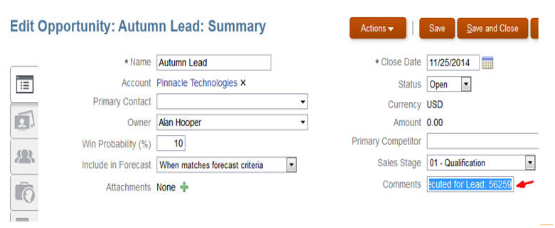
Examine the value in the Comments field. It contains the expected text, plus the lead number which originated this opportunity. Here's a screenshot that shows an example of the Edit Opportunity page with the Comments field populated with the lead number.