Hide and Reorder Opportunity Fields Using Page Composer
You can hide fields, make fields required, and change the order of fields in the edit opportunity page, for specific job roles. You use Page Composer to do the modifications.
Prerequisites
Before you begin, consider the following setup requirements or prerequisites:
-
This procedure applies only to the desktop UI.
-
You must have the job role of a setup user or Sales Administrator to do this task.
-
You must know how to create and publish sandboxes following your organization's established processes. As a best practice, your organization might want you to first make changes in a sandbox before rolling the changes out to all users with the Sales Representative job role by publishing the sandbox.
Starting Page Composer
First, start Page Composer's design mode to be able to make the changes:
-
Sign in to the application as a user with the Sales Administrator job role. Or, sign in as a setup user.
-
From the Navigator, select Opportunities.
-
Find an opportunity and edit it.
-
In the global region, expand the Settings and Actions menu which is available next to your user name. Then select Edit Pages, under the Administration subheading
The Edit Pages dialog appears.
-
In the Edit Pages dialog box, select the Edit option for the Job Role layer.
-
In the Value column next to Job Role, select Sales Representative from the list.
-
Click OK.
The page opens in Page Composer design mode.
-
Next, toggle Page Composer to Direct Selection mode: Click the Select icon in the global region.
Direct Selection mode is now invoked, allowing you to make field-level changes.
Hiding a Field and Changing the Order of a Field
To hide the Worst Case field and change the order of the Attachments and Partners fields, use the following steps:
-
With Page Composer in Direct Selection mode, in the Additional Details region of the edit opportunity page, hover over the Worst Case field.
A colored box appears around the field and its label.
-
Click inside the box around the Worst Case field.
A dialog box opens with two options: Edit Component and Edit Parent Component.
-
Select the Edit Parent Component option.
The Component Properties: panelFormLayout window opens.
-
In the Component Properties: panelFormLayout window, clear the checkbox next to the Worst Case field.
The following figure shows the Component Properties dialog box with Worst Case selected. 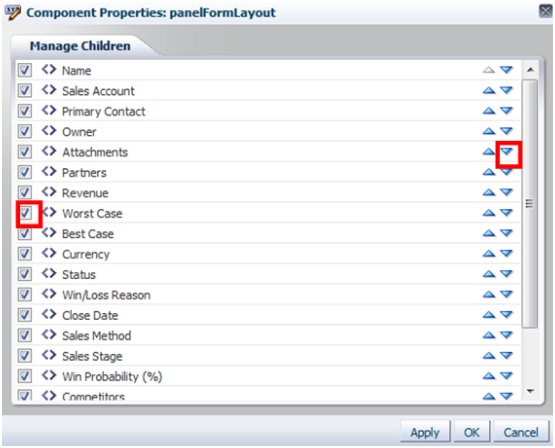
-
Select the down arrow to the right of the Attachments field to move it below the Partners field.
The order of the two fields changes.
-
Click OK.
Making a Field Read-Only
To make the Win Probability field read-only, use the following steps:
-
While still in Page Composer Direct Selection mode, hover over and then click the Win Probability (%) label.
A dialog box opens with two options: Edit Component and Edit Parent Component.
-
Select the Edit Component option.
The Component Properties: Win Probability (%) window opens.
-
In the Component Properties: Win Probability (%) window, select the Read only checkbox.
The field becomes read-only, as shown in the following figure. 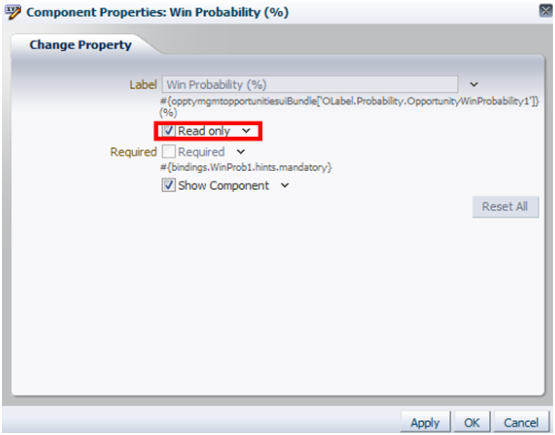
-
Click OK.
Making a Field Required and Not Able to Be Sorted
To make the Quantity column in the Revenue Items table required and not able to be sorted, use the following steps:
-
With Page Composer still in Direct Selection mode, in the Revenue Items region, hover over the Quantity column and click its header.
A dialog box opens two options: Edit Component and Edit Parent Component.
-
Select the Edit Component option.
-
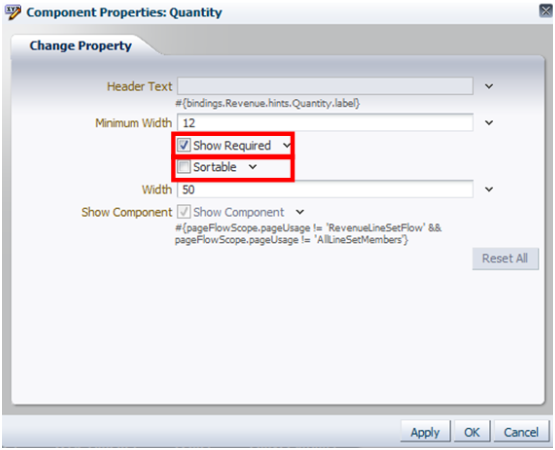
Select the Show Required checkbox to make it a required field.
-
Clear the Sortable checkbox to make the column appear as not able to be sorted.
The following figure shows the Change Property dialog box with the Show Required and Sortable check boxes.
-
Click OK.
Saving Your Changes
When you're ready to commit your modification changes to the main line, perform these steps:
-
Click the Close button in the global region to sign out of Page Composer editor.
-
On the Sandboxes page, click the name of the sandbox you want to publish, and click Publish.
Verifying Your Changes
Verify your modifications by using the following steps:
-
When you're done with your changes, click Close in the header to sign out of Page Composer.
-
Sign out of the application.
-
Sign as a user with the Sales Representative role.
-
Navigate to the opportunity record that you edited, and verify the following:
-
The Additional Details region is expanded by default.
-
The Worst Case field isn't visible.
-
The Win Probability (%) field is read-only.
-
The Attachments field is below the Partners field.
-
The Quantity column is marked as required with an asterisk, and can't be sorted.
-