Edit and Post Charges
Labor, part and expense debrief transactions entered by technicians in Field Service are automatically transferred to Service Logistics through web services. You can review and edit debrief transactions and post work order charges in the Manage Charges and Estimates page.
If field service technicians don't have the privileges to post charges, they will review the debrief lines and acknowledge that the debrief is completed. Field service administrators will then review these debrief charge lines and post the charges. When charges are posted, the cost of the service is captured and a sales invoice is generated for the customer. Discounts that are mentioned in the service contract for the customer and asset are applied to the prices before the final charges are calculated. The inventory balance is also adjusted based on the parts used or returned and the customer's asset configuration is updated.
You can also create charges to correct billing and debrief mistakes that don't affect costs and inventory.
For generic work orders, standalone work orders, and third-party work orders, charges must be created first using the Create Charges option.
To edit and post charges:
-
Select the work order for which you'll be posting the charges. Click the Manage Charges and Estimates icon. The work order will open in the Manage Charges and Estimates page where you'll see the work order header details, service overview, and service history.
-
Review the labor, part, and expense debrief information. You can add a new debrief line or remove an existing debrief line. You can also edit an existing debrief line. Here's some useful information about the various debrief lines:
-
Parts Lines
-
Quantity = value entered in the debrief line
-
UOM = value entered in the debrief line ( defaults from the item's primary UOM. LOV displays all the UOMs in the same UOM class as the primary UOM)
-
Inventory organization is entered in the debrief line
-
When the debrief line is added, an inventory reservation is created so that the part requested won't show up as available in the technician's trunk stock. If you edit that part debrief line, the reservation is also changed. Similarly, if you add a new part debrief line, a corresponding inventory reservation will be created.
-
If a project is associated with the work order, you can issue service parts from the common inventory instead of the project-specific inventory when you create the part debrief. Note that:
-
This feature is available only for project enabled organizations.
-
In order for the part or item to be available in the common inventory, the Allow Use of Common Supply attribute must be set up for the item in Product Information Management.
-
The Use Common Inventory check box appears in the Add Part Details window only for the items with the Allow Use of Common Supply attribute enabled.
-
-
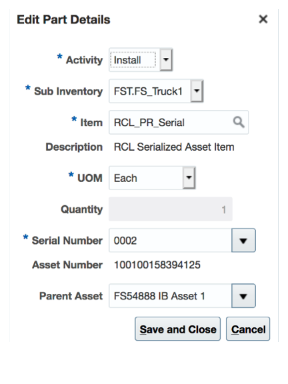
You can capture the parent asset details along with the serial number of the issued part during the debrief process. This ensures that the asset hierarchy is updated simultaneously in Installed Base. You can do this in both the Add Part Details window (when creating a new part debrief line) and the Edit Part Details window(when editing an existing part debrief line). Note that the parent asset on the part install debrief transactions defaults from the asset on the work order.
Field
Description
Asset Number
Displays the asset number for the serial number entered. This field is displayed only when the service activity selected is Install and the selected item is an asset tracked item and is serial controlled.
Parent Asset
List of values displays Installed Base assets that are already part of the debrief header asset's configuration. This field is displayed only when the service activity selected is Install and the selected item is an Installed Base asset. The parent asset information collected during the debrief process is used to update the Installed Base configuration and hierarchy for the debrief asset.
-
-
Fixed Charge Lines
-
Quantity = value entered in the debrief line
-
UOM = value entered in the debrief line (defaults from the item's primary UOM. LOV displays all the UOMs in the same UOM class as the primary UOM)
-
-
Expense Lines
-
Item = Expense (for example tolls, parking, hotel, and so on)
-
Expense here's the same as Quantity and Currency is equivalent to UOM. In the Charges tab, you'll see these values in the Quantity and UOM fields. Note that the user enters the payment currency and not the billing currency.
-
Amount = Net Price of Service Charge to customer
-
The inventory org defaults from the technician's default subinventory (or the Default Inventory Org profile)
-
-
Labor Lines
-
UOM = Labor item's Primary UOM
-
Quantity = Calculated based on the start and end times entered in the debrief line.
-
The inventory org defaults from the technician's default subinventory (or the Default Inventory Org profile)
-
-
-
Click the Charges tab. You'll see the summary of all charges incurred on the work order and the total amount that will be invoiced to the customer. The Estimated Total Amount field at the bottom of the Charges tab gives you the total work order estimate. You can compare the estimated amount with the final charges and make adjustments as required prior to posting the charges.
-
The final price is calculated after applying the warranty and all service contracts discounts for the customer and asset. To see the discounts that have been applied, click the amount displayed for each debrief line. For example, click the amount displayed for item Labor.
-
A dialog box will open displaying all the pricing components and the corresponding charges. Here you can see the discounts that have been applied.
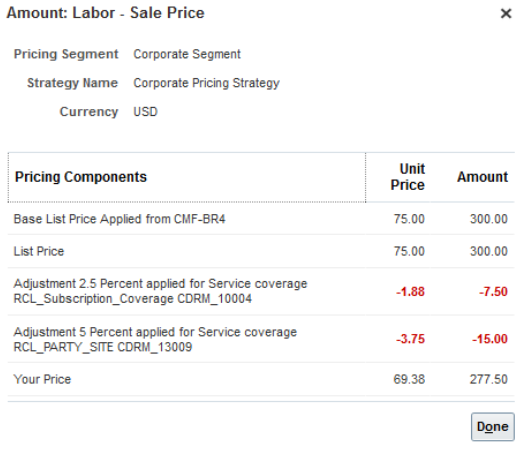
Hover over the charge explanation that has the subscription coverage to see the complete explanation along with the subscription number. Note that the subscription coverage is derived from the work order asset on the debrief header.
-
You might need to manually adjust the prices when there is a discrepancy between the price that the customer was promised and the final amount returned by Pricing or to provide further discounts. To adjust the price of any item at this stage, select the item and click the pencil icon in the Your Price column. The Edit Price dialog box appears.
-
Select the adjustment type. Here are the adjustments that you can make:
-
Discount Percent
-
Discount Amount
-
Markup Amount
-
Markup Percent
-
Price Override
-
-
Enter the adjusted price amount.
-
Select the basis or the price element. This is the pricing entity used to calculate the price for example the list price or net price.
-
Select a reason for the adjustment. Predefined values include Price match, Sales negotiation, Error correction, and Other. You can add your own custom adjustment reasons while setting up Service Logistics.
-
Click Save and Close to save the adjustment line and close the dialog box. You can add multiple adjustment entries for a single line item. When there are multiple line entries, the price is adjusted as per the sequence of the entries.
-
You can also delete an entry that's not required.
Note: The price of an item can only be changed when: -
-
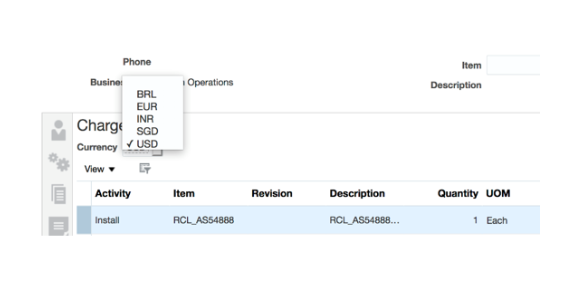
You can also change the currency that's used to bill the customers for the services provided. The Currency field displays the default currency in which the current charges are calculated. Click the drop-down button to select another currency. All existing charge lines will be repriced using the new currency exchange rate. This is useful when the default currency returned from Pricing isn't correct or when you want to generate customer invoices in their local currency. Note that the Currency drop-down list displays the currencies derived from the pricing strategy.
-
After you've reviewed all charges and completed the prices, click Post Charges.
- Field service administrators dealing with a large volume of work orders on a daily basis might review charges for a work order and then click the Post Charges and Close button and move on to the next work order. This button starts a background job to post the charges and then close the Manage Work Orders and Charges page.
-
If you don't have the Post Charges privilege assigned, you won't see the Post Charges button. Instead, you'll see the Complete Debrief button.
-
Click Complete Debrief. The status of the debrief line is updated to the Needs Review status.
Field service administrators will review these charge lines and then post the charges.