Create Your Enterprise Structure
Use the rapid implementation process to implement the common setup objects for enterprise structures.
-
Chart of accounts, including value sets, value set values, structures, and structure instances
-
Account hierarchies, represented in the application through trees and tree versions
-
Accounting calendars
-
Legal entities
-
Primary ledgers with legal entity assignments to primary balancing segment values
-
Business units
-
Rules for generating sequential IDs for transactions recorded in the application
-
Setup objects along with their accounting specifications for various Financials applications
Using rapid implementation involves:
-
Downloading the Rapid Implementation for General Ledger workbook.
-
Entering data into sheets.
-
Verifying the data you entered and resolving any errors.
-
Uploading the chart of accounts file.
-
Uploading the general ledger, legal entity, and business unit file together with the rest of the configuration when you successfully upload the chart of accounts.
Before you set up your enterprise structure, here are some items to note:
-
It's strongly recommended that you consult a core Financials consultant, implementation partner, or systems integrator for this section of the implementation.
-
Make sure you set up your enterprise structures properly to support the financial business processes in Oracle Fusion Student Management Cloud Service. For example, to ensure you can successfully create charges, complete the setup for auto-accounting. For more information, see:
-
AutoInvoice Setup for Oracle Fusion Receivables Cloud (1345332.1) on My Oracle Support at https://support.oracle.com.
-
Setting Up AutoAccounting Rules In Oracle Fusion Receivables (1347760.1) on My Oracle Support at https://support.oracle.com.
-
-
Using rapid implementation to create your enterprise structure is meant for first-time initialization. If you want to modify your configuration, you generally have to make those changes directly in the application. After you initially upload the file that contains your ledger, legal entity, and business unit, the fundamental accounting configuration framework is created and is permanently set. This framework includes the ledger and its assigned chart of accounts, calendar and currency assignment, and the associated definitions of those components.
You can create more values for the chart of accounts and extend the existing chart of accounts at any point in the future. The number of ledgers, legal entities, and business units depends on your requirements and is best answered by an implementation partner or systems integrator after they evaluate your requirements.
To set up your enterprise structure:
-
Sign in as FINUser.
-
Click .
-
In the Setup field, select Financials.
-
Click Tasks, then click Search.
-
In the search field, enter Create Chart of Accounts, Ledger, Legal Entities, and Business Units in Spreadsheet.
-
Click Search.
-
From the results, select Create Chart of Accounts, Ledger, Legal Entities, and Business Units in Spreadsheet.
-
In the window that appears, select Save File.
-
Select the area of your hard drive where you want to save the file, then click OK.
-
Go to the folder where you saved RapidImplementationForGeneralLedger.xlsm, then open the file.
The workbook includes the following sheets:
-
Instructions
-
Chart of Accounts, Calendar, and Ledger
-
Business Units
-
Companies and Legal Entities
-
Natural Accounts
-
Financial Sequences
-
-
On the Instructions sheet:
-
Review the Instructions sheet for important information about how to use the workbook and submit the accounting configuration. The sheet includes data preparation requirements, setup object concepts, and best practices and recommendations. Instructions on how to create additional hierarchies or additional hierarchy versions are also included.
-
Look at the section Rapid Implementation Template with Sample Data. Use the sample completed workbook to familiarize yourself with how to enter data, preview the sample report, and generate the required upload files.
-
-
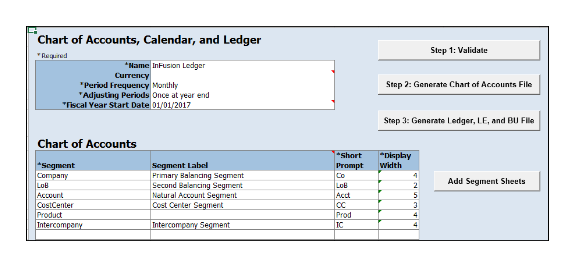
On the COA, Calendar, and Ledger sheet, enter the data to create your chart of accounts, calendar, and ledger.
Caution: You can't change the chart of accounts, accounting calendar, or currency for your ledgers after the setup is created. The chart of accounts (COA) is made up of multiple segments, so make sure you set up the number of segments correctly. Once it's set, you can't change it. If you want to change the number of segments in the future, you have to redo your implementation.Segments refer to things like business units, departments, natural accounts and so on, the number of which depends on the level of detail you want to collate at a later time. You can't add another segment like Location at a later date if you didn't add it at the beginning of your implementation. Once you set up the number of segments you require, you can extend the COA by adding new departments or natural accounts, but you can't add a new segment.
Field
Value
Name
Enter the name of your primary ledger.
A primary ledger is created for each unique country that's entered in the Companies and Legal Entities sheet. A country code is appended to the name that you specify. For example, one legal entity is based in the United States and another in Canada. If you enter the ledger name of InFusion Ledger, two primary ledgers are automatically created, InFusion Ledger US and InFusion Ledger CA.
All of the primary ledgers that are created use the same chart of accounts, account hierarchies, and accounting calendar. Legal entities and their primary balancing segment values are assigned to the primary ledger of their respective countries. If the addresses provided for the legal entities on the Companies and Legal Entities sheet are all in the same country, then only one primary ledger is created.
Currency
If you're not entering legal entities and only a single ledger should be created by the rapid implementation configuration, enter the ledger currency in which you want to maintain accounting for in that ledger. If you're entering legal entities, leave this field blank. The currency is automatically supplied based on the country.
Period Frequency
Select one of the available entries.
For accounting calendars created using rapid implementation, you're limited to the period frequency and adjusting periods that are available on the sheet. It's not possible to make alterations to the pattern or specified fiscal year start date once the calendar is created.
The accounting periods of the calendar are automatically named using a preset format. If you want to change these period names, you have a limited window of time to make those changes. Use the Manage Accounting Calendar page in the application to make the changes before the accounting calendar is used actively. This means when one of its accounting periods is set to Open.
Adjusting Periods
Select the number of periods used to segregate closing, auditing, or other adjustments in the General Ledger. The entries are tracked in the adjusting period and not in your monthly activity.
Fiscal Year Start Date
Enter the start date of the accounting calendar.
You can't change the date after you submit this configuration.
Segment
Enter the names for your segments.
A segment identifies one of the components of a chart of accounts which, when combined with other segments, creates an account combination for recording transactions and journal entries. A segment is associated with a value set, which provides the set of values for that segment, along with the formatting and validation for those values.
Segment Label
Select segment labels to assign special functionality to segments.
This label identifies certain segments in a chart of accounts and assigns special functionality to those segments.
-
Balancing Segment ensures that all journals balance for each balancing segment value or combination of multiple balancing segment values for financial processes and reports. The three balancing segment labels are: Primary Balancing Segment, Second Balancing Segment, and Third Balancing Segment.
-
Natural Account determines the account type (asset, liability, expense, revenue, or equity) and specific categorization of the financial activity. Facilitates General Ledger processes, such as closing of the income statement accounts to retained earnings at the beginning of a new fiscal year.
-
Cost Center facilitates grouping of natural accounts by functional cost types, accommodating tracking of specific business expenses across natural accounts.
You can assign these labels only once to a chart of accounts segment. The Primary Balancing Segment and Natural Account Segment labels must be assigned, while the other segment labels are optional. Segments that are assigned these two particular labels can't be assigned any other label. However, segments that are assigned the other remaining labels can also be assigned additional labels provided they're not Primary Balancing Segment or Natural Account Segment.
Short Prompt
Enter a short name for the segment. This is used on applications pages.
Display Width
Enter the segment size.
Select the size carefully and leave room for growth. For example, if you have 89 cost centers, enter 3 for the display length to allow for more than 100 cost centers in the future.
Add Segment Sheets
Select this button to create sheets for additional segments. Sheets are provided only for the Company and Natural Accounts segments.
From the new segment sheet, you can click the Generate Additional Hierarchy button to create more than one hierarchy for any chart of account segment. A worksheet is then automatically created and populated with the data already entered for that segment. Change this data as required for the new hierarchy. You can create additional hierarchies during initial setup, or after the initial setup is done.
-
-
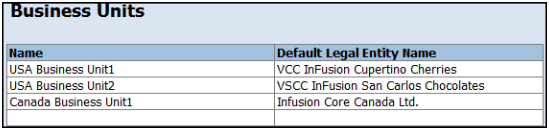
On the Business Units sheet, enter the name of your business units and related default legal entities.
Business units are created with the names that you enter. You can enter more than one business unit per ledger. Based on the default legal entity you specify on the Business Units sheet, the business unit is assigned the primary ledger to which its default legal entity is assigned.
-
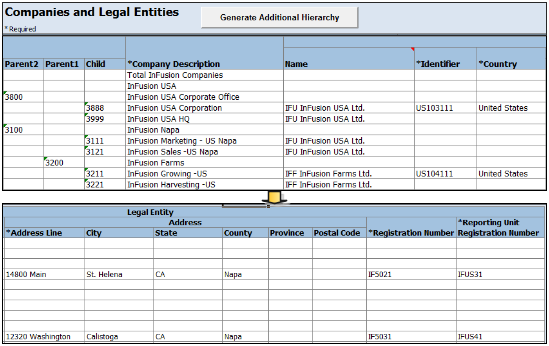
On the Companies and Legal Entities sheet, enter parent and child values for your Company segment, which is the segment that's assigned the Primary Balancing Segment label on the Chart of Accounts, Calendar, and Ledger sheet.
You can:
-
Create up to nine levels of parent values to roll up your companies to meet corporate and local reporting requirements. Enter your legal entities for the child values with the address, registration number, and reporting unit registration number. The registration number identifies legal entities registered for your company and recognized by law for which you want to record and perform transactions. The reporting unit registration number identifies the lowest level component of a legal structure that requires registrations.
-
Click the Generate Additional Hierarchy button to create additional hierarchies for the company segment for reporting or other purposes. A worksheet is automatically created and populated with the data already entered for that segment. Change this data as required for the new hierarchy. You can create additional hierarchies during initial setup, or after the initial setup is done.
When a new hierarchy sheet is created, the name for that sheet is derived by adding a counter to the sheet name. For example, when you click Generate Additional Hierarchy on the Companies and Legal Entities sheet, the new sheet is named Companies and Legal Entities 1. When you click Generate Additional Hierarchy again, another sheet is generated with the name Companies and Legal Entities 2.
-
-
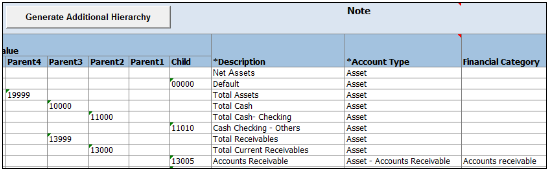
On the Natural Accounts sheet, enter account hierarchies, account values, and specify account types.
Field
Value
Parent
Enter parent account values to define hierarchies. Hierarchies are used for chart of accounts mappings, revaluations, data access sets, cross-validation rules, and segment value security rules. The balances cube and account hierarchies are also used for financial reporting, Smart View queries, and allocations.
Child
Enter child account values to define the postable accounts.
Description
Enter descriptions for the segment values.
Account Type
Caution: Assign account types carefully. If you assign an incorrect account type to a natural account segment value, accounting entries are recorded incorrectly and financial statements are inaccurate. Misclassified accounts are also potentially handled incorrectly at year end, with actual balances either getting zeroed out to retained earnings, or accumulating into the next year.You must assign an account type to each account value. Account types are used in year-end close processes and to correctly categorize account balances for reporting. Select from among general account types and expanded account types. The general account types are: Asset, Liability, Owner's Equity, Revenue, and Expense. Expanded account types provide specialized functionality and are used to:
-
Identify the intended usage of your natural account values to facilitate automation and enable completion of other required setup objects. For example, assign the Asset - Intercompany Receivable and Liability - Intercompany Payable expanded account types. The Rapid Implementation process then automatically creates a chart of accounts level intercompany balancing rule, which is a required setup for the application to perform intercompany balancing.
-
Automatically generate fully defined initial Financial Reporting reports and Account Groups based on your enterprise structure. Examples of expanded account types include:
-
Asset - Accounts Receivable: For Receivables receipt methods
-
Liability - Accounts Payable: For Payables common options
-
Owner's Equity - Retained Earnings: For General Ledger ledger options
-
Revenue - Top Revenues Parent Account: For sample reports and account groups
-
Expense - Top Operating Expenses Parent Account: For sample reports and account groups
-
You must assign the account types Revenue - Top Revenues Parent Account and Expense - Top Operating Expenses Account to the parent accounts that are your highest level and comprehensive revenue and operating expenses accounts. You can optionally assign the account type of Expense - Top Cost of Sales Parent Account if it's applicable for your scenario.
The Generate Financial Reports and Account Groups process, which is automatically submitted when the accounting configuration is created in the application, generates a set of Financial Reporting reports and account groups according to the accounting configuration defined in the workbook. The top parent accounts are used as the basis for deriving the accounts referenced in the reports and in the Account Groups.
The immediate descendants of the top parent accounts are used to define the rows on the reports. Depending on whether both the top operating expense and top cost of sales accounts are tagged, different variations of the income statements are generated. If the optional top cost of sales account is provided, the Financial Reporting reports that are income statements also include a gross margin section
Financial Category
Select a value to identify groups of accounts for reporting with Oracle Transactional Business Intelligence. Accounts that are tagged with expanded account types are automatically assigned a financial category. You can override the default category or leave it out.
Generate Additional Hierarchy
To create additional hierarchies for the natural account segment for reporting or for other purposes, click the Generate Additional Hierarchy button. A worksheet is automatically created and populated with the data already entered for that segment. Change this data as required for the new hierarchy. You can create additional hierarchies during initial setup or after the initial setup is done.
-
-
On the Financial Sequences sheet, enable document or journal sequences to assign unique numbers to transactions to meet legal requirements.
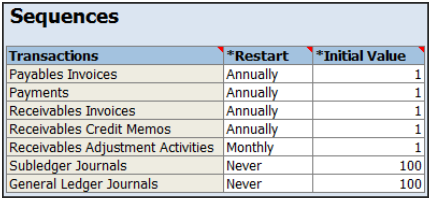
Document sequences are created for these transactions: Payables invoices, Payments, Receivables Invoices, Receivables Credit Memos, Receivables Adjustment Activities. Reporting and accounting journal sequences are created for Subledger journals and General Ledger journals.
For each transaction, you can provide values for these fields:
Field
Value
Restart
Set when to restart the numbering: Annually, Monthly, Never.
Initial Value
Specify the beginning number in the sequence.
-
On the Chart of Accounts, Calendar, and Ledger sheet, click Step 1: Validate.
The validation checks the worksheets for missing or inappropriate setups. Errors are marked as actionable items in a validation report sheet that's dynamically generated. You can review the anomalies and make the corrections as indicated. The Field column on the validation report notes the issue. Click the text link to navigate to the appropriate field in the sheet that must be updated. When the validation is successful, a message appears with the option of previewing a sample of the reports that are automatically generated as part of the enterprise configuration.
-
Click Step 2: Generate Chart of Accounts File. The process generates a data file called ChartOfAccounts.xml that contains the chart of accounts and hierarchies data you entered. Save the file to a network or local drive.
-
Click Step 3: Generate Ledger, LE, and BU File. The process generates a data file called FinancialsCommonEntities.xml that contains the ledger, legal entities, and business unit data you entered. Save the file to a network or local drive.
-
Upload your chart of accounts.
-
Click Tasks, then select Search.
-
In the search field, enter Upload Chart of Accounts.
-
From the results, click Upload Chart of Accounts.
The Upload Enterprise Structures and Hierarchies page appears.
-
In Data File, click Browse, then navigate to where you saved ChartOfAccounts.xml (generated in step 18).
-
On the Upload Enterprise Structures and Hierarchies page, click Submit.
-
Verify that the process completed without errors or warnings.
-
Click Done.
-
-
Upload your ledger, legal entities, and business units.
-
If necessary, click .
-
Click Tasks, then select Search.
-
In the search field, enter Upload Ledger, Legal Entities, and Business Units.
-
From the results, click Upload Ledger, Legal Entities, and Business Units.
The Upload Enterprise Structures and Hierarchies page appears.
-
In Data File, click Browse, then navigate to where you saved FinancialsCommonEntities.xml (generated in step 19).
-
On the Upload Enterprise Structures and Hierarchies page, click Submit.
-
Verify that the process completed without errors or warnings.
-