How do I manage Accounts Receivable service mappings?
You can use the Accounts Receivable service mapping to model entities and attributes in a declarative environment. The service mapping creates relationships between services, sources, entities, and attributes. It specifies a group of entities and attributes that a service can retrieve and update.
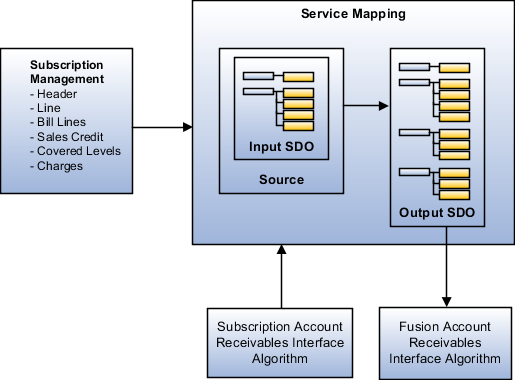
The Subscription AR Integration service mapping provides a flexible mechanism to map subscription attributes and custom attributes to Accounts Receivable interface tables. The additional attributes are used for downstream invoice grouping, invoice printing, reporting, and so on.
The Subscription AR Integration supplied mapping is created between the Subscription Management and Accounts Receivable invoice interface. The integration supports mapping at the invoice header and invoice line level. The Subscription AR Integration mapping sends eligible subscription billing information to Accounts Receivable. As an administrator, you can modify this supplied mapping, create additional entity attributes, and define transformation logic for the attributes.
Here's a graphic that shows how a typical Subscription AR Integration service mapping is processed:
Set Up the Subscription AR Integration Service Mapping
Here are the high-level steps to set up the Subscription AR Integration Service Mapping:
-
Create AR Descriptive Flexfields at the line and header level. See the sections after this one for details.
-
Create and activate a sandbox. In this sandbox, create the required custom attributes (Subscription, Subscription Product, Covered Level, and so on) at different levels using Application Composer. Duplicate standard details layout, pull in required custom attributes, and publish the sandbox.
Note: You must ensure that the custom attribute data type matches with the Service Mapping attribute data type. -
Create the Service Mapping with the required attributes
-
Edit and publish the algorithm.
-
Create a subscription. Enter the required details to verify custom attribute data and activate the subscription.
-
Run the Send Subscription Information to Receivables scheduled process job.
-
Connect to the database and verify database details for custom attributes using:
SELECT * FROM fusion.RA_INTERFACE_LINES_ALL
where interface_line_attribute1=<subscription number>;
Confirm that the custom attribute values passed in the subscription are displayed against the corresponding columns in the Accounts Receivable interface tables.
Create AR Transaction Line Descriptive Flexfields
Here are the steps for creating the line-level descriptive flexfields:
-
In the Setup and Maintenance work area, go to the Manage Descriptive Flexfields task.
-
Enter RA_CUSTOMER_TRX_LINES in Flexfield Code and click Search.
-
Select the Invoice Lines record from search results and click Edit.
-
Click Create to create a new global segment record and enter the required details.
Note: From the Column Assignment section, note the value selected in the Table Column field on the Create Segment page. This value is later used in the algorithm and the same column value is queried in the database for the mapped value. -
Click Save and Close.
-
Click Deploy Flexfield.
-
Click OK.
Create AR Transaction Header Descriptive Flexfields
Here are the steps for creating the header level descriptive flexfields:
-
In the Setup and Maintenance work area, go to the Manage Descriptive Flexfields task.
-
Enter RA_CUSTOMER_TRX in Flexfield Code and click Search.
-
Select the Invoice Lines record from search results and click Edit.
-
Click Create to create a new global segment record and enter the required details.
Note: From the Column Assignment section, note the value selected in the Table Column field on the Create Segment page. This value is used in the algorithm and the same column value is queried in the database for the mapped value. -
Click Save and Close.
-
Click Deploy Flexfield.
-
Click OK once the deployment process is complete.
Configure Service Mappings
Here are the steps for configuring the subscription service mappings:
-
Sign in as a setup user.
-
Go to the Subscription Management work area.
-
On the Subscriptions landing page, click the Subscription Configuration tab.
-
Click Manage Service Mappings.
-
Click Subscription AR Integration.
-
From the Entity tab, select an entity .
-
Click Add Row in the Details section to create custom entity attributes to map the custom descriptive flexfields attributes.
Note: Use the suffix "_Custom" in the Attribute column when adding a custom descriptive flexfields attribute. For example, let assume that the custom attribute created in the above steps is ListPrice. To enter ListPrice in the Attribute column, you must use "ListPrice_Custom" as the value. -
Click the Sources tab.
-
Select the entity and map the new custom attributes to view object attributes.
-
Click the Services tab.
-
Select the entity. Add the new custom attributes and provide the read and write access.
Edit and Publish the Algorithm
Here are the steps required for editing and publishing the algorithm:
-
Sign in as a setup user.
-
Go to the Subscription Management work area.
-
On the Subscriptions landing page, click the Subscription Configuration tab.
-
Click Manage Algorithms.
-
Select the Subscription Management and Account Receivables Integration algorithm and click to create a new version of this algorithm in the In progress status.
-
Click the latest version of the Subscription Management and Account Receivables Integration algorithm to open it in the edit mode.
-
In the Algorithm tab, click Edit to edit Actions in the Each Row Actions section.
-
On the Edit Actions page, enter the code for adding additional descriptive flexfields attributes. Here's the table that describes the values required in the code:
Name
Description
Examples of required values
AttributeContext
This attribute is used to identify the AR descriptive flexfields.
TransactionLineDff
TransactionInterfaceHeaderDff
AttributeName
Table column or standard column name.
ATTRIBUTE8 or BU_NAME
AttributeValue
Value of the attribute. You can source this value from any subscription entity.
BillLines.ListPrice_Custom
Here BillLines is a subscription entity and ListPrice_Custom is an attribute.
FlexContext
Descriptive flexfields context name
Invoice Lines
-
Go to the Variables tab.
-
Select the CustomizationFlag value and update the Default expression value as "True".
Note: The Default expression value is set as "False" by default. -
Click Save and Close
-
Select the same Subscription Management and Account Receivables Integration algorithm and click .
Run the Send Subscription Information to Receivables Scheduled Process
After you create and activate a subscription, perform these steps to run the scheduled process:
-
Navigate to .
-
on the Schedule Processes Overview page, click Schedule New Process.
-
In the Schedule New Process dialog box, enter Send Subscription Billing Information to Receivables in the Name field and click OK.
-
In the Process Details dialog box, make the necessary selections.
-
Click Process Options to set options such as language, currency, and time zone.
-
Click Advanced to define the schedule, notifications, or output parameters.
-
Select the Notify me when this process ends field to receive an e-mail notification.
-
-
In the Basic Options section, add the required parameters to filter the billing transaction records.
-
Click Submit.
You can use parameters to filter or group the billing transactions you want to interface with Oracle Receivables for invoicing. Here's more information about the parameters you add:
|
Parameter |
Description |
|---|---|
|
Subscription Number |
Enter a subscription number to interface bill lines based on the specific subscription to Oracle Receivables. |
|
BU Name |
Enter a business unit name to interface bill lines based on the business unit to Oracle Receivables. |
|
Customer |
Select a customer to interface bill lines based on the selected customer. |
|
Subscription Profile |
Select a subscription profile to interface the bill lines based on the selected profile name. You can use this parameter to group all high-volume customers or all preferred customers for invoicing. |
|
Interface Date |
Enter the interface date to interface bill lines to Oracle Receivables that are grouped by a specific date-based batch. This helps to accommodate future billing transactions. |
|
Number of Processes |
Use this parameter to create sub-processes before running the scheduled process. You can optimize the performance of the billing process by setting process limits. By default, the application runs 10 sub-processes when you don't enter any value for this parameter. |
|
Number of Records per Process |
Use this parameter in combination with the Number of Processes parameter to indicate the records that are included per process while the scheduled process is running. By default, the application includes 10000 records for processing. You can also adjust the number of processes or records per process based on your requirements. |
Withhold Sending Billing Information to AR
You can choose which bill lines are included in the invoice based on business requirements. You can withhold sending billing information to Oracle Receivables based on custom conditions. You can set up these conditions in the Subscription Management and Oracle Receivables integration algorithm so that billing lines are not interfaced unless the custom conditions are met.
For example, if you don’t have valid PO for the bill line or if the amount is $0, you can stop the bill line from getting interfaced to Receivables. To do this, you can use any standard attributes or define your own custom attributes in subscription header, product, covered level or bill lines, map them in service mapper, and define the custom logic in the Subscription Management and Accounts Receivables Integration algorithm.
- Sign in as a setup user.
- Navigate to the Subscription Management work area.
- On the Subscriptions landing page, click the Subscription Configuration tab.
- Click Manage Algorithms.
- Select the Subscription Management and Accounts Receivables Integration algorithm row and click Actions > Create Version to create a new version of the base algorithm.
- Click on the latest version of the algorithm Subscription Management and Accounts Receivables Integration to edit it.
- On the Edit Algorithms: Subscription Management and Accounts Receivables Integration page, select the Variables tab.
- Change the default value of CustomizationFlag from false to true.
- Perform customizations as per business requirement, click Save and Close.
- From the Manage Algorithms page, click .