Create an Approval Rule
Approval rules in change orders and new item requests can be based on items, attributes, or attribute groups. You can create rules to route each attribute group to a different approver or approval group.
- Change standard attributes.
- Affected item extensible flexfield attributes.
- Affected item standard attributes (including Product Line).
- You can’t create approval rules based on these attribute types:
Change header descriptive flexfields and change header context descriptive flexfields.
Change line standard attributes, change line descriptive flexfields, and change line context descriptive flexfields.
In this example, you create a change order approval group and an approval rule.
Rules are based on:
-
The new item data including the unchanged data from production or source version and
-
The modified data.
Prerequisites:
-
Ensure that extensible flexfields are deployed and synchronized in BPM.
-
For the change type, ensure that the approval is set to rules-based.
To do this, run the Manage Change Order Types task in the Product Management Offering. Edit the change type to set the approval to rules-based.
This table summarizes key decisions to consider, and the decisions made when creating an approval rule for a change type.
|
Decisions to Consider |
In This Example |
|---|---|
|
Who are the users responsible for approving the change order? |
Create a change order approval group. |
|
Have you created an approval rule for the change type? |
Create a change order approval rule. |
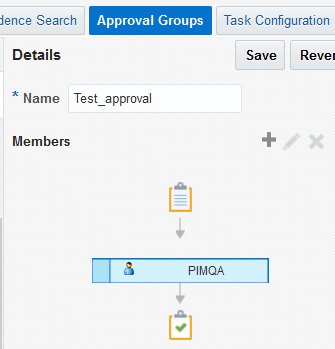
The figure shows an approval group and its members.
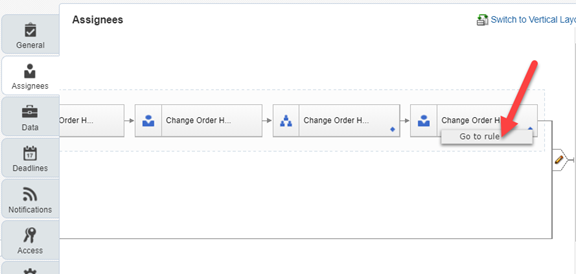
The figure shows one of the steps in creating an approval rule.
Create a Change Order Approval Group
-
From the Setup and Maintenance work area, run the Manage Approval Group task in the Product Management offering.
-
Click Create Approval Group.
-
Enter a name for the group and click Save. For example, create a Pricing Approval group to route all pricing changes to this group.
-
Click Add Member.
-
In the Add to Group dialog, select either a user or an existing approval group and click OK.
-
Save the approval group.
Create a Change Order Approval Rule and Include the Approver
- From the Setup and Maintenance work area, run the Manage Task Configurations for Supply Chain Management task in the Product Management offering. Click the task in the relevant functional area.
- In the BPM Worklist page, search for ChangeOrderApprovalTask and select that task. Note that ChangeOrderApprovalTask can also be used to create an approval rule for change request.
-
Click Assignees. The Change Order workflow appears.Note: Don’t delete any predefined rule sets available in BPM Worklist.
-
Click the Pencil icon next to the Save icon.
-
In Change Order Header Rule Based Approver, click the diamond icon and select Go to rule.
-
In Rulesets, click the Plus (Add Rule) icon.
-
Enter a name for the rule and click Expand to add the rule.
- Select the condition when the rule is required to be executed, and the outcome of
the rule.
For example, to control the approval of all change orders created by a user, you can route them to a particular approval group.
If you create a rule based on the change order priority, the name and case of the priority must match with the name and case of the lookup code in the Manage Change Priorities task.
If you create a rule based on the item class, ensure that you use the internal name mentioned in the item class.
-
Click Save.
-
To activate the rule, click Commit task.
Rule Syntax with Examples
Here's what you need to keep in mind while writing approval rules:
[<Root Item Class Name>].[<Attribute Group Name>].[<Attribute Name>]The root item class name is usually JItemRootIccPrivate and it may be suffixed by a number 2 or 3, for example.
JItemRootIccPrivate, JItemRootIccPrivate2 or JItemRootIccPrivate3.
JItemRootIccPrivate3.itemEFFTLBUYING5FAREAPrivateVO.buyingValue[<Attribute Group Name API>].[<Internal Attribute Name>]Example: If country is Canada and MSRP is greater than 10 CAD, then Approval Group is Marketing and Pricing Team. The rule is written like this:
PlmMarketingAndPricing.country is "Canada" and
PlmMarketingAndPricing.msrp more than 10
THEN
Approval Group: MarketingAndPricingTeam
[<Item Class Name>].[<Attribute Group Name>].[<Attribute Name>]If there's no API name defined for the attribute group, you can edit the attribute group name and add the API name.
Here's an image that shows the rule added in BPM Worklist.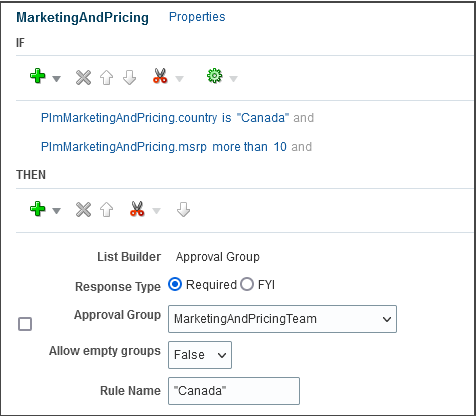
Best Practices
- When you create an item class or an attribute group, make sure you specify the API name.
- Avoid creating item classes with names such as Item, ItemRevision, ItemSupplier, RevisedItemLineApproval, ChangeObjectApproval, Evidence, and Certificate. Or creating similar names for the item class and flexfield attribute groups. Distinct names help ensure that rules run without error.
Assign Approver Based on Change Header Attribute
-
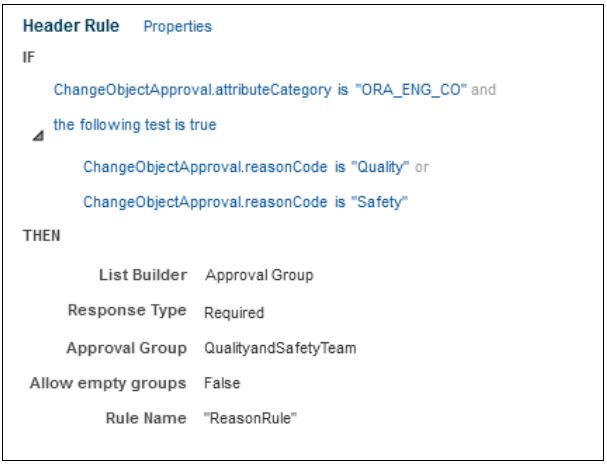
In the If statement click the Advanced Add or Modified Options (plus) icon and select simple test. Enter
ChangeObjectApproval.attributeCategory is "ORA_ENG_CO" Click Add > Nested test. Enter
orChangeObjectApproval.reasonCode is "Quality"ChangeObjectApproval.reasonCode is "Safety"In the Then statement, enter the approval group as:
QualityandSafetyTeamHere's an image that shows the approval rule added in BPM Worklist.
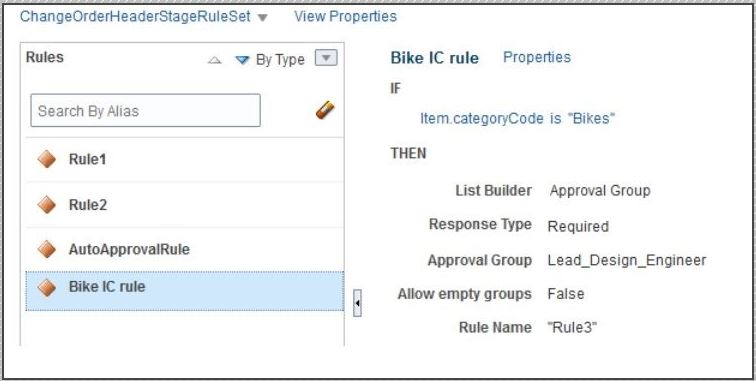
Assign Approver Based on Item Class
-
In the If statement click the Advanced Add or Modified Options (plus) icon and select simple test. Enter
Item.categoryCode is "<bikes>" - In the Then statement, enter the approval group
as:
Lead_Design_EngineerHere's an image that shows the approval rule added in BPM Worklist.