Import Agile PLM Data
The following sections describe how you can import Agile PLM data.
Here's a tabular list of which import process and import template you must use for each object type:
| Object Type | Import Template | Import Process Name |
|---|---|---|
| Items, Item Revisions, Trading Partner Items (Manufacturer Parts) | ItemImportTemplate.xlsm | Item Import |
| Item Structure | ItemStructureImportTemplate.xlsm | Item Import |
| Change Orders | ChangeOrderImportTemplate.xlsm | Import Change Orders |
When you fill in the FBDI import template for an object type, you must ensure that all required fields are filled in as described here. Attributes for each object type must be mapped correctly to prevent import errors.
Import Items with Revisions
Use the EGP_SYSTEM_ITEMS_INTERFACE sheet in ItemImportTemplate.xlsm to organize item data for import. Required fields include:
- Transaction Type
- Batch ID
- Item Number: If the item class is configured to provide the number, leave this blank.
- Organization Code
- Description
- Engineered Item Flag: to use the item in Product Development work area
- Transaction Type
- Batch ID
- Item Number
- Organization Code
- Revision
- Effectivity Date
You can create new items with revisions during the same import, or you can create revisions for existing items during an import. However, you can only create backdated revisions while creating a new item through import. After the item is created, you can no longer create backdated revisions.
Date attributes are important. Entering wrong dates may result in data going into wrong revisions, leading to corrupted data. Ensure that the dates are in YYYY/MM/DD format.
When importing items with revisions, enter the item information on the EGP_SYSTEM_ITEMS_INTERFACE tab. Add all backdated revisions on the EGP_ITEM_REVISIONS_INTERFACE tab, where you can enter the revision with the corresponding Effectivity Date, ECN Initiation Date, and Implementation Date. The Effectivity Date and Implementation Date are the same, but the ECN Initiation Date is set for 10 days earlier.
Here's an example of the item revisions interface table highlighting the Revison, Effectivity Date, ECN Date, and Implementation Date columns. Only columns relevant to the example are displayed in the image.
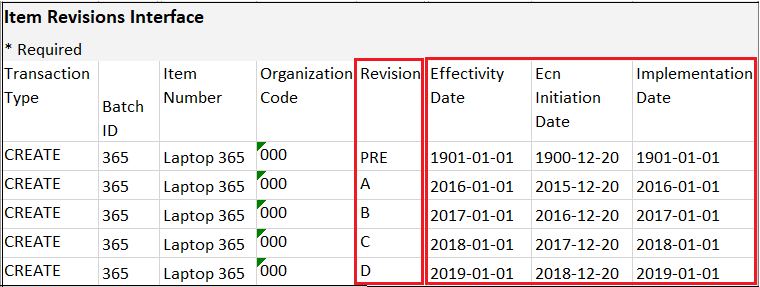
In Agile PLM, the initial revision is Preliminary and through the first change order, the revision can be set to ‘A’ or any name entered by the user. In Product Development, the initial revision is set to ‘A’ (not Preliminary) but can be modified by the user. It's recommended to use ‘PRE’ or ‘0’ or ‘00’ to denote ‘Preliminary’ in Product Development. This revision must be present in the data load as you can't backdate revisions after an item is created. Since this revision must have a date for the data load, and there's no equivalent data in Agile PLM, use a back date such as 1901/01/01.
It’s recommended that you don’t bring in all revisions of an item and bring in only the last revision. If importing change orders, bring in only one change order without revision control. pertaining to this last revision. The first revision (which is equivalent to Preliminary in Agile PLM) must be present during data load, and since there's no equivalent data in Agile PLM, use a back date such as 1901/01/01.
When importing Page Two and Page Three attribute values into Item Extensible Flexfields (EFFs), use the EGO_ITEM_INTF_EFF_B tab, NOT the EGO_ITEM_REVISION_INTF_EFF_B tab. Imported EFF values aren't revision-specific and thus will be the same for each revision you create during import.
Import Manufacturer Parts
After creating or importing manufacturers, you can import manufacturer parts. Use the EGP_TRADING_PARTNER_ITEMS_INTF tab to enter MPN data. The following table defines the key data columns for manufacturer parts:
| Column Type | Data Description |
|---|---|
| Trading Partner Item Number | Manufacturer Part Number |
| Trading Partner Number | Manufacturer Registry ID; obtained from Product Development |
| Trading Partner Type | MANUFACTURER |
| Start Date | The date when this part was added to Product Development; must be earlier than the AML Effectivity Date |
| End Date | The date when this part is no longer active or usable |
Example for MPN Data:
| Trading Partner Item Number | Trading Partner Number (Registry ID) | Trading Partner Type | Start Date | End Date |
|---|---|---|---|---|
| FC123 | 1000009 | MANUFACTURER | 2010/01/01 12:00:00 AM | Not specified |
| L123 | 1000015 | MANUFACTURER | 2016/01/01 12:00:00 AM | Not specified |
| S123 | 1000023 | MANUFACTURER | 2012/01/01 12:00:00 AM | Not specified |
Import AML
Use the EGP_ITEM_RELATIONSHIPS_INTF tab to organize AML data for import. Even if you enter the revision, it’s important to enter the correct Start Date Active and End Date Active for data to appear correctly in Product Development. We recommend that you migrate the AML pertaining to the latest revision only. If you attempt to import the AML from several revisions, you will need to import multiple batches as the AML of two different revisions can’t be imported in a single batch.
Here's an example of AML data:
| Item Number | Trading Partner Item Number | Trading Partner Number | Revision | Start Date | End Date |
|---|---|---|---|---|---|
| Laptop 123 | FC123 | 1000009 | Pre | 1901/05/01 12:00:00 AM | 2016/01/01 12:00:00 AM |
| Laptop 123 | L123 | 1000015 | A | 2016/01/01 12:00:00 AM | Not specified |
| Laptop 123 | S123 | 1000023 | B | 2017/01/01 12:00:00 AM | Not specified |
- In the case of MCOs (Non-Revision-controlled Change Orders in Product Development) on revision A, create AMLs where the Start Date Active is between 2016/01/01 and 2017/01/01.
- For the Start Date Active, enter the same date as the Revision Effectivity Date.
- For the End Date Active, enter the Effectivity Date of the revision that removed the part.
- For Trading Partner Number, enter the Registry ID of the manufacturer.
Import Attachments
You can import attachments for items, manufacturer parts, and change orders. Migration of manufacturer attachments isn't supported either through import or REST web services.
- In the item import template file (ItemImportTemplate.xlsm) use the EGP_ITEM_ATTACHMENTS_INTF tab to organize the data that maps the files in Oracle WebCenter to each item and revision.
- In addition to Transaction Type, Batch ID, Item Number, and Organization Code, also include the following information:
| Column Type | Description or Example |
|---|---|
| Revision | Enter the revision where the file will be attached |
| Entity Type | For revision-based attachments, select ITEM_REVISION |
| Batch Doc Name | The name of the zip file that contains the attachment files |
| Attachment Category | Example: Miscellaneous |
| File Type Name | File, URL, or Text (select File to attach files) |
| File URL Text | The name of the file inside the zip file. Example: IC_spec.doc |
| Title | The title you want displayed on the attachments page. Typically, the same as the file name. Example: IC_spec.doc |
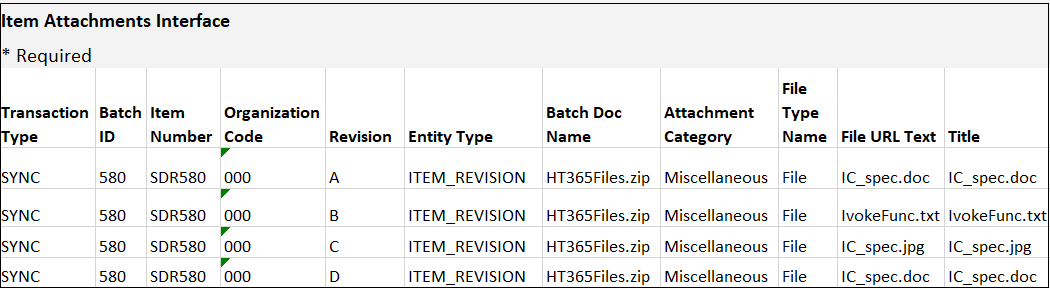
Here’s an example of the template data for four files in a ZIP file being assigned to four different revisions of the same item. Only columns relevant to this example are displayed in the image.
To import attachments for manufacturer parts (MPNs), additionally enter the following data in the EGP_ITEM_ATTACHMENTS_INTF sheet.
| Column | Description or Example |
|---|---|
| Trading Partner Item Number | The manufacturer part number |
| Trading Partner Number | The Registry ID of the manufacturer |
| Entity Type | MANUFACTURER_PART_NUMBER |
Import Item Structures
Before importing a structure, all items (including components), and their respective revisions, must be imported and available in the Product Development application. Once all the structure items are available in the application, use ItemStructureImportTemplate.xlsm to organize the structure data for import.
On the EGP_STRUCTURES_INTERFACE tab, enter information about each parent item. On the EGP_COMPONENTS_INTERFACE sheet, enter component information, where each component is listed in the Component Item Name column and its corresponding parent is listed in the Structure Item Name column. Use the Start Date and End Date columns to define the revision to which a component is assigned, based on the revision's Effectivity date.
Here's an example.
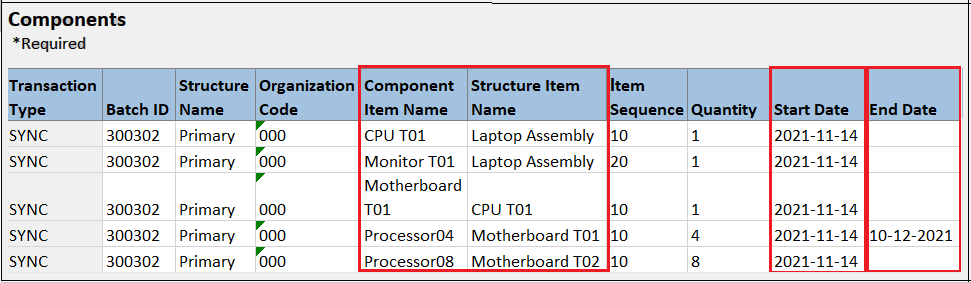
The image only displays columns relevant to this example.
- Line 1 for component 1: Start Date = D1, Effective Date = D2, End Date = D3
- Line 2 for the same component 1: Start Date = D1, Effective Date = D4 (which must be greater than D3), End Date = D5 (greater than or equal to D4)
Import Additional Item Structure Data
To include reference designators, use the EGP_REF_DESGS_INTERFACE tab on ItemStructureImportTemplate.xlsm, and provide an effectiviIty date that matches the component effectivity date.
To add substitute components, use the EGP_SUB_COMPS_INTERFACE tab. When importing either reference designators or substitute components, include the parent components during the same import; this is required because the application expects a 'component' entry in the interface tables.
Import Changes
You can import item revisions without change orders, so the importing of change orders is optional. The following item data must be imported to Product Development before you import change order data:
- Items and attributes (Agile PLM Item, Page Two, and Page Three data. Note that you must configure appropriate flexfields to receive the Agile PLM attribute data prior to import.)
- Item Revisions
- Manufacturer Parts
- Item AML
- Item Attachments
- Item Structures
Once the item data import is completed, import the following change order data:
- Change Header
- Change Lines
- Change Order Attachments
To import change orders, use the template: ChangeOrderImportTemplate.xlsm. First organize the change header data and then organize the change line data. Make sure that the Initiation Date, Implementation Date, and Schedule Date (on EGO_CHANGE_LINES_INT tab) are the same as the item revision Effectivity Date (found on Item Import Template revisions tab). For the change header import, use the EGO_CHANGES_INT sheet.
Enter the following information:
| Column | Description or Example |
|---|---|
| Transaction Type** | Use SYNC |
| Batch ID | The unique identifier for the import batch |
| Change Type | Example: Engineering Change Order |
| Organization Code | Apply the appropriate organization |
| Change Number | The unique number for the change order. (Make sure the change type is set to User Defined for the number generation.) |
| Change Name | The name of the change order |
| Description | The description of the change order |
| Status Name | The status to assign to this change order |
| Initiation Date | The date the change order was created |
| Implementation Date | The date the change order was implemented |
| Priority | Example: LOW |
| Reason | Example: COST |
| Requestor | The user to be assigned as the requestor |
| Assigned To | The user who will maintain the change order |
| Need By Date | The date by which it should be completed |
Organize the change lines (affected objects) data using the EGO_CHANGE_LINES_INT sheet. In addition to Transaction Type and Organization Code, include the following information on the sheet:
| Column | Description or Example |
|---|---|
| Change Number | The change number to which this change line applies |
| Sequence | The order sequence of the change lines in a specific change order |
| Item Number | Identifies the affected item |
| Item Revision | Specifies the old revision |
| Schedule Date | The date when the change line creates the revision; must be the same as the revision effectivity date |
| New Item Revision | Specifies the new revision |
- ChangeOrderImportTemplate.xlsm doesn't include SYNC as a Transaction Type. After opening the template, select the Data ribbon and click Data Validation. In the Source property, you can see CREATE and UPDATE separated by a comma. Add a comma after UPDATE and then add SYNC. Click OK.
- Before you begin your import process, review the best practices for item import performance.