Use Extensible Flexfields In Approval Rules
Use an extensible flexfield as part of the condition in an approval rule so you can meet your specific requirements and improve the efficiency of your order approval flow.
Assume some of your customers are government organizations and some aren't. You need to indicate whether the customer is a government organization when you create the sales order, so you create an extensible flexfield segment named Government Customer on the order header.
You then set up an approval rule that does a compliance check to make sure the order meet's the government's various purchasing requirements.
If the governmentCustomer attribute on the order header is equal to Yes, then do compliance.Try it.
- Create an extensible flexfield named Government Customer. For details, see Overview of Using Extensible Flexfields in Order Management.
- Set up approvals.
Make sure you set the Start Approval Process for Sales Orders parameter to Yes. For details, see Overview of Setting Up Approval and Manage Order Management Parameters.
- Go to the Setup and Maintenance work area, then go to the task.
- Offering: Order Management
- Functional Area: Customers
- Task: Manage Task Configurations for Supply Chain Management
- In the BPM Worklist section, search for SalesOrder, then click ApprovalHumantask.
- Click EditTask (the pencil icon). If you have created or modified your flexfield set up, then you will see a warning message.
- Click Start Synchronization in the message and wait for
the warning to disappear.
The BPM Worklist area displays the warning only if you have created or modified a flexfield. You must synchronize your flexfield so the rules editor has the latest flexfield definitions.
- Create a new approval rule or modify an existing one.
Assume you're adding a flexfield on the order header.
- Go to the Setup and Maintenance work area, then open the Manage Order Approval Rules task.
- On the Manage Order Approval Rules page, click Create New Rule.
- In the Attributes area, click Order Header > Header EFF
Categories.
Notice that the Header EFF Categories tree contains the categories that you created in step 1.
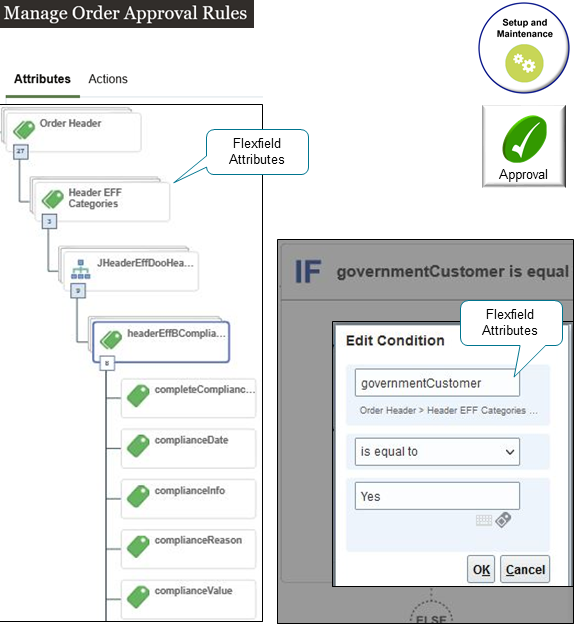
- Click New Condition.
- In the Create Condition dialog, enter
Header. - Click HeaderId (Order Header > Header EFF Categories).
- Notice how the dialog contains the categories that you created in step 1.
- Test your set up.
- Go to the Order Management work area and create a sales order.
- Verify that the order header displays the Government Customer attribute.
- Add a check mark to the Government Customer attribute, add an order line, then click Submit.
- Verify that Order Management starts the approval process.