Get Supply from a Node's Parent
Set up a hierarchy that gets supply from a node's parent and distributes it to other nodes.
Assume you have this hierarchy, and you will get supply for the sales order from all three levels of the hierarchy.
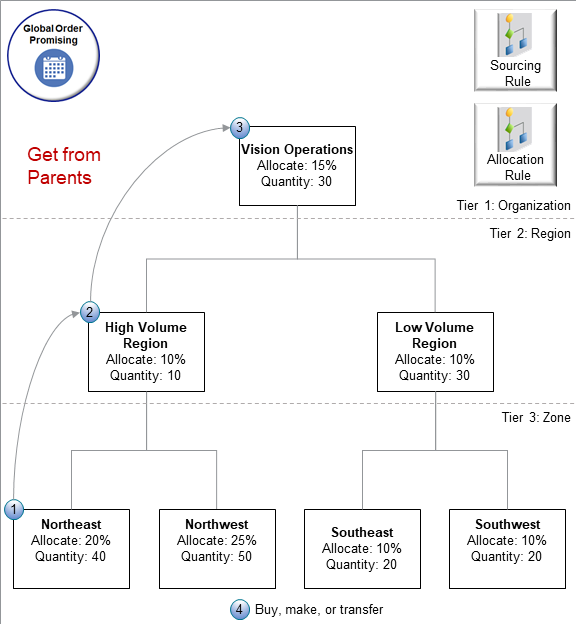
Here's the sequence that Promising will use to allocate supply. It’s the same one that's in Use Lower Priority Supply to Fulfill Higher Priority Demand but with a few important differences:
| Step | Description | Remaining Balance |
|---|---|---|
| 1 | You create a Sales Order in the Northeast node for the AS54888 computer with a quantity of 100, and Order Management populates the three attributes that you reference in your allocation hierarchy to All, High Volume, and Northeast. Promising consumes all 40 units of the supply that's available to allocate in the Northeast node, which is in the lowest level, first. | 220 minus 40 equals 180. |
| 2 | Promising consumes the 10 units of supply that's available to allocate in Northeast's parent, High Volume Region. | 180 minus 10 equals 170. |
| 3 | Promising still needs 170 units, so it consumes the 30 units that are available in High Volume's parent, Vision Operations. | 170 minus 30 equals 140. |
| 4 | Promising still needs 140 more units to fulfill the 220 units on the fulfillment line, so it uses your ATP rules and sourcing rules to make, buy, or transfer the remaining 140 units. | 140 minus 140 equals 0. |
Summary of the Setup
- Enable the features.
- Specify the hierarchy.
- Import your data.
- Create an extensible flexfield.
- Create value sets.
- Create an allocation rule.
- Test your setup.
This topic uses example values. You might need different values, depending on your business requirements.
Enable the Features
- Go to the Setup and Maintenance work area, then select the Supply Chain Planning offering.
- Click Change Feature Opt In.
- On the Opt In page, In the Supply Chain Planning row, click the pencil.
- Enable the Attribute-Based Planning feature, then click Done.
If you don't do these steps, you won't be able to see the Manage Supply Allocation Rules page that you use later in this procedure.
Specify the Hierarchy
- Go to the Plan Inputs work area, then click Tasks > Manage Planning Attributes.
- On the Define Planning Attribute Mapping tab, use the Create action three times
to create these attributes.
Attribute Name Planning Attribute Type Data Type GOPCustGrp Netting and Allocation Attribute Character GOPAll Netting and Allocation Attribute Character GOPCustParentGrp Netting and Allocation Attribute Character Leave the Oracle Fusion Value Set attribute empty.
- Click Set Allocation Attributes. Make sure you enabled the features earlier in this procedure. If you didn't, you won't see the Set Allocation Attributes tab.
- Set the values.
Attribute Value Allocation Tier 1 GOPAll Allocation Tier 2 GOPCustParentGrp Allocation Tier 3 GOPCustGrp - Click Save and Close.
Promising automatically creates an attribute set named BM_Attr_Hrcy. You must use this value when you import. We'll show you how next.
Import Your Data
You must use file-based data import to create your hierarchy. You can't use the promising or planning work areas to do this.
What the Numbers Mean
- Think about how the hierarchy that you'll need to prioritize and fulfill demand.
- Use file-based data import to import your thoughts into Oracle Applications.
- Use the AttributeValues tab to establish tiers in the hierarchy.
- Use the AttributeValueRelationships tab to establish relationships for each node in the hierarchy.
- Reference the hierarchy that you create on the AttributeValues tab.
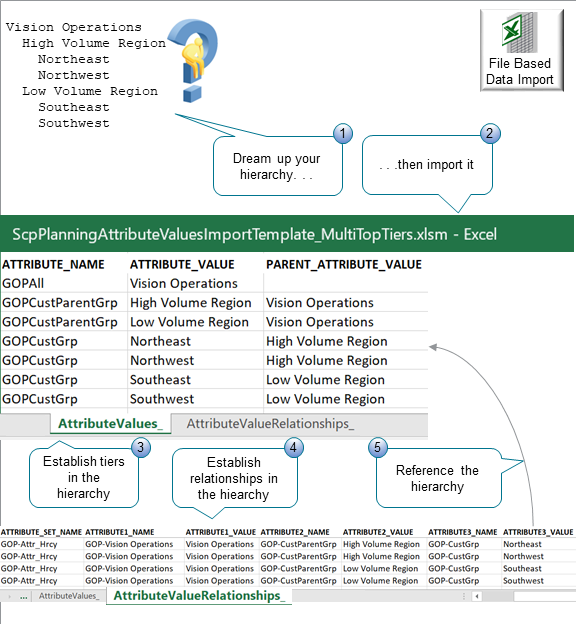
Assume you need to create this hierarchy.
Vision Operations
    High Volume Region
      Northeast
      Northwest
    Low Volume Region
      Southeast
      Southwest
The text might be hard to read in the illustration, so here is the same data from the AttributeValues tab:
| SR_INSTANCE_CODE | ATTRIBUTE_NAME | ATTRIBUTE_VALUE | PARENT_ATTRIBUTE_VALUE |
|---|---|---|---|
| GOP | GOPAll | Vision Operations | - |
| GOP | GOPCustParentGrp | High Volume Region | Vision Operations |
| GOP | GOPCustParentGrp | Low Volume Region | Vision Operations |
| GOP | GOPCustGrp | Northeast | High Volume Region |
| GOP | GOPCustGrp | Northwest | High Volume Region |
| GOP | GOPCustGrp | Southeast | Low Volume Region |
| GOP | GOPCustGrp | Southwest | Low Volume Region |
Note these requirements for the AttributeValues tab. You must include:
- A separate row for each node in the top tier of your hierarchy, a separate row each node in the middle tier, and a separate row for each node in the bottom tier. Each row establishes the relationships between all nodes in the hierarchy.
- To specify a top level node, include the value GOPAll in the ATTRIBUTE_NAME column, and include the name of the top level node in the ATTRIBUTE_VALUE column, such as Vision Operations. GOPAll establishes the top tier. All the rows that have GOPAll will be part of your top tier.
- To specify a node in the middle tier of your hierarchy, include the value GOPCustParentGrp in ATTRIBUTE_NAME, include the name of the node in ATTRIBUTE_VALUE, such as High Volume Region, and include the name of this row's parent in PARENT_ATTRIBUTE_VALUE, such as Vision Operations. GOPCustParentGrp establishes the middle tier. All the rows that have GOPCustParentGrp will be part of your middle tier.
- To specify a node in the bottom tier of your hierarchy, include the value GOPCustGrp in ATTRIBUTE_NAME, include the name of the node in ATTRIBUTE_VALUE, such as Northeast, and include the name of this row's parent in PARENT_ATTRIBUTE_VALUE, such as High Volume Region. GOPCustGrp establishes the bottom tier. All the rows that have GOPCustGrp will be part of your bottom tier.
GOP, GOPAll, GOPCustParentGrp, GOPCustGrp are all example values. You don't have to use them. You can use whatever values you need to represent your supply chain.
Moving on, here is the data from the AttributeValueRelationships tab.
| ATTRIBUTE_SET_NAME | ATTRIBUTE1_NAME | ATTRIBUTE1_VALUE | ATTRIBUTE2_NAME | ATTRIBUTE2_VALUE | ATTRIBUTE3_NAME | ATTRIBUTE3_VALUE |
|---|---|---|---|---|---|---|
| BM_Attr_Hrcy | GOP-Vision Operations | Vision Operations | GOP-CustParentGrp | High Volume Region | GOP-CustGrp | Northeast |
| BM_Attr_Hrcy | GOP-Vision Operations | Vision Operations | GOP-CustParentGrp | High Volume Region | GOP-CustGrp | Northwest |
| BM_Attr_Hrcy | GOP-Vision Operations | Vision Operations | GOP-CustParentGrp | Low Volume Region | GOP-CustGrp | Southeast |
| BM_Attr_Hrcy | GOP-Vision Operations | Vision Operations | GOP-CustParentGrp | Low Volume Region | GOP-CustGrp | Southwest |
Note these requirements for the AttributeValueRelationships tab. You must include:
- The value BM_Attr_Hrcy in the ATTRIBUTE_SET_NAME column, and you must include this value in each row that has data. BM_Attr_Hrcy means Backlog Management Attribute Hierarchy. Don't worry. We aren't using Backlog Management. We're using this value because we share this logic with other Oracle Applications, such as Oracle Backlog Management.
- A separate row for each node in the bottom tier of your hierarchy. Each row establishes a relationship between the bottom node, that node's parent, and the bottom node's grandparent.
- The name of the bottom node's grandparent in ATTRIBUTE1_VALUE, and preface it with the text GOP-. For example, GOP-Vision Operations.
- The name of the top node in ATTRIBUTE1_VALUE, such as Vision Operations.
- The value GOP-CustParentGrp in ATTRIBUTE2_NAME, and you must include this value in each row that has data.
- The name of the bottom node's parent in ATTRIBUTE2_VALUE. For example, in the row that has Northeast in ATTRIBUTE3_VALUE, include the value High Volume Region in ATTRIBUTE2_VALUE.
- The value GOP-CustGrp in ATTRIBUTE3_NAME, and you must include this value in each row that has data.
- The name of a node that resides in the bottom tier in ATTRIBUTE3_VALUE, such as Northeast.
Try it.
- Download a copy of ScpPlanningAttributeValuesImportTemplate_MultiTopTiers.xlsm
from the Supply Chain Planning chapter of File-Based Data Import (FBDI) for Oracle
SCM.
To get an xls file that already has the data for this example, go to My Oracle Support, search for Technical Reference for Oracle Global Order Promising (Doc ID 2896893.1), then download the Example FBDI of an Allocation Hierarchy attachment.
- Add your data to the template, then click Generate CSV Files. The template will create three CSV files and save them, typically to the hard drive on the computer that you're using. Make a note of where the template saves them.
- Go to the Scheduled Processes work area, the search for the Load Interface File for Import scheduled process.
- In the Process Details dialog, set the parameters, then click
Submit.
Parameter Value Import Process Load Planning Data from Flat Files Data File Browse to the location that you noted earlier, then select AttributeValues.csv.
Don't attempt to import AttributeValueRelationships.csv before you import AttributeValues.csv. If you do, the scheduled process will fail.
- Wait for the process to successfully finish.
- Repeat these steps, except import the AttributeValueRelationships.csv file.
Where Are My Values in the Plan Inputs Work Area?
Notice the relationship that you just created between your import and the Manage Planning Attributes page that you used earlier in this procedure.
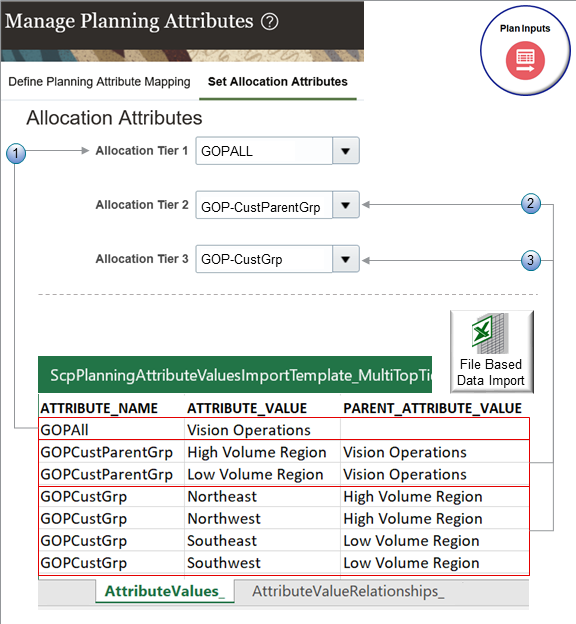
What the Numbers Mean
- GOPALL is your top tier, Tier 1. You included only Vision Operations in the GOPALL tier on the AttributeValues worksheet in your import, so Tier 1 will include only this one node.
- GOP-CustParentGrp is your middle tier, Tier 2. You included the High Volume Region node and the Low Volume Region node in the GOPCustParentGrp tier on the AttributeValues worksheet, so Tier 2 will include these two nodes.
- GOPCustGrp is your bottom tier, Tier 3. You included the Northeast, Northwest, Southeast, and Southwest nodes in the GOPCustGrp tier on the AttributeValues worksheet, so Tier 3 will include all four of these nodes.
Create an Extensible Flexfield
- Add a context that has three segments to the predefined Fulfillment Line
Information extensible flexfield.
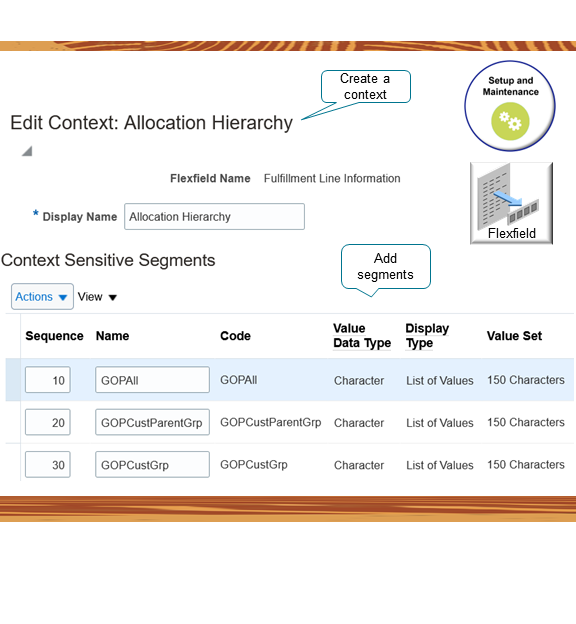
Use these values.
Sequence Name Code Value Data Type Display Type Value Set 10 GOPAll GOPAll Character List of Values 150 Characters 20 GOPCustParentGrp GOPCustParentGrp Character List of Values 150 Characters 30 GOPCustGrp GOPCustGrp Character List of Values 150 Characters You will view this flexfield in the Order Management work area to see how Promising allocates supply on the order line.
The context name that you use must match the context code that you specify on the Manage Contexts page. For details about this page and how to setup and deploy flexfields, see Overview of Using Extensible Flexfields in Order Management. - Deploy your flexfield.
- Go to the Plan Inputs work area, then click Tasks > Manage Planning Attributes.
- On the Manage Planning Attributes page, search for the value.
Attribute Value Attribute Name Vision Operations
This is the name of the hierarchy that you imported. It is the value of the GOP-Vision Operations attribute from your import template.
- In the Define Planning Attribute Mapping area, map the first segment.
- Click Create, then set the values.
Attribute Value Collection Entity from Source Sales Orders Entity Additional Details Fulfillment Line Information Source Attribute Reference Supply Hierarchy
This is the name of the context that you created earlier in this procedure.
Source Attribute Name GOPAll
This is the name of the segment that you created earlier in this procedure.
- Click Save.
- Click Create, then set the values.
- Map the next segment. Repeat the above step. Use the same value except
for:
Attribute Value Source Attribute Name GOPCustParentGrp - Map the next segment. Repeat the above step. Use the same value except
for:
Attribute Value Source Attribute Name GOPCustGrp
Create Value Sets
- Go to the Setup and Maintenance work area, click Search > Tasks, search for, then open the Manage Value Sets task.
- Create a set.
- On the Manage Value Sets page, click Actions > Create.
- On the Create Value Set page set the values.
Attribute Value Value Set Code GOPAll Description Value set for the top GOPAll tier in my allocation hierarchy. Module Planning Common Validation Type Table Value Data Type Character From Clause msc_attribute_values Value Column Name attribute_value Description Column Name attribute_description WHERE Clause attribute_number=3 and plan_id=-1 - Click Save and Close.
- Create a value set for the middle tier. Repeat the above step. Use all the same
values except for these differences.
Attribute Value Value Set Code GOPCUSTPARENTGRP Description Value set for the middle GOPCUSTPARENTGRP tier in my allocation hierarchy. WHERE Clause attribute_dest_value_id in (select distinct attribute2_val_id from fusion.msc_attr_val_relationships where attribute1_val_id = (select distinct attribute_dest_value_id from fusion.msc_attribute_values where attribute_value=:{SEGMENT.XXSCF_GOPALL_AT} and attribute_number = 3)) and plan_id=-1 - Create a value set for the bottom tier. Repeat the above step. Use all the same
values except for these differences.
Attribute Value Value Set Code GOPCUSTGRP Description Value set for the bottom GOPCUSTGRP tier in my allocation hierarchy. WHERE Clause attribute_dest_value_id in (select distinct attribute3_val_id from fusion.msc_attr_val_relationships where (attribute2_val_id in (select attribute_dest_value_id from fusion.msc_attribute_values where attribute_value=:{SEGMENT.XXSCF_GOPCUSTPARENTGRP_AT})) and attribute1_val_id in (select distinct attribute1_val_id from fusion.msc_attr_val_relationships where attribute1_val_id = (select distinct attribute_dest_value_id from fusion.msc_attribute_values where attribute_value=:{SEGMENT.XXSCF_GOPALL_AT}))) and plan_id=-1
Create an Allocation Rule
You will add the nodes that you imported as a hierarchy, and then allocate each one of them.
Try it.
- Go to the Order Promising work area.
- Click Tasks > Manage Supply Allocation Rules.
- On the Manage Supply Allocation Rules page, search for the value.
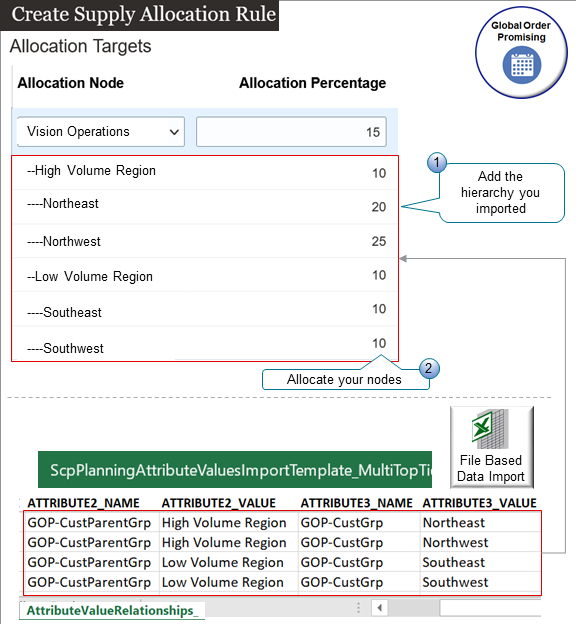
Attribute Value Name Supply for Vision Operations Specification Type Percentage - Click Actions > Edit.
- On the Allocation Targets tab, click Actions > Add Row, then set the
values.
Attribute Value Start Date Choose a Sunday. End Date Choose a Sunday. Each allocation rule works on a weekly basis that starts and ends on Sunday.
- In the Allocation Targets area, click Actions > Add Row to add each
node.
Allocation Node Allocation Percentage Vision Operations 15 High Volume Region 10 Northeast 20 Northwest 25 Low Volume Region 10 Southeast 10 Southwest 10 Note
- Set the Node Rank attribute to zero.
- Set the Stealing Protection Percentage attribute to zero.
- Don't set any values in the Date Range to Consider Shipping History area or in the Allocation Targets area.
- Notice that the page automatically prefaces each node with a series of hyphens. This isn't part of the node's name, but it does help you to visualize the hierarchy.
- Click Allocation Assignment, then set the values.
Attribute Value Assignment Basis Item Assigned to Item AS54888
Test Your Setup
For the final part of the set up, you create a sales order and verify that Promising correctly allocated supply.
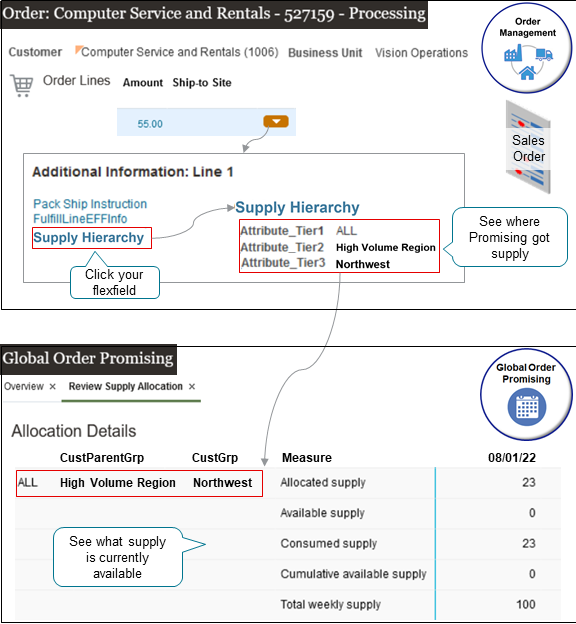
You will:
- Use the Order Management work area to create a sales order. You submit the order, then examine the extensible flexfield that you set up to see how Promising allocated supply for the order line.
- Use the Global Order Promising work area to get details about the current supply, such as what supply has Promising allocated in the Northwest node, what supply is available, what supply has Promising consumed to meet demand, and so on.
- Examine your allocations.
- Go to the Global Order Promising work area, and then click Open.
- In the dialog that displays, click the row that says Review Supply Allocation in the Name attribute.
- On the Review Supply Allocation page, set the values, then click
Apply.
Attribute Value Organization Vision Operations Item AS54888 Allocation Nodes Select them:
- All
- High Volume Region
- Low Volume Region
- Northwest
- Northeast
- Southwest
- Southeast
- Examine the values in the Allocation Details area. Notice that Promising will allocate quantities for each node according your setups.
- Create a sales order.
- Go to the Order Management work area, then create a sales order.
Attribute Value Customer Computer Service and Rentals Business Unit Vision Operations - Add an order line and set these attributes.
Attribute Value Item AS5488 - Click Submit.
- On the order line, click the down arrow, then click View Additional Information.
- In the dialog that displays, click GOP Attributes.
- Notice that the dialog displays details about your allocation hierarchy that Promising has applied to the line, such as the parent entity and the node that Promising is using to promise the item at each tier, such as High Priority Region and Northwest.
- Click Actions > Switch to Fulfillment View.
- On the Fulfillment Lines tab, click Schedule.
- Go to the Order Management work area, then create a sales order.
- Examine the revised allocation.
- Repeat step 1.
- In the Allocation Details area, notice how Promising consumed supply
according to your allocation set up. It consumed all the supply for the
Northwest node first. It then consumed supply from the Northwest Region
in the middle tier, and finally then the Vision Operations node in the
top tier. It consumed supply from Northwest's parent and then
Northwest's grandparent until it had all the supply it needed to meet
demand.
You can also use the Supply Allocation Availability REST API to get allocation data. For details and examples, go to REST API for Oracle Supply Chain Management Cloud, then search for Supply Allocation Availability.