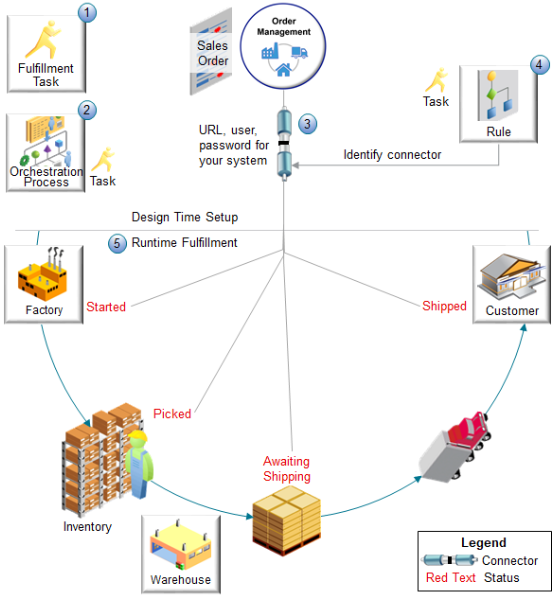
Example of Integrating Order Management with Your Fulfillment System
Assume you need to integrate Order Management with your shipment system. Use this topic to learn how.
An external fulfillment system is a fulfillment system that resides outside of Oracle Applications. Here's an example of how you set up the integration.
Note
-
You will specify status values and status conditions on your fulfillment task according to the values that your fulfillment system uses. You also specify the web services to use when communicating status.
-
Set up shipping steps on your orchestration process so they call your fulfillment system through the fulfillment task and task type that you set up for your integration. Modify status values and conditions on the orchestration process so they meet your integration requirements.
-
Set up a connector that includes the URL to your fulfillment system and any sign in requirements, such as user and password. Order Management uses the connector to find your fulfillment system and communicate with it.
-
Set up a routing rule that routes calls from your fulfillment system to the connector according to the task type that you specify.
-
At run time, Order Management and your fulfillment system use the connector to communicate status updates throughout the fulfillment lifecycle, such as Started, Picked, Awaiting Shipping, and Shipped.
Summary of the Steps
Assume you must integrate your shipping system, Vision Shipments, with Order Management so you can fulfill sales orders that you create in the Order Management work area. Vision Shipments uses status values that are unique to Vision Shipments, such as Awaiting Fulfillment and Awaiting Fulfillment Line Aggregation. You specify them in the Setup and Maintenance work area. Here's a summary of the steps you will do in this topic.
-
Manage task types.
-
Manage status values and status conditions.
-
Create a new orchestration process.
-
Add status values for the fulfillment line.
-
Publish your orchestration process.
-
Set up connector and routing rule.
-
Test your setup.
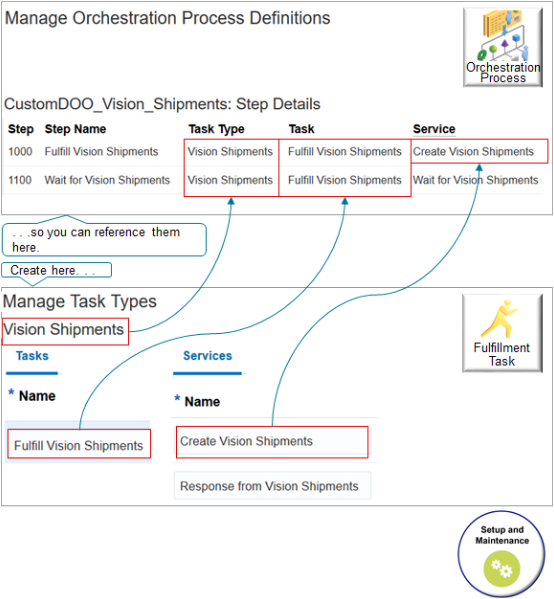
Manage Task Types
To start, you create task type, task, and services so you can reference them later in this procedure when you set up the orchestration process.
Try it.
-
Go to the Setup and Maintenance work area, then go to the task.
-
Offering: Order Management
-
Functional Area: Orders
-
Task: Manage Task Types
-
-
On the Manage Task Types page, click Actions > Add Custom, set values, then click Save.
Attribute
Value
Task Type
Vision Shipments
You can use any value.
Description
Task type we use to communicate with our Vision Shipments fulfillment system.
-
In the Details area, on the Services tab, add the services you will use to communicate with your Vision Shipments fulfillment system.
Code
Name
Operation Code
Hold Enabled
Create Vision Shipments
Create Vision Shipments
Create
Yes
Vision Shipments Inbound
Response from Vision Shipments
Inbound
-
Cancel Vision Shipments
Cancel Vision Shipments
Cancel
No
Hold Vision Shipments
Hold Vision Shipments
Apply Hold
-
Release Vision Shipments
Release Vision Shipments
Release Hold
-
Update Vision Shipments
Update Vision Shipments
Update
Yes
Wait for Vision Shipments
Wait for Vision Shipments
Wait
-
Its recommend that you use these operations to accommodate the various statuses that Order Management uses when it processes each sales order. This way, the statuses in your fulfillment system will be synchronized with the statues in Order Management.
-
Click Tasks, click Actions > Add Row, set the values, then click Save and Close.
Code
Name
Display Name
Intermediate Replanning
Fulfill_Vision_Shipments
Fulfill Vision Shipments
Fulfill Vision Shipments
Doesn't contain a check mark.
Order Management uses the task to communicate status values with your fulfillment system.
Manage Status Values and Status Conditions
Manage Status Values
Create status values on the Manage Status Values page so you can reference them when you set up the orchestration process.
Note
-
Add status values on the Manage Status Values Page.
-
Later in this procedure, reference your status value on each orchestration process step.
-
For details, see Fulfillment Tasks.
Try it.
-
Go to the Setup and Maintenance work area, then go to the task.
-
Offering: Order Management
-
Functional Area: Orders
-
Task: Manage Status Values
-
-
On the Manage Status Values page, click Task Types, click Query by Example, enter
Vision Shipmentsin the Type column, then press the Enter key. -
In the Status Values area, notice that the Setup and Maintenance work area automatically created a set of status values for you when you created the Vision Shipments task type.
Status Value
Split Priority
Change Pending
10
Not Started
20
Started
30
Various
39
Completed with Various Statuses
50
User Action Required
60
Awaiting Response
110
Not Applicable
900
Cancellation Pending
970
Canceled
990
These values match what Order Management uses. You can add, delete, or modify them to accommodate your fulfillment system, as necessary. In general, we recommend that you keep these statuses so your fulfillment system is synchronized with statuses in Order Management, but you can add more.
For example, here's the same set of statuses but with a few new ones that Vision Shipments uses. The bold statuses are new. This way, Vision Shipments can communicate its statuses, such as Awaiting Fulfillment or Awaiting Fulfillment Line Aggregation, to Order Management and Order Management can display them in the Order Management work area, or you can reference them in your other set ups, as necessary.
Status Value
Split Priority
Awaiting Fulfillment
2
Awaiting Fulfillment Line Aggregation
5
Change Pending
20
Not Started
30
Started
40
Various
60
Partially Picked
70
Partially Backordered
80
Picked
90
Backordered
100
Shipped
110
Canceled
120
Not Applicable
130
Cancellation Pending
140
Awaiting Shipping
150
Awaiting Response
160
Completed with Various Statuses
170
User Action Required
180
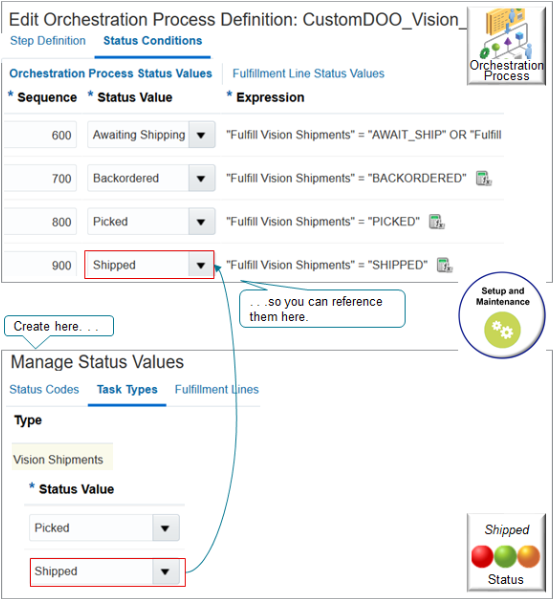
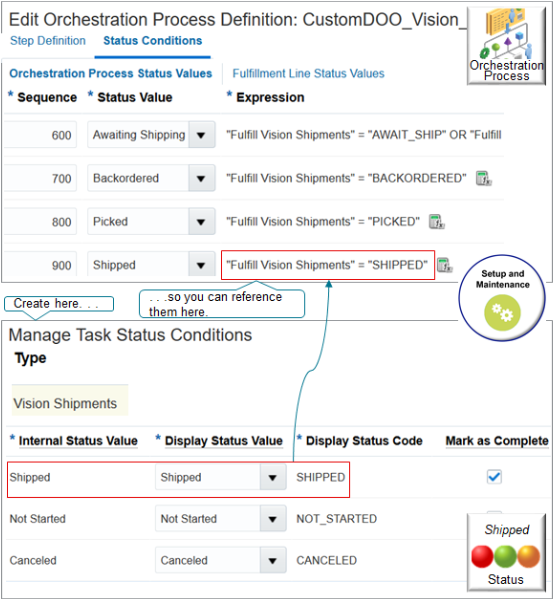
Manage Status Conditions
Create status values on the Manage Task Status Conditions page so you can reference them when you set up the orchestration process.
-
Go to the Setup and Maintenance work area, then go to the task.
-
Offering: Order Management
-
Functional Area: Orders
-
Task: Manage Task Status Conditions
-
-
On the Manage Task Status Conditions page, click Query by Example, enter
Vision Shipmentsin the Type column, then press the Enter key. -
In the Status Conditions area, notice that the Setup and Maintenance work area automatically created a set of conditions for you when you created the Vision Shipments task type.
Internal Status Value
Internal Status Code
Display Status Value
Display Status Code
Awaiting Response
AWAIT_RESPONSE
Awaiting Response
AWAIT_RESPONSE
Canceled
CANCELED
Canceled
CANCELED
Cancellation Pending
CANCEL_PENDING
Cancellation Pending
CANCEL_PENDING
Change Pending
CHANGE_PENDING
Change Pending
CHANGE_PENDING
Completed with Various Statuses
COMPLETED_VAR
Completed with Various Statuses
COMPLETED_VAR
Not Applicable
NOT_APPLICABLE
Not Applicable
NOT_APPLICABLE
Not Started
NOT_STARTED
Not Started
NOT_STARTED
Started
STARTED
Started
STARTED
User Action Required
USER_ACTION
User Action Required
USER_ACTION
Various
VARIOUS
Various
VARIOUS
As with the status values, these status conditions match what Order Management uses. You can add, delete, or modify them to accommodate your fulfillment system, as necessary.
Here's the same set with some new conditions. The bold conditions are new. Make sure only the Shipped status contains a check mark in the Mark as Complete column.
Internal Status Value
Internal Status Code
Display Status Value
Display Status Code
Awaiting Fulfillment
AWAIT_FULFILLMENT
Awaiting Fulfillment
AWAIT_FULFILLMENT
Awaiting Fulfillment Line Aggregation
AWAIT_FLINE_AGGREGATE
Awaiting Fulfillment Line Aggregation
AWAIT_FLINE_AGGREGATE
Awaiting Response
AWAIT_RESPONSE
Awaiting Response
AWAIT_RESPONSE
Awaiting Shipping
AWAIT_SHIPPED
Awaiting Shipping
AWAIT_SHIPPED
Backordered
BACKORDERED
Backordered
BACKORDERED
Canceled
CANCELED
Canceled
CANCELED
Cancellation Pending
CANCEL_PENDING
Cancellation Pending
CANCEL_PENDING
Change Pending
CHANGE_PENDING
Change Pending
CHANGE_PENDING
Completed with Various Statuses
COMPLETED_VAR
Completed with Various Statuses
COMPLETED_VAR
Not Applicable
NOT_APPLICABLE
Not Applicable
NOT_APPLICABLE
Not Started
NOT_STARTED
Not Started
NOT_STARTED
Partially Picked
PARTIAL_PICK
Partially Picked
PARTIAL_PICK
Picked
PICKED
Picked
PICKED
Shipped
SHIPPED
Shipped
SHIPPED
Started
STARTED
Started
STARTED
User Action Required
USER_ACTION
User Action Required
USER_ACTION
Various
VARIOUS
Various
VARIOUS
Create a New Orchestration Process
-
Go to the Setup and Maintenance work area, then go to the task.
-
Offering: Order Management
-
Functional Area: Orders
-
Task: Manage Orchestration Process Definitions
For details, see Guidelines for Setting Up Orchestration Processes.
-
-
Create your process.
-
On the Manage Orchestration Process Definitions page, do a search.
Attribute
Value
Process Name
DOO_OrderFulfillmentGenericProcess
-
Click Actions > Duplicate, modify the attributes, then click Save.
Attribute
Value
Process Name
CustomDOO_Vision_Shipments
Process Display Name
Vision Shipments
Description
Custom orchestration process that fulfills sales orders in the Vision Shipments fulfillment system.
-
-
Modify steps.
-
In the Process Details area, modify values in the row that contains Create Shipment Request in the Step Name attribute.
Attribute
Value
Step Name
Fulfill Vision Shipments
Task Type
Vision Shipments
This is the task type you created earlier in this procedure.
Task
Fulfill Vision Shipments
This is the task you created earlier in this procedure.
Service
Create Vision Shipments
This is the service you created earlier in this procedure.
Update Service
Update Vision Shipments
Cancel Service
Cancel Vision Shipments
Don't modify any of the other attributes.
-
Modify values in the row that contains Wait for Shipment Advice in the Step Name attribute, then click Save.
Attribute
Value
Step Name
Wait for Vision Shipments
Task Type
Vision Shipments
Task
Fulfill Vision Shipments
Service
Wait for Vision Shipments
Exit Criteria
Add a check mark to Canceled.
Add a check mark to Shipped.
Fulfillment Completion Step
Contains a check mark.
Next Expected Task Status
Shipped
Don't modify any of the other attributes.
-
Add Status Values for the Orchestration Process
-
Click Status Conditions, then, on the Orchestration Process Status Values tab, verify values in the Expression column.
Sequence
Status Value
Expression
600
Awaiting Shipping
"Fulfill Vision Shipments" = "AWAIT_SHIP" OR "Fulfill Vision Shipments" = "VARIOUS"
700
Backordered
"Fulfill Vision Shipments" = "BACKORDERED"
800
Picked
"Fulfill Vision Shipments" = "PICKED"
900
Shipped
"Fulfill Vision Shipments" = "SHIPPED"
1200
Partially Picked
"Fulfill Vision Shipments" = "PARTIAL_PICK"
1300
Partially Backordered
"Fulfill Vision Shipments" = "PARTIAL_BACK"
Make sure you verify the correct rows. For example, several rows contain the Awaiting Shipping status value, but you must verify only row 600.
If you don't have these values, then modify the expression, as necessary. For example, if you must modify row 600.
-
Click the Calculator icon in the Expression column.
-
In the Expression Builder dialog, delete everything in the Expression window, expand CustomDOO_Vision_Shipments, Fulfill Vision Shipments, click AWAIT_SHIP [ Awaiting Shipping ], then click Insert Into Expression.
-
In the Expression window, enter the text
ORafter the closing bracket. -
Click VARIOUS [ Various ], then click Insert Into Expression.
-
Verify that the Expression window contains "AWAIT_SHIP" OR "VARIOUS", then click OK.
-
-
Add a new row.
-
Click Actions > Add Row, then set the values.
Attribute
Value
Sequence
1600
Status Value
Awaiting Fulfillment
-
Click the Calculator icon in the Expression column.
-
In the Expression Builder dialog, in the Expression window, enter the name of your task, enclose it with double quotation marks, then add a space and equal sign.
Recall that in this example you created a fulfillment task named Fulfill Vision Shipments, so enter
"Fulfill Vision Shipments" =. -
Expand CustomDOO_Vision_Shipments, Fulfill Vision Shipments, click AWAIT_FULFILLMENT [ Awaiting Fulfillment ], then click Insert Into Expression.
-
Verify that the Expression window contains
"Fulfill Vision Shipments" = "AWAIT_FULFILLMENT", then click OK.
-
-
Add a new row.
-
Click Actions > Add Row, then set the values.
Attribute
Value
Sequence
1700
Status Value
Awaiting Fulfillment Line Aggregation
-
In the Expression column, use the Calculator icon to add
"Fulfill Vision Shipments
" = "AWAIT_FLINE_AGGREGATE"
.
-
-
Click Save.
Add Status Values for the Fulfillment Line
-
Click Fulfillment Line Status Values, then click Edit Status Rule Set.
-
On the Edit Status Rule Set page, verify values.
Sequence
Status Value
Expression
1200
Awaiting Shipping
"Fulfill Vision Shipments" = "AWAIT_SHIP" OR "Fulfill Vision Shipments" = "VARIOUS"
1300
Backordered
"Fulfill Vision Shipments" = "BACKORDERED"
1400
Picked
"Fulfill Vision Shipments" = "PICKED"
1500
Shipped
"Fulfill Vision Shipments" = "SHIPPED"
1800
Partially Picked
"Fulfill Vision Shipments" = "PARTIAL_PICK"
1900
Partially Backordered
"Fulfill Vision Shipments" = "PARTIAL_BACK"
-
Click Actions > Add Row, then set the values.
Sequence
Status Value
Expression
1930
Awaiting Fulfillment
"Fulfill Vision Shipments" = "AWAIT_FULFILLMENT"
-
Click Actions > Add Row, set the values, then click Save and Close.
Sequence
Status Value
Expression
1960
Awaiting Fulfillment Line Aggregation
"Fulfill Vision Shipments" = "AWAIT_FLINE_AGGREGATE"
Publish Your Orchestration Process
-
On the Edit Orchestration Process Definition page, click Actions > Validate.
-
Click Actions > Release.
-
Wait for the release to finish, then cancel the Download dialog.
-
Click Actions > Deploy Process.
Set Up Connector
-
Go to the Setup and Maintenance work area, then go to the task.
-
Offering: Order Management
-
Functional Area: Orders
-
Task: Manage External Interface Web Service Details
For details about how to set up a connector, see Overview of Connecting Order Management to Your Fulfillment System.
-
-
On the Manage Connector Details page, click Actions > Add Row, set the values, then click Save and Close.
Attribute
Value
Target System
OPS
OPS means Order Orchestration and Planning.
Connector Name
Vision Shipments
Connector URL
Enter the URL that locates your fulfillment system.
Connector Description
Connect Order Management to the Vision Shipments fulfillment system.
User Name
Name of a user you have set up on your fulfillment system.
Password
Password you need to access your fulfillment system.
Invocation Mode
Synchronous Service
Set Up Routing Rule
Create a routing rule that routes the fulfillment request to your connector according to task type.
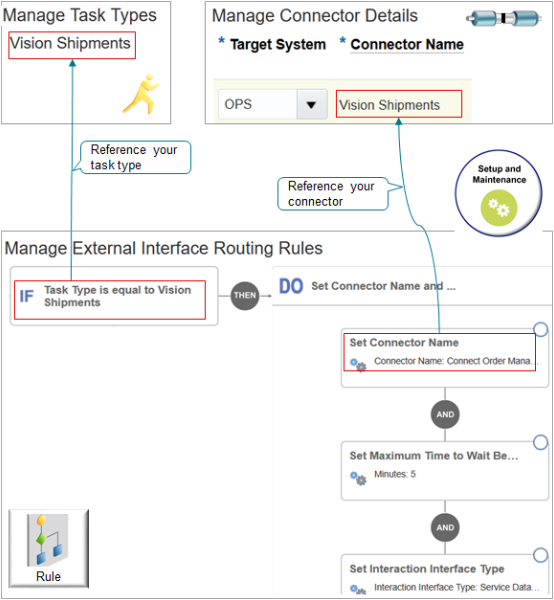
Note
-
Reference the task type that you created on the Manage Task Types page when you create the If statement.
-
Reference the connector that you created on the Manage Connector Details page when you set the connector name in the Do statement.
Try it.
-
Go to the Setup and Maintenance work area, then go to the task.
-
Offering: Order Management
-
Functional Area: Orders
-
Task: Manage External Integration Routing Rules for Sales Orders
For details about how to set up a routing rule, see Use Visual Information Builder.
-
-
On the Manage External Interface Routing Rules page, click Create New Rule.
-
Set the values, then click Save and Close.
Attribute
Value
Name
Route Sales Orders to the Vision Shipments Fulfillment System
-
Create the If statement.
If Task Type is equal to Vision Shipments -
Create the Then statements.
Set Connector Name to Vision Shipments
Set Maximum Time to Wait Before Allowing Cancel to 5 Minutes
Set Interaction Interface Time to Service Data Object
Test Your Setup
-
Create a sales order in the Order Management work area, then click Submit.
-
Monitor the progress of the fulfillment line on the sale order. Verify that it proceeds through the fulfillment statuses as expected.