Guidelines for Setting Up Configuration Models
Follow guidelines to help your setup go smoothly.
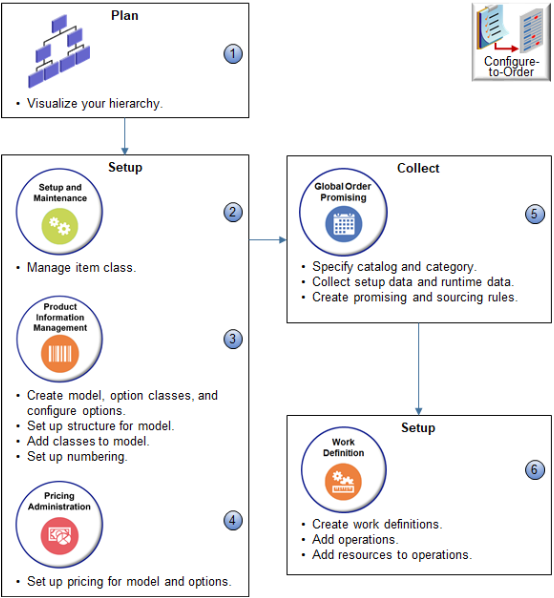
Use a Proven Setup Sequence
You use various work areas to set up your configuration model. Here's an example sequence for the make flow.
Note
-
Use a graphics program or pen and paper to visualize your hierarchy.
-
Use the Setup and Maintenance work area to manage the item class.
-
Use the Product Information Management work area.
-
Create the model, option classes, and configure options.
-
Set up a structure for your model.
-
Add classes to your model.
-
Set up numbering.
-
-
Use the Pricing Administration work area to set up pricing for your model and configure options.
-
Use the Global Order Promising work area.
-
Specify catalog and category.
-
Collect setup data and runtime data.
-
Create promising and sourcing rules.
-
-
Use the Work Definition work area.
-
Create work definitions.
-
Add operations.
-
Add resources to operations.
-
Organize Your Hierarchy
Your hierarchy can include parents and children, but there are limits about what you can include in assemble-to-order (ATO) items, pick-to-order (PTO) items, and kits. Here's what's allowed.
| Hierarchy | Allowed? |
|---|---|
| ATO child in an ATO parent | Yes |
| ATO child in a PTO parent | Yes |
| PTO child in a PTO parent | Yes |
| PTO child in an ATO parent | No |
| ATO child or PTO child in a kit parent | No |
| Kit child in a kit parent, ATO parent, or PTO parent | No |
Assume you sell these items in various configurations:
- Kitchen Appliances
- Stove
- Stove Burners
- Espresso Station
- Milk Frother
- Coffee Grinder
- Air Fryer
Here are some example hierarchies.
| Allowed | Not Allowed |
|---|---|
|
|
|
|
|
|
|
You can’t have a PTO child in an ATO parent, so you can’t have PTO Espresso Station as a child of ATO Kitchen Appliances. If you need to include the Espresso Station as a child of Kitchen Appliances, then change Kitchen Appliances from ATO to PTO. |
More
-
You can include a configure option in your hierarchy that isn't part of an option class.
-
You can set up a hybrid configuration model. For example, add a child assemble-to-order model to a parent pick-to-order model or assemble-to-order model. The configurator views each child as a component of the parent, and it creates all child models at the same time.
-
Reuse your option classes. For example, create an option class for hard drives, then reuse it for different laptop computer models. Or sell it as an individual component to your customer who needs to expand their drive capacity or replace a failed drive.
Set Up Your Item
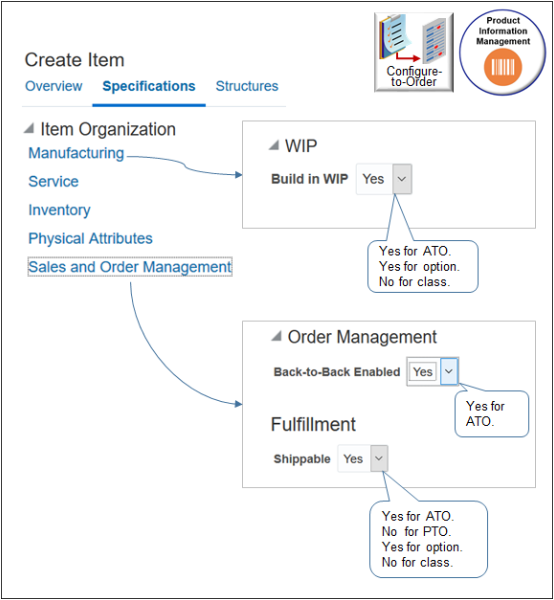
- Click Tasks > Create Item to create the model, each class, and each option.
-
Click Specifications > Manufacturing.
-
Set Build In WIP to Yes for an assemble-to-order model and each option. It instructs manufacturing to build the item.
-
Set Shippable to Yes for an assemble-to-order model and each of its options. Set it to No for a pick-to-order model and each of its options. Pick-to-order is already built, for example, with a return or transfer order.
-
Set Shippable and Build In WIP to No for any option class. You don't build or ship the class. You build and ship the option in the class.
-
-
Click Specifications > Sales and Order Management.
-
Set Back to Back Enabled to Yes for an assemble-to-order model for all Inventory organizations.
-
Set Shippable to Yes for an assemble-to-order model. Set it to No for a pick-to-order model and each of its option classes and options.
-
-
Set the Optional attribute to Yes for each component of an assemble-to-order or pick-to-order item when you create the item in Product Information Management. Setting it to Yes means the user can set a value for it, or not set any value.
For example, if you set Optional to Yes for the Hard Drive component, and if the user doesn't choose an option for the hard drive, such as 1TB or 2TB, then configure-to-order uses the default value that you set for the hard drive.
-
If you use a transaction attribute, then, to create a new configured item at run time, set the scope to Configuration Matching in the item class for your transaction attribute. You must set the scope for each transaction attribute that's unique in your assemble-to-order model. If you don't do this, then Order Management will save the value, but Supply Chain Orchestration won't save it or send it to manufacturing.
Set Up Global Order Promising
Here are some setups you can do.
-
Promise an assemble-to-order item, pick-to-order item, or a hybrid that includes an assemble-to-order item inside a pick-to-order item.
-
Consider lead times for the model, option class, and option when determining the lead time for the configured item. You can do supply chain availability but not lead-time promising when you use an available-to-promise rule in a business-to-business flow. You can set some values, but don't mix rule types.
-
Exclude sourcing on each option and option class.
-
Create a supply recommendation at runtime for each configured item in a back-to-back flow.
-
Promise each configured item in a drop ship flow.
-
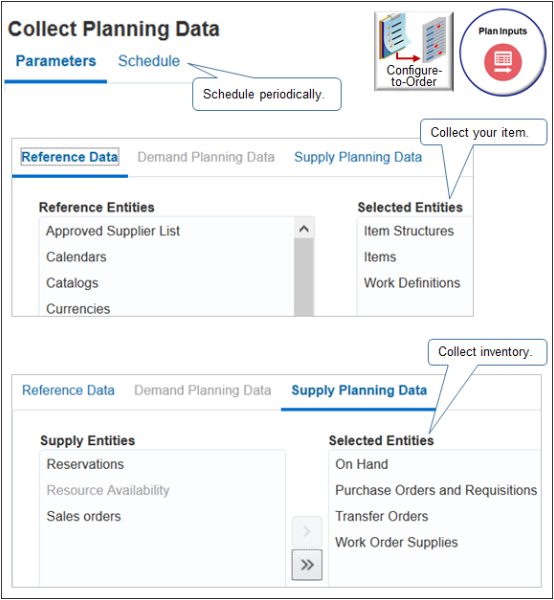
Make sure Supply Planning is available for each component. Planning plans each component, including child models.
Note
-
Go to the Plan Inputs work area, then click Tasks > Collect Planning Data.
-
Collect your configured item on a schedule, such as at the end of each day, so the flow can include them in the on-hand quantity. For example, the return orders you receive throughout the day might increase on-hand quantity.
-
Collect items, item structures, and work definitions for your new model. Promising won't provide a make recommendation if you don't collect the work definition.
-
Collect on-hand inventory for each configure option. If even one component isn't in stock, then Promising won't display availability for your model.
-
You must collect each new configured item.
-
Refresh the repository after you collect.
Avoid the Not Available message at runtime.
-
Create an available-to-promise (ATP) rule to get a recommendation from Promising during the back-to-back flow.
-
Explicitly reference the model and each component in your available-to-promise rule. If you don't explicitly reference them, then include them in a category.
Consider Resource Capacity
Consider resource capacity and availability for each configured item that you manufacture.
|
If |
Then |
|---|---|
|
You must specify the operation assignment for the item at the first level component of the model. You do this when you set up the work definition for your assemble-to-order model. The flow ignores assignments you set at lower levels. |
Note
-
You can use an available-to-promise rule to promise according to fixed and variable lead times for an attribute on the option.
-
Oracle Manufacturing Cloud supports assignments at any level in the model.
Use the Configurator Models Work Area
Use the Configurator Models work area to extend your configuration model. For example:
-
Set default choices or values.
-
Automatically select a configure option according to another choice your user makes when configuring the item.
-
Prevent your user from selecting options that result in a configured item that won't work.
-
Control the number of instances your flow creates for a model at runtime.
-
Calculate and set the values for numeric configure options.
If you use the Configurator Models work area, then follow these guidelines.
-
If you must display a transaction attribute at runtime, then import your model into the Configurator Models work area.
-
If you revise a model, update the item class, add it to an unreleased workspace, then release the workspace into the Configurator Models work area.
For details, see Create and Maintain Configurator Models.
Import Configurator Models
If you use the Configurator Models work area, and if you import a configured item at runtime through.
-
File-base data import. Use the same template you use when you import a sales order that includes only one order line.
-
Web service. Use the same web service you use when you import a sales order that includes only one order line.
-
Make sure your import includes child lines for the configure options and that it establishes a relationship between the child and parent configured item.
I Use My Own Application to Set Up the Configuration Model
Assume you use your own application to set up a configuration model and to create the bill of materials that Oracle Applications use to build the model, and you use that list to import the order lines that contain your configured item and its components. If at some later point you import a revision for the model, then you must make sure the sequence that you use in the revision is identical to the sequence you used in the original import.
Assume you import a configuration model for a desktop computer, it has 3 components, and you import this sequence and hierarchy.
  Desktop Computer
    4K Monitor
    HD Monitor
You also have a rule that says depending on the value of the Desktop Computer, if user doesn't select 4K Monitor, then add the HD Monitor to the configured item.
Some time later, you import a revision for Desktop Computer. If your revision doesn't import Desktop Computer, 4K Monitor, and HD Monitor in the same sequence that you used in the original import, then the configuration might fail. For example, if your revision imports 4K Monitor before it imports Desktop Computer, then the rule might fail because the rule logic depends on the value of Desktop Computer before it can proceed to make the decision about HD Monitor.
I Use Oracle Configurator to Set Up the Configuration Model
If your application integrates with Oracle Configurator and you used it to set up the configuration model, then don't import the entire list of components from the model when your send your revision. Instead, import only the configuration header and revision number, and the import will communicate with Oracle Configurator to recreate the component list.
Troubleshoot
You set up a configuration model in two phases.
-
Create the model, options, classes, and hierarchy in Product Information Management.
-
Send details about the model to your downstream systems.
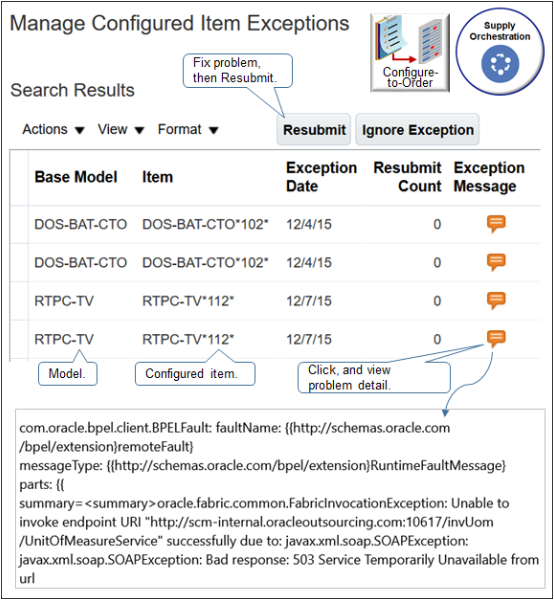
Use the Manage Configured Item Exceptions page to examine most errors that happen in this step. Correct the error and resubmit, or ignore it.
For details, see Troubleshoot Problems with Configure-to-Order.
Other Guidelines
Use two browser applications during set up. Opening a second browser application allows you to toggle between work areas without having to close a work area and then open another work area. For example, you can keep the Product Information Management work area open in browser x, open the Work Definition work area in browser y, then toggle between x and y as necessary if you find you need to modify your set up in Product Information Management.