Set Up Messages in Order Management
Modify a message that displays in the Order Management work area, or create your own message.
Examine a Predefined Message
-
Go to the Order Management work area and create a sales order.
-
Add two order lines, assign each line to a shipment set named My_Shipment_Set, then click Submit.
-
Click Actions > Create Revision.
-
Add a new order line and assign it to My_Shipment_Set.
-
To cancel line 2, set the quantity on line 2 to zero.
-
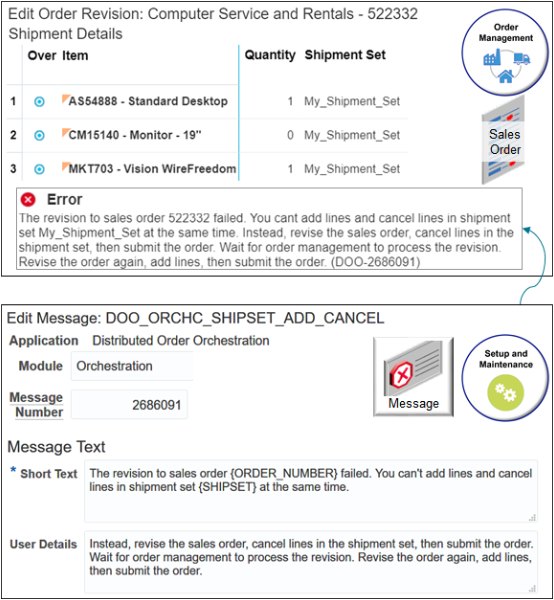
Click Submit, then examine the message that displays.

Note
-
Order Management doesn't allow you to add a new line and cancel a line in the same shipment set during the same revision, so it displays the error message.
-
The predefined DOO_ORCHC_SHIPSET_ADD_CANCEL message defines the message text.
-
Modify a Predefined Message
Assume you want to add some text to DOO_ORCHC_SHIPSET_ADD_CANCEL.

Try it.
-
Examine the predefined message.
-
Open another browser window.
You open a second browser window so you can toggle between your design time set up in the Setup and Maintenance work area and run time rendering in the Order Management work area.
-
In the Setup and Maintenance work area, click Tasks > Search.
-
On the Search page, search for, then open Manage Messages.
-
On the Manage Messages page, set the value, then click Search.
Attribute
Value
Application
Order Management
You can also search for Distributed Order Orchestration to examine messages that Order Management displays primarily during order fulfillment or during interactions with a web service.
Refine your search. Remove the value from the Application attribute and enter a value in Message Name, such as DOO_ORCHC_SHIPSET_ADD_CANCEL.
If you don't know the name, then remove the value from the Application attribute and enter a value in the Module attribute.
Module
Message Includes Errors That Happen When
Import Order
You import a sales order.
Decomposition
Preparing a source order for Order Management during order import.
Orchestration
An orchestration process runs.
Fulfillment Task
Processing a request through a fulfillment task.
Process Order
Order Management starts to process fulfillment. There's usually missing data, attribute values aren't correct, there's a problem in communicating with other applications during fulfillment, and so on.
Manage Orders
You are creating or revising a sales order.
Common
Order Management encounters any one of a wide variety of problems. The problem isn't specific to Order Management. It might happen with other Oracle Applications. For example, communication with a web service fails, you attempt to use an application programming interface that Oracle Applications doesn't support, and so on.
Search is additive. For example, if you set Module to Common and Message Name to DOO_ORCHC_SHIPSET_ADD_CANCEL, then the search doesn't return anything because DOO_ORCHC_SHIPSET_ADD_CANCEL isn't in the Common module.
Use a wildcard. For example, enter DOO_% in Message Name to return all messages that start with DOO_. Here are some abbreviations you might find useful.
Abbreviation and Wildcard
Return Messages For
FOM_%Order Management. FOM is an abbreviation for Oracle Order Management
DOO_%Distributed order orchestration.
QP_%Oracle Pricing.
CTO_%Configured items. CTO is an abbreviation for configure-to-order.
CZ_%Configuration model.
DOS_%Supply Chain Orchestration
-
Search Message Name for DOO_ORCHC_SHIPSET_ADD_CANCEL.
-
-
Edit the message.
-
In the search results, click the line that includes DOO_ORCHC_SHIPSET_ADD_CANCEL in the Message Name column, then click Actions > Edit.
-
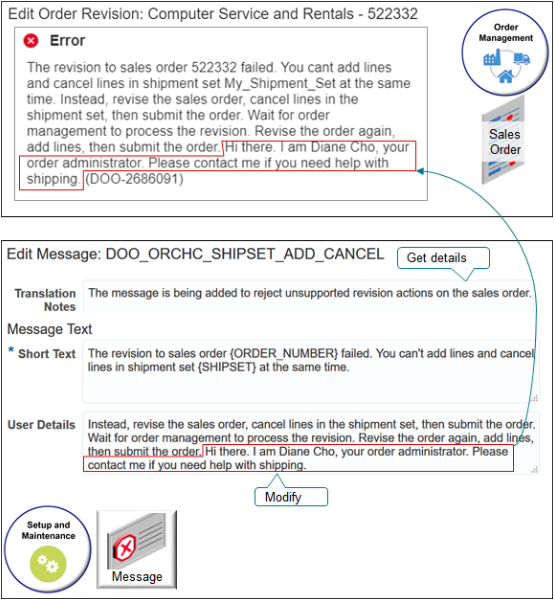
On the Edit Message page, add your text at the end of the User Details attribute. For example:
Instead, revise the sales order, cancel lines in the shipment set, then submit the order. Wait for Order Management to process the revision. Revise the order again, add lines, then submit the order. Hi there. I am Diane Cho, your order administrator. Please contact me if you need help with shipping.Note
-
Don't modify the Message Number. Order Management uses it to uniquely identify the message.
-
Examine the Translation Notes. They might contain details that describe when and why a message displays. Use them to help troubleshoot errors or warnings.
-
In general, don't modify predefined text in the Short Text attribute. Each message describes an error or warning condition. Its important to keep the predefined Short Text to support these conditions.
-
Short Text has a 160 character limit.
-
In general, don't modify predefined text in the User Details attribute. If you want to add text, add it immediately after the predefined text.
-
-
Click Save.
-
-
Test your set up.
-
Go to the Order Management work area in your other browser.
-
If the work area still displays the error message, then close the message dialog.
-
Click Submit.
-
Verify that the message displays the text you added.
-
Create Your Own Message
Assume you must set up a warning message that displays when the Order Entry Specialist enters a quantity of more than 100 on an order line. The purpose of the message is to make sure the Order Entry Specialist agrees that the quantity is correct before submitting.
-
Go to the Manage Messages page, then search the predefined messages.
Create a new message only if you can't find a predefined message that meets your needs.
-
Click Actions > New, then set the values.
Attribute
Value
Message Name
FOM_EXAMINE_QUANTITY
You can enter any text.
Use a format that helps you identify your message and distinguish it from predefined messages that Order Management and other Oracle Applications display.
application_text_descriptionwhere
-
application. Abbreviation that identifies the application. Use
FOMfor Oracle Order Management, orDOOfor Distributed Order Orchestration. -
text_description. Describe the purpose of the message. Use underscores to improve readability.
Application
Order Management
Module
Manage Orders
Here are the modules you typically use when you set Application to Order Management.
-
Manage Orders
-
Import Orders
Here are the modules you typically use when you set Application to Distributed Order Orchestration.
-
Fulfillment Task
-
Decomposition
-
Process Order
-
Orchestration
Message Number
Enter
10000001.Enter any number from 10,000,000 to 10,999,999. The Order Entry Specialist can use this number when they contact the help desk.
At runtime, the message displays the message name, number, and application abbreviation. For example:
fom_examine_quantity-fom-10000001Short Text
Enter this value.
Quantity {QUANTITY} that you entered on the order line exceeds 100. You can order this quantity, but make sure it is correct before you submit the sales order.You use one set of curly brackets ( {} ) to enclose a token. A token is a placeholder for variable content, such as text or a number. Order Management replaces the token with a value at run time. In this example, it replaces {QUANTITY} with the number that the Order Entry Specialist enters in the Quantity attribute on the order line.
Message Type
Warning
Category
Product
Severity
Low
Logging Enabled
Contains a check mark.
-
-
In the Message Tokens area, click Actions > New, then set the values.
Attribute
Value
Token Name
QUANTITY
Data Type
Number
Description
Number that the Order Entry Specialist enters in the Quantity attribute on the order line.
-
Click Save and Close, and then click Save and Close again.