Import Discount List Batches that Include Pricing Matrices
Add a pricing matrix to a discount list that already exists.
Assume you must import the DISCOUNT_LIST_1 discount list. It already exists, but you must add pricing terms and a pricing matrix to it. You must add the Size condition and the Color condition. For details, see Import Batches of Discount Lists.
Summary of the Setup
-
Add your discount list data.
-
Set up matrix class.
-
Upload and verify data.
Add Your Discount List Data
-
Get a copy of the Excel file for this example.
-
Go to Technical Reference for Oracle Order Management (Doc ID 2051639.1).
-
Download the Payloads and Files attachment.
-
Unzip the attachment and open DiscountListImportTemplate_example_2.xlsm. This file already includes the values you use in this example.
-
-
Open the DiscountListImportTemplate.xlsm file in Excel.
-
Add the discount list header.
-
Click the QP_DISCOUNT_LISTS_INT tab, then set the values.
Attribute
Value
BATCH_NAME
Import Batch 1
OPERATION_CODE
NO-OP
The discount lists already exists in the Pricing Administration work area. You aren't adding it, so you use NO-OP (no operation) to indicate to not do an operation, but you still use this row to identify the discount list where you're adding the pricing matrix.
SOURCE_DISCOUNT_LIST_ID
1001
This value identifies the discount list. You use it to create a relationship between the parent list DISCOUNT_LIST_1 on sheet QP_DISCOUNT_LISTS_INT and other entities on other child sheets.
For example, you also use 1001 in the SOURCE_DISCOUNT_LIST_ID column of the child QP_DISCOUNT_LIST_ITEMS_INT sheet.
-
In your web browser, go to the Pricing Administration work area, then click Tasks > Manage Discount Lists.
-
On the Manage Discount Lists page, search for the DISCOUNT_LIST_1 discount list, then open it for editing.
-
Expand Show Detail.
-
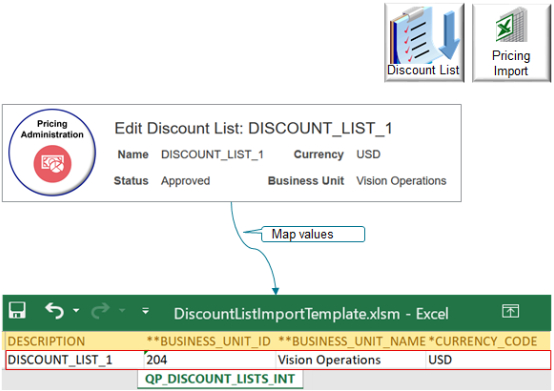
Map values from the Edit Discount List page of the work area to the QP_DISCOUNT_LISTS_INT worksheet in Excel.
Attribute
Value in Work Area
Value in QP_DISCOUNT_LISTS_INT
Name
DISCOUNT_LIST_1
Set NAME to DISCOUNT_LIST_1.
Business Unit
Vision Operations
Set BUSINESS_UNIT_NAME to Vision Operations.
Currency Code
USD
Set CURRENCY_CODE to USD.
Start Date
1/15/19 10:10 AM
Set START_DATE to 2019/01/15 10:10:10.
End Date
Empty
Leave END_DATE empty.
Status
Approved
Set STATUS_CODE to Approved.
Description
DISCOUNT_LIST_1
Set DESCRIPTION to DISCOUNT_LIST_1.
Make sure you map the exact value, including upper case and lower case letters. For example, use Vision Operations. Don't use other values, such as Vision operations, vision operations, visionOperations, Vision Ops, and so on.
For example:

-
-
Ignore the access sets in Excel.
This discount list doesn't have any access sets other than the common set, so ignore the QP_DISCOUNT_LIST_SETS_INT worksheet.
-
Add your item.
-
Click the QP_DISCOUNT_LIST_ITEMS_INT tab in Excel, then set the values.
Attribute
Value
OPERATION_CODE
NO-OP
The item already exists in the Pricing Administration work area. You aren't adding it, so you use NO-OP to indicate to not do an operation. You use this row to identify the item where you're adding the pricing matrix.
SOURCE_DISCOUNT_LIST_ID
1001
SOURCE_DISCOUNT_LIST_ITEM_ID
10001
This value creates a relationship between the parent AS54888 item on the QP_DISCOUNT_LIST_ITEMS_INT worksheet and the.
-
Child pricing term on worksheet QP_PRICING_TERMS_INT.
-
Child matrix dimension on worksheet QP_MATRIX_DIMENSIONS_INT.
-
-
In Pricing Administration, on the Edit Discount List page, on the Discount Lines tab, search for your item.
Attribute
Value
Name
AS54888
-
Map values from the search results in Pricing Administration to the QP_DISCOUNT_LIST_ITEMS_INT worksheet in Excel.
Attribute
Value in Work Area
Column in QP_DISCOUNT_LIST_ITEMS_INT
Item Level
Item
Set ITEM_LEVEL_CODE to ITEM.
Name
AS54888
Set ITEM_NUMBER to AS54888.
-
-
Leave ITEM_ID empty.
Pricing UOM
Each
Set PRICING_UOM to Each.
-
-
Set PRICING_UOM_CODE to Ea.
Line Type
Buy
Set LINE_TYPE_CODE to ORA_BUY.
Service Duration Period, Service Duration, and Associated Items are empty in Pricing Administration, so leave all other columns in the worksheet empty, such as SERVICE_DURATION_PERIOD, SERVICE_DURATION_PERIOD_CODE, SERVICE_DURATION, ATTRIBUTE_CATEGORY, ATTRIBUTE_CHAR1, and so on.
-
-
Create a new pricing term.
-
Click the QP_PRICING_TERMS_INT tab in Excel, then set the values.
Attribute
Value
OPERATION_CODE
CREATE
SOURCE_ROOT_PARENT_ID
1001
This value creates a relationship to the DISCOUNT_LIST_1 discount list that you specify in column SOURCE_DISCOUNT_LIST_ID on sheet QP_DISCOUNT_LISTS_INT.
The discount list is the grandparent, and the AS54888 item is the parent of the pricing term.
SOURCE_PARENT_ID
10001
This value creates a relationship to the parent AS54888 item that you specify in column SOURCE_DISCOUNT_LIST_ITEM_ID on sheet QP_DISCOUNT_LIST_ITEMS_INT.
SOURCE_TERM_ID
100001
The pricing term is a parent of the pricing matrix, so you will use this value in the next step to create a relationship between term and matrix.
NAME
AS54888-AR1
PRICING_RULE_TYPE_CODE
ATTRIBUTE_PRICING
PRICE_TYPE_CODE
ONE_TIME
CHARGE_TYPE_CODE
ORA_SALE
CHARGE_SUBTYPE_CODE
ORA_PRICE
APPLY_TO_ROLLUP_FLAG
N
START_DATE
2019/01/15 10:10:10
Leave all other values in the sheet empty.
-
-
Create new matrix dimensions.
-
Click the QP_MATRIX_DIMENSIONS_INT tab, then set the values.
OPERATION_CODE
SOURCE_ROOT_PARENT_ID
SOURCE_PARENT_ID
SOURCE_MATRIX_ID
DIMENSION_NAME
DIMENSION_TYPE
MAP_TO_RULE_COLUMN
CREATE
1001
100001
7001
Color
Condition
VALUE_STRING1
CREATE
1001
100001
7001
Size
Condition
VALUE_STRING2
CREATE
1001
100001
7001
Adjustment Type
Result
VALUE_STRING3
CREATE
1001
100001
7001
Adjustment Amount
Result
VALUE_STRING4
CREATE
1001
100001
7001
Adjustment Basis
Result
VALUE_STRING5
Note
-
Use a separate row for each CREATE action.
-
SOURCE_ROOT_PARENT_ID maps to the SOURCE_DISCOUNT_LIST_ID column on the QP_DISCOUNT_LISTS_INT sheet. It identifies DISCOUNT_LIST_1 as the root parent of each matrix dimension.
-
SOURCE_PARENT_ID maps to the SOURCE_TERM_ID column on the QP_PRICING_TERMS_INT sheet. It identifies AS54888-AR1 as the parent pricing term of each matrix dimension.
-
SOURCE_MATRIX_ID is a unique value you add to identify the pricing matrix.
-
DIMENSION_NAME and DIMENSION_TYPE must equal the same value you set up in the matrix class. You will verify these later in this topic.
-
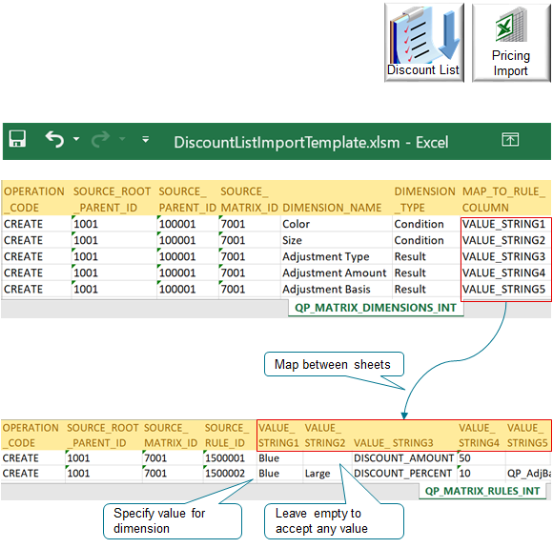
Use a different value for each row in MAP_TO_RULE_COLUMN. You must use the name of a VALUE_STRING column from sheet QP_MATRIX_RULES_INT. You will see why next.
-
-
-
Create new matrix rules.
-
Click the QP_MATRIX_RULES_INT tab, then set the values.
OPERATION_CODE
SOURCE_ROOT_PARENT_ID
SOURCE_MATRIX_ID
SOURCE_RULE_ID
CREATE
1001
7001
1500001
CREATE
1001
7001
1500002
Note
-
Use a separate row for each CREATE action.
-
SOURCE_ROOT_PARENT_ID maps to the SOURCE_DISCOUNT_LIST_ID column on the QP_DISCOUNT_LISTS_INT sheet. It identifies DISCOUNT_LIST_1 as the root parent of each matrix rule.
-
SOURCE_MATRIX_ID maps to the SOURCE_ MATRIX_ID column on the QP_MATRIX_DIMENSIONS_INT sheet. It identifies 7001 as the parent dimension for the matrix rule.
-
SOURCE_RULE_ID is a unique value you add to identify the rule.
Here's a continuation of the same rows. You add the value strings.
VALUE_STRING1
VALUE_STRING2
VALUE_STRING3
VALUE_STRING4
VALUE_STRING5
Blue
Leave empty
DISCOUNT_AMOUNT
50
Leave empty
Blue
Large
DISCOUNT_PERCENT
10
QP_AdjBasisforBaseListPrc
Use the value strings columns to create relationships between QP_MATRIX_DIMENSIONS_INT and QP_MATRIX_RULES_INT.

Note
-
You map value strings from the QP_MATRIX_DIMENSIONS_INT sheet to the QP_MATRIX_RULES_INT sheet.
-
The MAP_TO_RULE_COLUMN on sheet QP_MATRIX_DIMENSIONS_INT identifies the column on sheet QP_MATRIX_RULES_INT.
-
For example, VALUE_STRING1 in column MAP_TO_RULE_COLUMN maps to column VALUE_STRING1 on sheet QP_MATRIX_RULES_INT. The dimension on sheet QP_MATRIX_DIMENSIONS_INT is Color, and it maps to VALUE_STRING1 on QP_MATRIX_RULES_INT, which contain Blue.
-
The value string column on QP_MATRIX_RULES_INT identifies the value you will be able to select in Pricing Administration. If you leave the value empty in a value string column on QP_MATRIX_RULES_INT, then you can select any value Pricing Administration. If you leave it empty, make sure you enable Allow Null for the matrix class, which you will do later in this topic.
-
The value for VALUE_ STRING5 is QP_AdjBasisforBaseListPrc. Its chopped off in the screen print.
-
-
Set Up Matrix Class
You must set up the class so it supports the pricing matrix that you're adding to the discount list. You must set it up before you upload your data.

Note
-
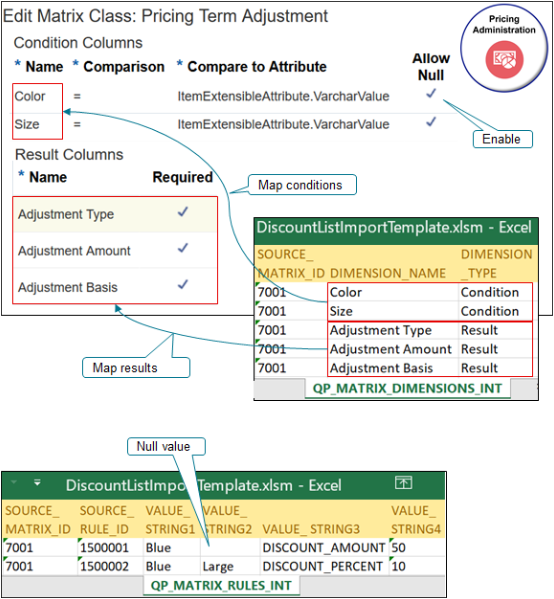
Add condition columns in the matrix class that support the conditions you add on the QP_MATRIX_DIMENSIONS_INT sheet.
-
Add result columns in the matrix class that support the results you add on the QP_MATRIX_DIMENSIONS_INT sheet.
-
Enable the Allow Null attribute on the condition in the matrix class so you can use an empty value in the QP_MATRIX_RULES_INT sheet. Use null so you can enter any value when you set up the discount list in the Pricing Administration work area. If you don't use null, then you must select from the values that you specify on the sheet.
-
Do this set up only if your import includes conditions and results that are different from the matrix class in the Pricing Administration work area.
For this example, you add your own attributes to the predefined Pricing Term Adjustment matrix class.
Try it.
-
Go to the Pricing Administration work area, then click Tasks > Manage Matrix Classes.
-
On the Manage Matrix Classes page, in the Name column, click Pricing Term Adjustment.
-
On the Edit Matrix Class page, in the Condition Columns area, add rows.
Name
Comparison
Compare to Attribute
Allow Null
Size
=
itemExtensibleAttribute.VarcharValue
Contains a check mark
Color
=
itemExtensibleAttribute.VarcharValue
Contains a check mark
Recall that you added these in the worksheet and specified them as Condition dimension types.
Learn how to set the compare to attribute and domain in the condition and result. For details, see Add Your Own Attributes to Items in Pricing.
-
Verify that the results support your new pricing matrix.
In the Result Columns area, if these rows don't exist, add them. Recall that you added these in the worksheet and specified them as Result dimension types. Notice that they're all required.
Name
Required
Allow Null
Adjustment Type
Contains a check mark
Empty
Adjustment Amount
Contains a check mark
Empty
Adjustment Basis
Contains a check mark
Contains a check mark
-
Click Save and Close.
Upload and Verify Data

Do it.
-
Create the zip file, upload your data, and run the scheduled processes. For details, see Import Batches of Discount Lists.
-
In the Pricing Administration work area, click Tasks > Manage Discount Lists.
-
Search for and DISCOUNT_LIST_1 and open it for editing.
-
Verify that the header contains the values you specified on sheet QP_DISCOUNT_LISTS_INT.
Attribute
Value
Name
DISCOUNT_LIST_1
Currency
USD
Business Unit
Vision Operations
-
In the Discount Lines area, search for the item you added from sheet QP_DISCOUNT_LIST_ITEMS_INT.
Attribute
Value
Name
AS54888
-
Verify that the search results contain the values you specified on sheet QP_DISCOUNT_LIST_ITEMS_INT.
Attribute
Value
Pricing UOM
Each
Line Type
Buy
Note that Pricing gets other values for the item from Product Information Management, such as Standard Desktop in the Description.
-
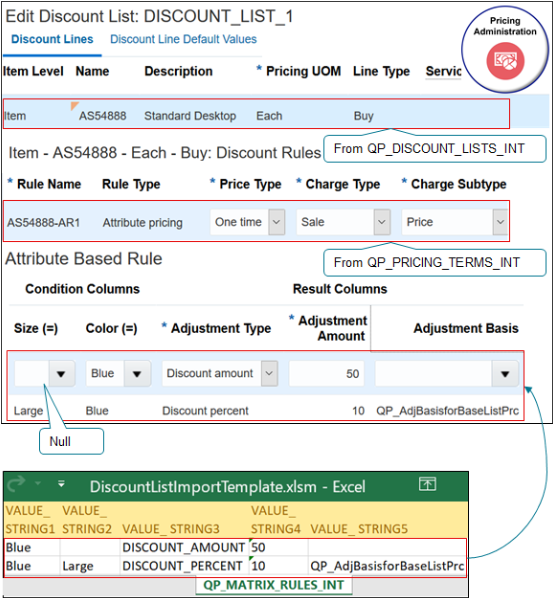
Expand section Item AS54888 Each Buy: Discount Rules, then verify that it contains the values you specified in sheet QP_PRICING_TERMS_INT.
Attribute
Value
Rule Name
AS54888-AR1
Rule Type
Attribute Pricing
Price Type
One Time
Charge Type
Sale
Charge Subtype
Price
-
Expand section Attribute Based Rule, then verify that it contains the values you specified in sheet QP_MATRIX_RULES_INT.
Size
Color
Adjustment Type
Adjustment Amount
Adjustment Basis
Empty
Blue
Discount Amount
50
Empty
Large
Blue
Discount Percent
10
QP_AdjBasisforBaseListPrc