Use Extensible Flexfields with Pricing
Use an extensible flexfield to modify how Oracle Pricing calculates pricing.
To use an extensible flexfield for a sales order in a pricing rule, you add an entity to the source in a service mapping to store your own data.
-
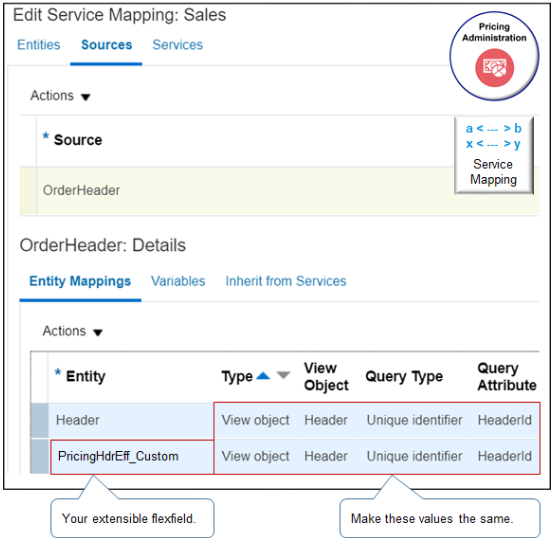
Select the entity on the source. For example, if you're adding an extensible flexfield to the order header, then select the OrderHeader source.
-
Copy the name of the view object from the flexfield archive.
-
On the Entity Mappings tab, click Actions > Add Row.
-
If you add an extensible flexfield on the order header, then make sure all the values you set on the entity that you add for the flexfield match the values that Pricing uses for the predefined Header entity.
-
If you add an extensible flexfield on the source for the.
-
Order header, then you must also add it to source for the order line and the source for the catalog line.
-
Order line, then you must also add it to source for the order header.
-
You will modify Order Management and Pricing so they use the sales channel attribute of an extensible flexfield to determine the pricing strategy.
Here are the tasks that you do.
|
Task |
Description |
|---|---|
|
Manage Service Mappings |
Define an extensible flexfield attribute as part of a service mapping so Pricing can use it to identify the pricing strategy it will use to determine the price according to the sales channel. |
|
Manage Matrix Classes |
Add an extensible flexfield attribute named Sales Channel as part of a condition in the predefined matrix class that the pricing strategy assignment references. |
|
Manage Algorithms |
Add a data set for an extensible flexfield entity to the Get Sales Pricing Strategy pricing algorithm. |
Summary of the Set Up
-
Create the value set.
-
Define the extensible flexfield.
-
Administer the service mapping.
-
Modify the matrix class.
-
Modify the pricing algorithm.
-
Create the pricing strategy.
-
Test your set up.
For details, see Developing Applications with Flexfields.
Create the Value Set
The Order Entry Specialist enters a value into a flexfield segment while using an Oracle Application. The flexfield validates each segment against the value set that you define in this topic. To validate a segment means that the flexfield compares the value that you enter into the segment against the values in the value set.
Create the value set.
-
Go to the Setup and Maintenance work area.
-
Click Tasks > Search, then open Manage Application Core Value Sets.
-
On the Manage Application Core Value Sets page, click Actions > Create, set the values, then click Save and Close.
Attribute
Value
Value Set Code
SALES_ORDER_CHANNEL
Description
Set pricing strategy according to sales order channel
Module
Application Flexfields
Validation Type
Table
Value Data Type
Character
From Clause
FND_LOOKUPS
Value Column Name
LOOKUP_CODE
Description Column Name
MEANING
ID Column Name
LOOKUP_CODE
WHERE Clause
LOOKUP_TYPE='ORA_QP_CHANNEL_METHODS'
ORDER BY Clause
DISPLAY_SEQUENCE
-
On the Manage Applications Core Value Sets page, Click Save and Close.
Define the Extensible Flexfield
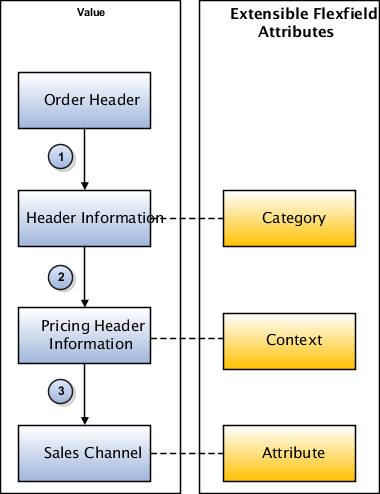
Here's the hierarchy you define for your extensible flexfield.
Note
|
Reference |
Description |
|---|---|
|
1. The Order Header references the Header Information flexfield category. |
Not applicable |
|
2. The Header Information flexfield category references the Pricing Header Information flexfield context. |
A category is an organizing structure that you use to dynamically display different sets of pages and contexts at run time. In this example, you create a single category for a flexfield so Order Management displays the same extensible flexfield context for each sales channel. |
|
3. The Pricing Header Information flexfield context references the Sales Channel attribute. |
An extensible flexfield context is a group of attributes that you use to arrange segments into meaningful groups. For example, the Order Management work area displays each context in the same area on a page at run time. |
Create the context for the extensible flexfield.
-
On the Search page, search for, then open Manage Extensible Flexfields.
-
On the Manage Extensible Flexfields page, in the Search area, enter the value, then click Search.
Attribute
Value
Name
Header Information
-
In the Search Results, click Actions > Edit.
-
On the Edit Extensible Flexfield page, click Manage Contexts.
-
On the Manage Contexts page, click Actions > Create.
-
On the Create Contexts page, click Actions > Create, then set the values.
Attribute
Value
Display Name
Pricing Header Information
Code
PricingHeaderInformation
API Name
PricingheaderinformationEnabled
Contains a check mark
Behavior
Single Row
-
On the Context Usages tab, click Actions > Create, set the values, then click Save.
Attribute
Value
Name
Additional Header Information
View Privileges
None
Edit Privileges
None
-
In the Context Sensitive Segments area, click Actions > Create.
-
On the Create Segment page, set values, then click Save and Close.
Attribute
Value
Name
SalesChannel
Code
SalesChannel
API Name
saleschannelEnabled
Contains a check mark
Data Type
Character
Table Column
ATTRIBUTE_CHAR1
Value Set
SALES_ORDER_CHANNEL
Prompt
Sales Channel
Display Type
List of Values
-
On the Edit Context page, click Save and Close.
-
On the Manage Contexts page, click Save and Close.
Associate the context with the category.
-
On the Edit Extensible Flexfield page, in the Category area, click the row that contains the value.
Attribute
Value
Display Name
Additional Header Information
-
On the Associated Contexts tab, click Actions > Select and Add.
-
In the Select and Add dialog, search for the value.
Attribute
Value
Name
Pricing Header Information
-
In the search results, click the row, click Apply, then click OK.
-
In the Associated Contexts tab, notice that the Associated Contexts tab now displays a row for Pricing Header Information, which means you successfully assigned the Pricing Header Information context to the Additional Header Information category.
-
Click Save.
Specify where to display the extensible flexfield.
-
In the Category Details area, click Pages, then click Actions > Create.
-
In the Create Page dialog, set the values, then click OK.
Attribute
Value
Display Name
Pricing Header Information
Code
PricingHeaderInformation
Usage
Additional Header Information
This step assign the contexts to the page in the Order Management work area that will display the extensible flexfield.
-
On the Edit Extensible Flexfield page, in the Category Details area, click the row that contains Pricing Header Information in the Display Name column.
-
In the Pricing Header Information - Associated Contexts Details area, click Actions > Select and Add.
-
In the Select and Add dialog, search for Pricing Header Information, wait for the search to finish, click the result row, click Apply, then click OK.
-
Click Save and Close.
-
On the Manage Extensible Flexfields page, click Deploy Flexfield, and then use the Processing dialog that displays to monitor the deployment.
Deploy makes the extensible flexfield available in the Order Management work area.
-
Click Done, then click Done again.
Administer the Service Mapping
Administer the service mapping that implements this SDO.
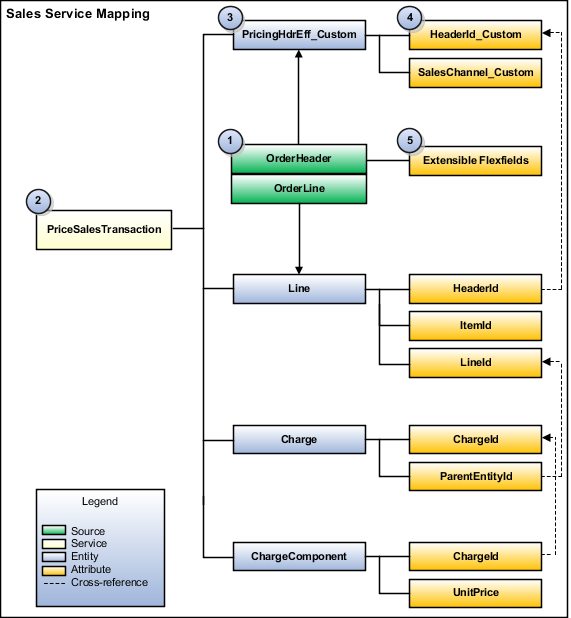
Here are the objects that this SDO contains.
|
Object |
Your Work in This Example |
|---|---|
|
1. Source. Provides a structure so Pricing can model data in the input SDO. |
You specify the OrderHeader source on the predefined Sales service mapping. You map this source to the PricingHdrEff_Custom entity, then map the SalesChannel_Custom and HeaderId_Custom attributes to this entity. |
|
2. Service. Requests the service mapping and receives the output SDO. |
The PriceSalesTransaction service references the entities and attributes that the pricing algorithm uses to calculate the product price of each sales order. |
|
3. Entity. References the entities that the service mapping requires to structure the output SDO. |
You add the PricingHdrEff_Custom entity to the Sales service mapping. |
|
4. Attribute. References the attributes that the service mapping requires to structure the output SDO. |
You add the HeaderId_Custom attribute and SalesChannel_Custom attribute. |
|
5. Extensible flexfields. Contains the data that this example uses. |
You map the extensible flexfields that you created earlier in this topic. You map them as attributes of the PricingHdrEff_Custom entity on the OrderHeader source. |
Learn about SDOs. For details, see How Service Mappings, Pricing Algorithms, and Matrixes Work Together.
Add the header entity to the service mapping.
-
Make sure you have the privileges that you need to administer pricing.
-
Go to the Pricing Administration work area, then click Tasks > Manage Service Mappings.
-
On the Manage Service Mappings page, in the Name column, click Sales.
-
On the Entities tab, click Action > Add Row, set the values, then click Save.
Attribute
Value
Entity
PricingHdrEff_Custom
Description
Entity for the flexfield on the sales order header. This modification supports the business flow that uses a sales channel.
-
In the Details area, add the attributes, then click Save.
Attribute
Type
Allow Null
HeaderId_Custom
Long
Contains a check mark.
SalesChannel_Custom
String
Contains a check mark.
Specify the service.
-
Click Services, then click the row that contains this value.
Attribute
Value
Service
PriceSalesTransaction
-
In the Details area, on the Entities tab, click Actions > Add Row, set the values, then click Save.
Attribute
Value
Entity
PricingHdrEff_Custom
Read
Contains a check mark.
Write
Does not contain a check mark.
-
In the PricingHdrEff_Custom Entities area, add these attributes.
Attribute
Read
Write
HeaderId_Custom
Contains a check mark.
Doesn't contain a check mark.
SalesChannel_Custom
Contains a check mark.
Doesn't contain a check mark.
Specify the sources.
-
Click Sources, then click the row that contains this value.
Attribute
Value
Source
OrderHeader
-
In the OrderHeader Details area, click Actions > Add Row, set the \values, then click Save.
Attribute
Value
Entity
PricingHdrEff_Custom
Type
View Object
View Object
PricingHeaderInformation
Make sure the value you enter for View Object matches the value from the Code attribute on the Create Context page you used when you created the extensible flexfield earlier in this topic.
Query Type
Unique Identifier
Query Attribute
HeaderId
Make sure the value you enter for Query Attribute matches the name you used earlier in this topic when you defined the entity for the extensible flexfield.
-
In the PricingHdrEff_Custom Details area, add the attributes.
Attribute
View Object Value
HeaderId_Custom
HeaderId
Make sure the value you enter matches the name you used earlier in this topic when you defined the entity for the extensible flexfield.
SalesChannel_Custom
SaleschannelMake sure the value you enter matches the value of the API Name attribute on the Create Segment page that you used when you defined the extensible flexfield earlier in this topic.
Modify the Matrix Class
Modify the matrix class so it uses the SalesChannel_Custom attribute of the PricingHdrEff_Custom entity when it determines whether the condition is true. For details, see Pricing Matrix Class.
-
On the Overview page, click Tasks > Manage Matrix Classes.
-
On the Manage Matrix Classes page, click the link that contains this value.
Attribute
Value
Name
Sales Pricing Strategy Assignment
-
On the Edit Matrix Class page, in the Condition Columns area, in the Channel Method row, set the values.
Attribute
Value
Name
Channel Method
Source Code Name
SaleschannelCode
Comparison
=
Compare to Attribute
PricingHdrEff_Custom.SalesChannel_Custom
Required
Does not contain a check mark.
Allow null
Contains a check mark.
Null is Wild card
Contains a check mark.
Domain
Lookup: ORA_QP_CHANNEL_METHODS
Modify the Pricing Algorithm
Modify the predefined pricing algorithm so it constrains the set of records that it processes to the PricingHdrEff_Custom entity. For details, see How Service Mappings, Pricing Algorithms, and Matrixes Work Together.
-
On the Overview page, click Tasks > Manage Algorithms.
-
On the Manage Algorithms page, click the row that contains the value, then click Actions > Create Version.
Attribute
Value
Name
Get Sales Pricing Strategy
-
In the Name column, click Get Sales Pricing Strategy.
-
On the Edit Algorithm page, on the Algorithm tab, expand step 13, Retrieve Header Strategy, then click step 14, Get Header Strategy.
-
In the Data Sets area, click Add Row, set the values, then click Save and Close.
Attribute
Value
Name
PricingHdrEff_Custom
Variable Path
PriceRequest.PricingHdrEff_Custom
Cardinality
Zero or one
Primary
Doesn't contain a check mark.
Data Set Join
[HeaderId_Custom:{Header.HeaderId}] -
On the Manage Algorithms page, click Actions > Publish.
Create the Pricing Strategy
-
On the Overview page, click Tasks > Manage Pricing Strategies.
-
On the Manage Pricing Strategies page, click Actions > Create.
-
In the Create Pricing Strategy dialog, set the values, then click Save and Edit.
Attribute
Value
Name
Corporate Pricing Strategy Sales Channel
Description
Corporate strategy for sales channels.
Business Unit
Vision Operations
Default Currency
USD US Dollar
Default GL Conversion Type
Corporate
Allow Price List Override
Contains a check mark.
Allow Currency Override
Contains a check mark.
-
Add a price list.
For details, see Manage Pricing Strategies.
-
Click Approve > Save and Close.
-
Click Tasks > Manage Pricing Strategy Assignments.
-
On the Manage Pricing Strategy Assignments page, immediately below the page title, click Actions > Add Row, set the values, then click Save.
Attribute
Value
Assignment Level
Header
Pricing Context
Sales
Transaction Type
All
-
Click Create Assignment Matrix.
-
In the Create Assignment Matrix dialog, add a check mark to each of these condition columns.
-
Channel Method
-
Pricing Segment
-
Transaction Type
-
-
Click OK.
-
In the Pricing Strategy Assignment Rules area, click Actions > Add Row, set the values, then click Save and Close. Leave Pricing Segment and Transaction Type empty.
Attribute
Value
Channel Method
Inside Sales
Pricing Strategy
Corporate Pricing Strategy, Sales Channel
Precedence
100
Test Your Set Up
-
Make sure you have the privileges that you need to manage sales orders.
Go to the Order Management work area and create a new sales order.
-
Verify that you can adjust the sales channel in the order header.
-
Adjust the sales channel, and then verify that the pricing changes depending on channel.