Migrate Orchestration Processes in Order Management
Migrate your orchestration processes from one environment to another.
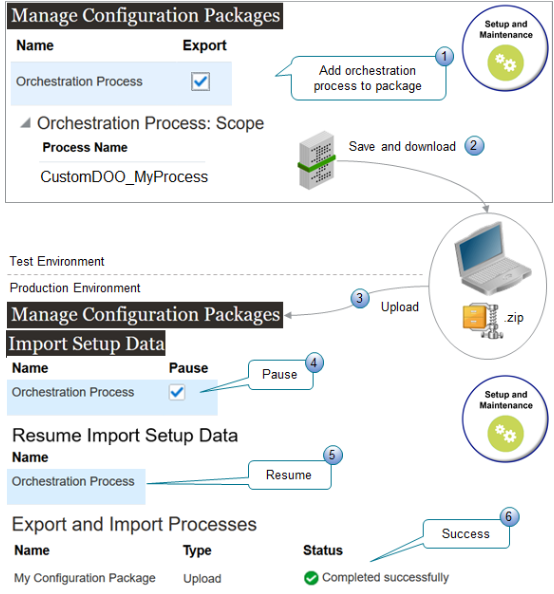
Here's a summary of how its done.
Note
-
Assume you created an orchestration process named CustomDOO_MyProcess in your test environment and need to migrate it to your production environment.
-
There are dependencies between the orchestration process and other objects that you import. Pausing the import for the orchestration process object allows the import to finish processing these dependencies. You then resume the import.
-
Click Yes to any dialogs that display during this procedure.
Summary of the Set Up
-
Export.
-
Import.
Export
Do this in your test environment.
-
Release and deploy CustomDOO_MyProcess in your test environment.
For details, see Deploy Orchestration Processes.
-
Create an implementation project.
-
Go to the Setup and Maintenance work area, then click Tasks > Manage Implementation Projects.
-
On the Implementation Projects page, click Actions > Create.
-
On the Create Implementation Project page, set the value, then click Next.
Attribute
Value
Name
My Implementation Project
On the Select Offerings to Implement page, in the Order Management row, set the value, then click Save and Open Project.
Attribute
Value
Include
Selected
-
On the My Implementation Project page, click Done.
-
On the Implementation Projects page, notice that the search results displays your My Implementation Project, then click Done.
-
-
Create a configuration package.
-
On the Setup page, click Tasks > Manage Configuration Packages.
-
On the Manage Configuration Packages page, click Actions > Create.
-
On the Create Configuration Package page, set the values, then click Next.
Attribute
Value
Name, in the Source Implementation Project area
My Implementation Project
Setup Task List and Setup Data
Enabled
Name, in the Configuration Package Details area
My Configuration Package
-
On the Select Objects for Export page, click Deselect All, then sort the Name column in alphabetic order.
-
Scroll to the row that has Orchestration Process in the Name column, then click that row.
-
In the row you just clicked, set the value.
Attribute
Value
Export
Contains a check mark.
-
Scroll to the bottom of the page, then, in the Orchestration Process area, click Actions > Select and Add.
-
In the dialog that displays, search the Name attribute for CustomDOO_MyProcess, then click Apply > Save and Close.
-
On the Create Configuration Package page, click Submit.
-
-
Monitor and download the configuration package.
-
On the Manage Configuration Packages page, in the search results, click the row that has My Configuration Package in the Name column.
-
In the Export and Import Processes area, click Actions > View Process Results.
-
On the Export and Import Process Results page, monitor the Status attribute at the top of the page until it changes to Completed Successfully. If necessary, click Refresh to periodically update the page. It might take a few minutes.
-
Click Done.
-
On the Manage Configuration Packages page, in the Export and Import Processes area, click Refresh (the circular arrow).
-
In the Download column, click the icon, then click Download Configuration Package.
-
Save the My Implementation Project_1.zip file to your computer.
Notice that the download appends some text to the file name, such as My Implementation Project 1_1_20210811_2348.zip.
-
Import
Do this in your production environment.
-
Upload your configuration package.
-
Go to the Setup and Maintenance work area, then click Tasks > Manage Configuration Packages.
-
On the Manage Configuration Packages page, Click Actions > Upload.
-
On the Upload Configuration Package, browse to the My Implementation Project_1.zip file that you downloaded earlier, click Get Details, wait until the details display, then click Submit.
-
-
Upload your orchestration process.
-
In the Export and Import Processes area, click the row that has the value.
Attribute
Value
Name
My Configuration Package
-
Click Actions > Import Setup Data.
-
On the Enter Basic Information page, click Next.
-
On the Select Pauses for External Import page, click Actions > Deselect All, then sort the Name column in alphabetic order.
-
Scroll to the row that has Orchestration Process in the Name column, then click that row.
-
In the row you just clicked, set the value.
Attribute
Value
Pause
Enabled
-
Click Next > Submit.
-
-
Monitor and finish the upload.
-
In the Export and Import Processes area, click the row that has My Configuration Package in the Name attribute, then click Actions > View Process Results.
-
On the Export and Import Process Results page, monitor the Status attribute at the top of the page until it changes to User Action Required. If necessary, click Refresh to periodically update the page. It might take a few minutes.
-
Click Done.
-
On the Manage Configuration Packages page, in the Export and Import Processes area, click Refresh (the circular arrow), click the row that has your configuration package, then click Actions > Resume.
-
On the Resume Import Setup Data page, click Next > Next > Submit.
-
On the Manage Configuration Packages page, in the Export and Import Processes area, click Refresh, click the row that has your configuration package, then notice the value in the Status column. Keep refreshing until it says Completed Successfully.
-
At the top of the page, click Refresh until the status at the top of the page says Completed Successfully.
-