Modify How Order Management Displays Attributes
Order Management comes predefined with hidden attributes that you can expose and display them in the Order Management work area. You can also modify the attribute's display name to meet your needs.
You can expose and modify attributes in various locations, such as in the sales order header or on the order line. You can then use the Order Management work area to display them. You use a sandbox to do the change, test it, publish it, then use the work area's runtime version to verify.
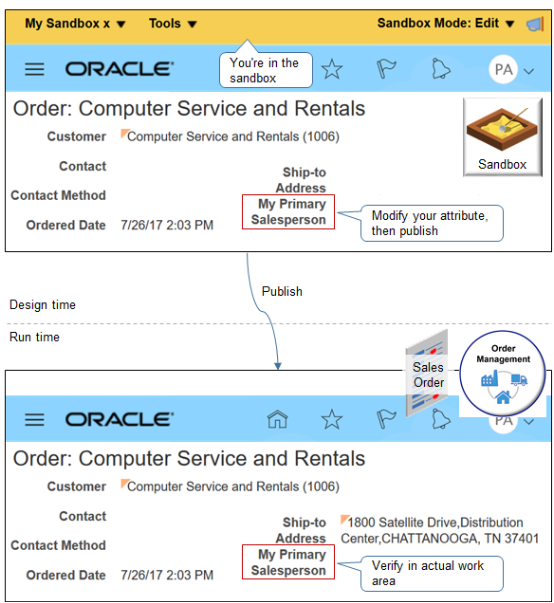
In this example, you create a sandbox named My Sandbox, expose the Primary Salesperson attribute, then modify the display name so it says My Primary Salesperson. For more details, including screen prints, see How To Display Primary Sales Person LOV on Order Entry Form Via Sandbox Page Customization. (Doc ID 2394038.1).
-
Create your sandbox.
-
On your home page, in the upper-right corner, click your login name.
-
In the Settings and Actions menu, click Edit Pages.
-
In the dialog that displays, click Activate Sandbox.
-
On the Sandbox page, click Create Sandbox. Create a new sandbox, activate it, then open it.
-
On the Create Sandbox page, on the Page Composer row:
-
In the Active column, add a check mark.
-
In the Support Context column, click the pencil, set the Category to Default, then click OK.
-
-
Enter a name, then click Create.
Attribute
Value
Name
My Sandbox
-
On the Sandbox page, in the My Sandbox row, click Enter Sandbox.
-
Make sure you're in the sandbox. Verify that a banner displays along the top of the page. The banner includes the name of your sandbox.
-
-
Open Page Composer:
-
Go to the Order Management work area, then click Tasks > Manage Orders.
-
On the Manage Orders page, search for, then open any sales order.
-
On the Order page, in the upper-right corner, click your login name.
-
Click Settings and Actions > Edit Pages.
The Order Management work area displays the Oracle Page Composer, which is a page editor that you can use to modify your work area's visual layout. You can tell you're in Page Composer because it displays a section across the top of the page. The section includes tabs, such as Add Content, Select, and Structure.
To modify an attribute in another work area, go to that work area, then go to the page in the work area that displays the attribute you must modify.
Get details about how to use Page Composer. Go to Configuring and Extending Applications, then search for Guidelines for Using Page Composer.
-
-
Expose the attribute.
-
Click Select.
-
Click in the lower portion of the order header, for example, below the Customer attribute, then click Edit Parent Component.
-
In the Component Properties dialog, click Children, then notice the list of attributes.
Each attribute that doesn't contain a check mark is hidden. You can add a check mark to unhide the attribute.
-
Add a check mark next to Primary Salesperson, then click Apply > OK.
-
-
Verify values in the sandbox.
-
Verify that the order header displays the Primary Salesperson attribute.
-
In the Order Lines area, click View > Columns, and notice you can display the attribute.
-
In the upper-right corner, click Close.
-
On the Order page, click Done.
-
Notice that you can now display the Primary Salesperson attribute on the Manage Orders page.
-
In the Search area, click Add Fields.
-
In the Search Results, click View, then click Columns, and notice you can display the Primary Salesperson attribute.
-
-
-
Modify the display name:
-
Navigate back to the order page.
-
On the order header, click Primary Salesperson > Edit Component.
-
In the Component Properties dialog, next to Label, click Edit > Override, then click OK.
-
On the order header, click Primary Salesperson > Edit Component.
-
In the Component Properties dialog, in the text window next to Label, enter
Mybefore the textPrimary Salesperson, then click OK. -
Verify that the order header now displays My Primary Salesperson.
-
-
Publish:
-
At the top-right corner, click My Sandbox > Publish.
-
On the Sandbox Detail page, click Publish.
-
In the dialog, click Continue to Publish.
You're longer in the sandbox. You're now back in Order Management.
-
Repeat the verification you did earlier in the sandbox, but this time use the Order Management work area outside of the sand box.
-
Use Line Numbers to Filter Large Sales Orders
You can use query by example to filter a large sales order according to a range of attributes, but you can't use it to filter according to the order line. Instead, you can use Page Composer to add the Order Line attribute, and then filter by line.
You can add the Order Line attribute to any of these tabs:
- Order Lines
- Shipment Details
- Payment and Billing Details
- Sales Credits
Assume you want to add the Order Line attribute on the Order Lines tab. Do the procedure described above in this topic, but with these differences:
- When you use the Component Properties dialog, add a check mark to the Order Line attribute.
- Skip the step where you modify the display name.
Modify an Attribute's Width
Assume your items have a really long number. In fact they're so long that you can't see the entire number when you enter it in the Select Item field on the Create Order page in the Order Management work area. Here's your fix:
- Open Page Composer, then open the Properties dialog of the Item Number field.
- Use the Style tab to increase the item's width to a higher value, such as 250px.
For details, see How to Customize a Field in Oracle Applications Using Page Composer (Doc ID 2115127.1).