Set Up User Roles and Privileges in Order Management
Set up user roles and privileges to manage the authentication and authorization that Order Management uses to secure Order Management processing, including web service usage.
Here's how Order Management implements security.
-
Uses authentication through a user name and password during sign in to allow each user to access the Order Management work area
-
Uses authorization through user roles and privileges to allow each user to do different tasks according to job outcome in the Order Management work area
This topic describes how to examine privileges and job roles that come predefined with Order Management, and how to add an Order Management user. For background details, see:
|
Book |
Details |
|---|---|
|
Job roles, privileges, duty roles, and how to set up security, including values that you set for each user. |
|
|
Job roles that come predefined with Order Management. |
The examples in this topic use predefined job roles. You must create your own job roles, depending on your security requirements.
Here are some example roles.
|
Role |
Description |
|---|---|
|
Pricing Administrator- All Business Units, which is QP_PRICING_ADMINISTRATOR_ALL_BUSINESS_UNITS_DATA |
Administers pricing. |
|
Product Manager, which is EGP_PRODUCT_MANAGER_JOB |
Sets up organizations and items so you can add items to your sales orders. |
Summary of the Set Up
-
Create users and assign job roles.
-
Create a job role.
-
Manage data access for users.
This topic uses example values. You might need different values, depending on your business requirements.
Create Users and Assign Job Roles
Create two users and assign job roles. One user can use administrative privileges. The other user can use only view privileges.
-
Make sure you have the privileges that you need to manage job roles.
If you don't sign in with these privileges, then various actions will be grayed out when you do the Create Implementation Users task, such as copying a job role, and you won't be able to add privileges to a job role.
-
Go to the Setup and Maintenance work area, then go to the task:
-
Offering: Order Management
-
Functional Area: Initial Users
-
Task: Create Implementation Users
-
-
On the User Accounts page, click Add User Account, enter values, then click Add Role.
Attribute
Value
First Name
Diane
Last Name
Cho
Email
diane.cho@yourComany.com -
In the Add Role Membership dialog, enter
Order Manager, then click Search. -
In the search results, click the row that contains the values.
Attribute
Value
Name
Order Manager
Code
ORA_DOO_ORDER_MANAGER_JOB
-
In the Confirmation dialog, click Add Role Membership > OK, then click Done
-
On the Add User Account page, add the user's passwords, then click Save and Close.
Each user can use these passwords the first time the user signs in. Instruct your users to change passwords immediately after sign in.
Create another user and assign a job role so the user can only view sales orders, but not create, update, or delete them.
-
Identify the role that provides only view access to sales orders.
-
Examine the roles, duties, privileges, and policies until you locate one that meets your needs. For this example, the Order Entry Specialist is the most likely role.
-
In the Order Entry Specialist section, scroll through the Privileges area until you locate the Item Inquiry granted role.
Granted Role
Description
Privilege
Item Inquiry
Queries and views items in the enterprise.
Manage Item Attachment
Item Inquiry
Queries and views items in the enterprise.
Manage Item Catalog
Item Inquiry
Queries and views items in the enterprise.
Manage Item Global Search
Item Inquiry
Queries and views items in the enterprise.
Manage Trading Partner Item Reference
Item Inquiry
Queries and views items in the enterprise.
View Item
Item Inquiry
Queries and views items in the enterprise.
View Item Organization Association
Item Inquiry
Queries and views items in the enterprise.
View Item Relationship
-
For this example, you must provide only read access, so you will use the View Item privilege.
-
On the User Accounts page, click Add User Account, set the values, then click Add Role.
Attribute
Value
First Name
Yu
Last Name
Li
Email
yu.li@yourComany.com -
In the Add Role Membership dialog, enter the role you located earlier in this procedure, Order Entry Specialist, then click Search.
-
In the search results, click the row that contains the values.
Attribute
Value
Name
Order Entry Specialist
Code
ORA_FOM_ORDER_ENTRY_SPECIALIST_JOB
-
In the Confirmation dialog, click Add Role Membership > OK, then click Done.
-
On the Add User Account page, add passwords for this user, then click Save and Close.
Create Job Role
As an option, you can create a job role to meet your business requirements. In this example, you create a job role that allows Yu to view sales orders but not edit them.
-
On the User Accounts page, click Roles.
-
On the Roles page, in the Search window, enter
Order Entry, then click Search. -
In the search results, in the row that contains these values, click Actions > Copy Role.
Attribute
Value
Name
Order Entry Specialist
Code
ORA_FOM_ORDER_ENTRY_SPECIALIST_JOB
Tip: Reduce your work load. Modify the copy of a predefined role rather than create a new one. -
In the Copy Options dialog, select Copy Top Role, then click Copy Role.
-
On the Basic Information page, enter values, then click Next.
Attribute
Value
Role Name
Order Entry Specialist View Only
Role Code
FOM_ORDER_ENTRY_SPECIALIST_JOB_VIEW_ONLY
Description
Search for and view sales orders, including sales order header, order lines, price details, and price totals. Don't allow user to create, update, or delete any part of the sales order.
-
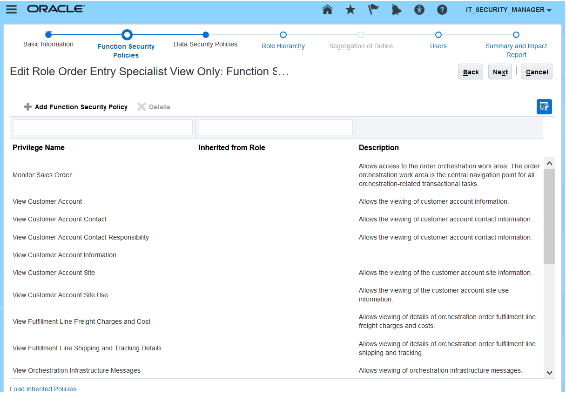
On the Function Security Policies page, delete all rows except rows that contain these privileges.
-
Monitor Sales Order
-
View Customer Account
-
View Customer Account Contact
-
View Customer Account Contact Responsibility
-
View Customer Account Information
-
View Customer Account Site
-
View Customer Account Site Use
-
View Fulfillment Line Freight Charges and Cost
-
View Fulfillment Line Shipping and Tracking Details
-
View Item
-
View Item Organization Association
-
View Item Relationship
-
View Orchestration Infrastructure Messages
-
View Orchestration Order Fulfillment Line Hold
-
View Orchestration Order Hold
-
View Orchestration Order Line Hold
-
View Orchestration Process Details
-
View Orchestration Process Hold
-
View Order Orchestration Request Messages
-
View Orders
-
View Planning Supply Availability
-
View Supply Availability Report
-
View Supply Chain Financial Orchestration System Options
-
View Supply Orders
For example:
Note
-
If you must add a privilege, then click Add Function Security Policy.
-
If you must add all privileges, for example you select to not copy a predefined role, then, in the Add Function Security Policy dialog, enter the first characters that are similar across a group of privileges, such as View Customer, click Search, then add each privilege from the search results.
-
-
On the Data Security Policies page, delete each row that includes these values.
Attribute
Values
Policy Name
-
Grant on Collaboration Document Header
-
Grant on Business Unit
To delete a row, click the down arrow in the row, then click Remove Data Security Policy.
-
-
Verify that the Data Security Policies page displays these policies.
Policy Name
Policy Description
Privilege
Grant on Trading Community Customer Account Site Use
Order entry specialist can view customer account site use.
Read, View Customer Account Site Use
Grant on Trading Community Relationship
Order entry specialist can view trading community relationship.
Read, View Trading Community Relationship
Grant on Trading Community Organization Party
Order entry specialist can view trading community organization.
Read, View Trading Community Organization
Grant on Application Reference Data Set
Order entry specialist can view customer account site use.
View Customer Account Site Use
Grant on Application Reference Data Set
Order entry specialist can view customer account site.
View Customer Account Site,
Grant on Trading Community Party
Order entry specialist can view trading community person.
Read, View Trading Community Person
Grant on Trading Community Customer Account
Order entry specialist can view customer account.
Read, View Customer Account
Grant on Application Reference Data Set
Order entry specialist can view customer account relationship.
View Customer Account Relationship
Grant on Trading Community Customer Account Site
Order entry specialist can view customer account site.
Read, View Customer Account Site
Specify the Create, Read, Update, and Delete Actions
Specify the actions that each policy allows. For example:
-
In the Policy Name column, in the row that contains this value, click Actions > Edit Data Security Policy.
Attribute
Value
Policy Name
Grant on Trading Community Customer Account Site Use
-
In the Edit Data Security Policy dialog, next to Actions, click the down arrow, then add or remove the check mark next to each of the actions you will allow or disallow the user to do.
For example, View Customer Account Site, Manage Customer Account Site, Read, Delete, Update, and so on. For this example, you're setting up a read-only view, so make sure only the view actions and read actions contain a check mark.
Specify Access According to a Group of Business Units
A business unit set as a group of business units that you can use for a specific setup. For example, assume you add business unit 1 and business unit 2 to business unit set x, and then attach
Payment Term NET30to set x. You can then use this payment term for business unit 1 and business unit 2.The Set Id identifies the business unit set. For details, go to Implementing Sales, then search for Overview of Multiple Business Units in Sales.
You can specify the actions that each policy allows according to Set Id. For example:
-
In the Policy Name column, in the row that contains this value, click Actions > Edit Data Security Policy.
Attribute
Value
Policy Name
Grant on Application Reference Data Set
-
In the Edit Data Security Policy dialog, next to Actions, click the down arrow, then notice you can specify a wide range of views and manage actions that the user can perform.
Specify Access According to Business Unit
You can specify the actions that each policy allows according to business unit. For example:
-
Click Create Data Security Policy.
-
In the Create Data Security Policy dialog, click Search.
-
In the Search Database Resources dialog, enter
Business Unit, click Search, wait for the results to display, then click OK. -
Set the values.
Attribute
Value
Policy Name
Grant on Business Unit
Data Set
Select by Instance Set
You can also use Select by Key to specify the business unit according to BU_ID.
Condition Name
Specify how to filter according to business unit. For most situation, select Access the Business Unit for Which the User is Explicitly Authorized.
Actions
Select the actions that you must allow the user to do for the business unit.
-
-
Click Next.
-
On the Role Hierarchy page, delete all role hierarchies except for these:
Role Name
Role Code
Item Inquiry
ora_egp_item_inquiry_duty
Item Inquiry
ora_egp_item_inquiry_duty_hcm
Item Inquiry
ora_egp_item_inquiry_duty_obi
Item Inquiry
ora_egp_item_inquiry_duty_crm
Manage Item Catalog
egp_manage_item_catalog_priv_obi
Print Order
fom_print_order_priv_obi
Use the Role Hierarchy page to specify other job roles that the job role you're creating can access. A role hierarchy is a hierarchy that specifies other job roles that a job role references.
For example, here's the predefined role hierarchy that the Order Entry Specialist job role uses.
Order Entry Specialist

          B2B Messaging Administration

                    Collaboration Messaging Manager

                    Collaboration Messaging Setup

                    SOA Infra Designer

          FSCM Load Interface Administration

          Item Inquiry

          Upload data for Source Sales Order Import
For details about the role hierarchy that each predefined job role uses, see the Security Reference for Order Management book.
-
Click Next.
-
On the Users page, click Add User.
-
In the Add User dialog, search for Yu Li, wait for the results to display, click Add User to Role > OK in the confirmation dialog, then click Cancel.
-
Click Next > Save and Close.
Manage Data Access for Users
Manage data access for Yu.
-
Go to the Setup and Maintenance work area, then go to the task:
-
Offering: Order Management
-
Functional Area: Initial Users
-
Task: Manage Data Access for Users
For details, see Implementing Common Features for Oracle SCM.
-
-
On the Manage Data Access for Users page, enter a value, then click Search.
Attribute
Value
User Name
yu.liYou must search according to dot notation, which is firstName.lastName.
The search results display the data access you set up for Yu, including for the Order Entry Specialist role where you added Yu as a user on the User Accounts page, and the other job roles you specified when you created the Order Entry Specialist View Only job role, and then assigned to Yu.
-
Click Authorize Data Access.
-
In the Opening SecurityDataAccessTemplate.xls dialog that displays, accept the Open With option, then click OK.
Microsoft Excel opens.
-
Edit in Microsoft Excel.
-
In Microsoft Excel, in the Connect dialog, click Yes.
-
On the Login page, sign in with the privileges that you need to manage IT security.
-
In the Authorize Data Access for Users template that displays, verify that the template includes the security contexts that Yu needs for view access.
Security Context
User Name
Role
Business unit
li.yu@yourComany.comOrder Entry Specialist
Data access set
li.yu@yourComany.comOrder Entry Specialist View Only
Asset book
li.yu@yourComany.comOrder Entry Specialist View Only
Business unit
li.yu@yourComany.comOrder Entry Specialist View Only
Control budget
li.yu@yourComany.comOrder Entry Specialist View Only
Cost organization
li.yu@yourComany.comOrder Entry Specialist View Only
Intercompany organization
li.yu@yourComany.comOrder Entry Specialist View Only
Ledger
li.yu@yourComany.comOrder Entry Specialist View Only
Manufacturing plant
li.yu@yourComany.comOrder Entry Specialist View Only
Inventory organization
li.yu@yourComany.comOrder Entry Specialist View Only
Project organization classification
li.yu@yourComany.comOrder Entry Specialist View Only
Reference data set
li.yu@yourComany.comOrder Entry Specialist View Only
-
In the Security Context Value column, in the first row that contains data, right-click the cell, then click
Invoke Action.Caution: Use this action instead of manually entering text. This action searches the Oracle database for the data access sets you can use. If you manually enter text, and if your text doesn't exactly match text that the database contains, then the upload will fail. -
In the Select Security Context Value dialog, set the value, then click Search.
Attribute
Value
Business Unit
Vision Operations
-
In the search results, click the row that includes Vision Operations, then click OK.
Notice that Excel adds Vision Operations to the cell you selected in the Security Context Value column.
-
Repeat the above steps for each of the other rows that contain data.
For example, for the row that contains Asset Book, set value Security Context to an asset book.
-
In the command ribbon that displays across the top of Excel, click Authorize Data Access for Users > Upload.
-
Wait for the upload to finish, then verify that the Status column displays
Successfully Uploaded for each row. -
Click Status Viewer, then verify that the Status View displays
No Error. -
Sign out.
-
-
Go back to Oracle Applications.
-
Go to the Scheduled Processes work area.
-
On the Scheduled Processes page, click Schedule New Process, then run the scheduled process.
Scheduled Process Name
Description
Synchronizes users, roles, and role grants with the definitions that exist in LDAP (Lightweight Directory Access Protocol ) that Order Management uses to determine who can access the Order Management work area.
Examine Role Usage in Your Implementation Project
Your implementation project specifies the roles that can do for each task in the project. You will examine how a predefined implementation project allows the Order Administrator role to manage source systems where you typically use web services to communicate data.
-
Go to the Setup and Maintenance work area.
-
On the Setup page, click Tasks, then click Manage Implementation Projects.
-
On the Manage Implementation Projects page, click Actions > Create.
-
On the Create Implementation Project page, click Next.
-
In the Order Management row, add a check mark in the Include column, then click Save and Open Project.
-
In the Task list, expand Order Management > Define Orders, then, in the Manage Upstream and Fulfillment Source Systems row, in the Authorized Roles column, click Details.
-
Notice that the Authorized Roles dialog includes the Order Administrator role.