Use Extensible Flexfields in Your Integration
Use these guidelines to help you set up an extensible flexfield when you integrate Order Management with another Oracle application.
Get Your Flexfield Archive
The flexfield archive is a zip file that contains an XML file that you download when you create your extensible flexfield. You use details from the flexfield archive when you set up the service mapping. You must get these details now.
Note
-
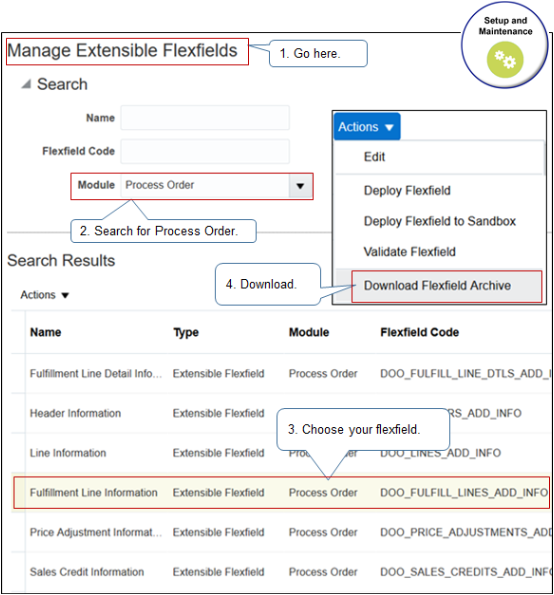
In the Setup and Maintenance work area, go to the task.
-
Offering: Order Management
-
Functional Area: Orders
-
Task: Manage Order Extensible Flexfields
-
-
On the Manage Order Extensible Flexfields page, in the Module attribute, search for Process Order.
-
Select your extensible flexfield.
-
Header Information
-
Fulfillment Line Information
-
Fulfillment Line Detail Information
-
-
Click Actions > Download Flexfield Archive.
-
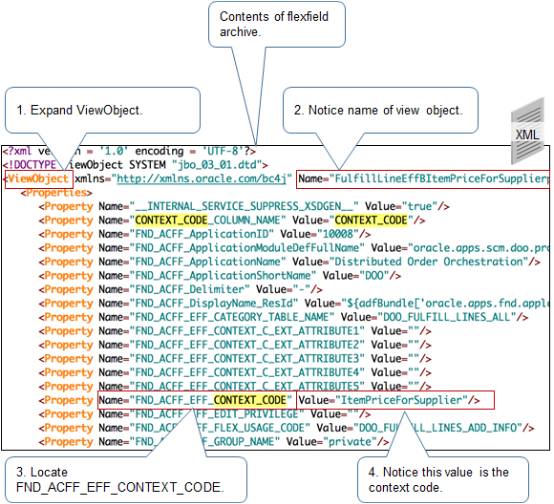
Open the zip file that you downloaded and navigate to oracle/apps/scm/doo/processOrder/flex/myObjectContextsB/view/myVO.xml.
where
-
myObject is the name of your object.
-
myVO is the name of your virtual object.
-
-
Open the XML, then copy the contents into a text file.
Have a look at an example that downloads a flexfield archive. For details, see Use Descriptive Flexfields to Integrate Order Management with Other Oracle Applications.
Examine Flexfield Archive
Note
-
Expand ViewObject.
-
Notice the value in the Name attribute of the view object. This is the name of the view object that you copy and paste into the View Object attribute of your service mapping.
The name in the screen capture above is truncated. The full name for this example is FulfillLineEffBItemPriceForSupplierprivateVO.
The name for the example earlier in this topic is HeaderEFFBComplianceDetailsprivateVO.
-
Under ViewObject, locate FND_ACFF_EFF_CONTEXT_CODE.
-
Notice the value of the context code. In this example, the value is ItemPriceForSupplier. You will use it later.
-
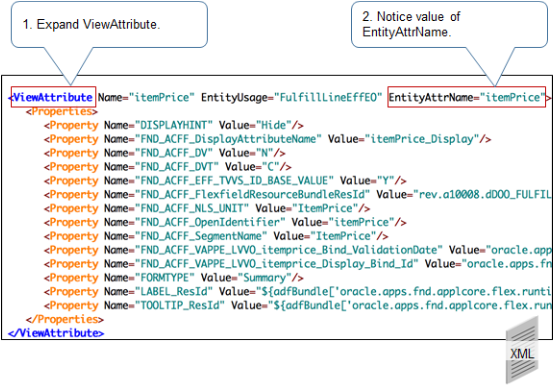
Expand ViewAttribute.
-
Notice the value of EntityAttrName. This is the name of the view object that you copy and paste into the attribute View Object Attribute of your service mapping. EntityAttrName for the example earlier in this topic would equal
_complianceInfo.
Specify Entity
Note
-
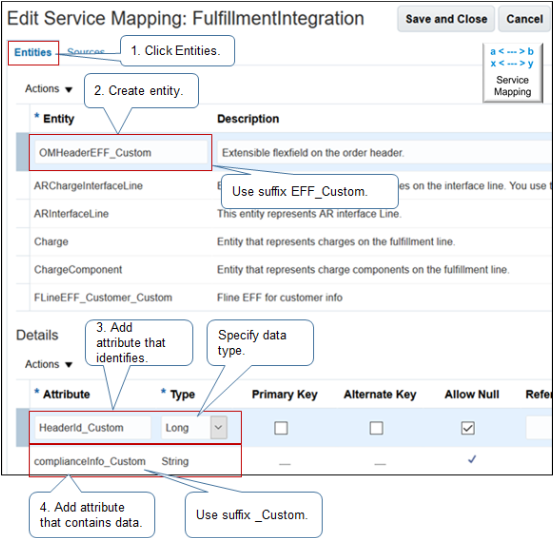
Navigate back to your service mapping, then click Entities.
-
Create one entity for each extensible flexfield context.
You must use the EFF_Custom suffix for entity name. For example, OMHeaderEFF_Custom. If you don't use this suffix, then your service mapping will fail.
-
Add an attribute that identifies the entity. In this example, HeaderId identifies the sales order header.
-
Add an attribute that contains data.
Note
-
Specify the data type. If you don't specify the correct data type for the attribute, then your service mapping will fail.
This example uses the Long data type for the HeaderId attribute because identifiers are typically a Long numeric value. It uses String for the
complianceInfoattribute because, in this example,complianceInfocontains text. -
Use the _Custom suffix for attributes.
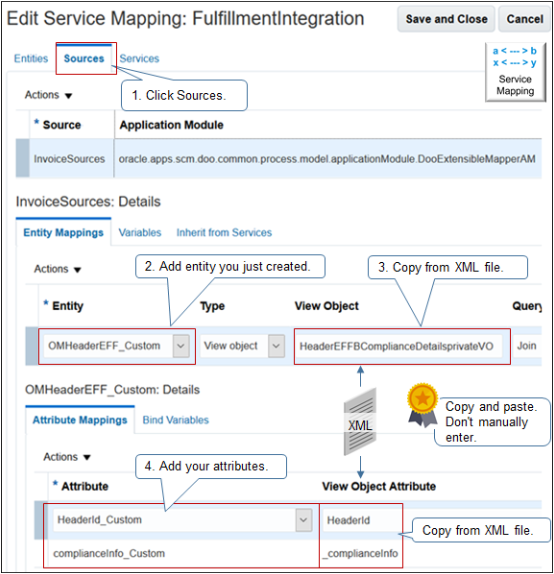
Specify Source
Note
-
Click Sources.
-
On the Entity Mappings tab, add your new entity, such as OMHeaderEFF_Custom.
-
Specify the view object.
-
Locate the view object name in the XML of the flexfield archive, copy it, then paste it into the View Object attribute. In this example, the view object name is HeaderEFFBComplianceDetailsprivateVO.
-
The values must match exactly, or your service mapping will fail. To avoid problems, use copy and paste. Don't manually enter it.
-
Add your attributes.
For each attribute you add, locate the view object attribute in the XML, copy it, and paste it into the attribute View Object Attribute. In this example, notice that the
_complianceInfoview object attribute begins with an underscore because the XML also contains an underscore.
-
Add Entity
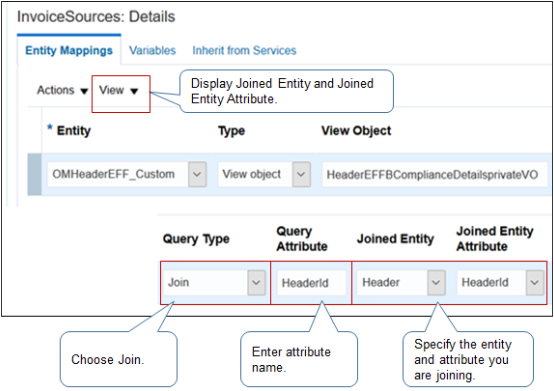
Here's some tips when you add the entity.
-
Before you add the entity, click View > Joined Entity > Joined Entity Attribute.
-
Set the values.
Attribute
Value
Query Type
Select Join.
Query Attribute
Enter the name of your attribute, such as HeaderId.
Joined Entity
Specify the entity you're joining, such as Header.
Joined Entity Attribute
Specify the attribute in the entity you're joining, such as HeaderId.
- Integrate Order Management with Accounts Receivable
- Use a Service Mapping to Integrate Order Management with Other Oracle Applications
- Use Descriptive Flexfields to Integrate Order Management with Other Oracle Applications
- Overview of Integrating Order Management with Other Oracle Applications
- Create a Sandbox So You Can Edit Service Mappings