Configure Approval Rules
Rule set and rules control how a workflow task is routed based on specific conditions. For example, a rule can say that change orders with high priority can be routed to a specific approval group.
A workflow task in BPM Worklist has a rule set, and a rule set can have one or more rules. If the rule set has multiple rules, all the rules are evaluated at the same time. The rule has two parts: an If section that has the conditions, and a Then section that has the actions to take when the conditions are met.
- Don’t delete any predefined rule sets.
- If you plan to configure rules for changes and new item requests, it's recommended that you limit the number of item classes to 300.
Here's how you can configure the rules in a predefined header rule set:
-
In the Setup and Maintenance work area, go to the Manage Task Configurations for Supply Chain Management task.
-
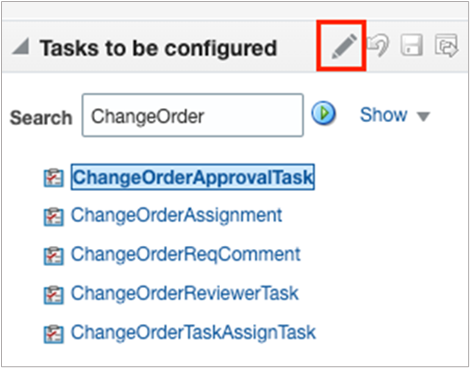
In BPM Worklist, on the Task Configuration tab, search for the workflow task in the Tasks to be configured pane. Depending on the object you want to configure, search for ChangeOrder or NewItemRequest. Select ChangeOrderApprovalTask or NewItemRequestApprovalTask.
-
Select the task from the search results and click the Edit task icon in the toolbar.
Here's a screenshot of the Edit task icon for the change order approval task.
 Note: You may see a message saying that flexfields have been modified. Click the Start Synchronization button to get the latest set of flexfields that you can use for the rules in this task.
 -
Click the Assignees subtab.
-
Click the Go to rule icon (that's the blue diamond icon) on the participant box you want to work on, and select Go to rule.
-
To configure the rule, select the rule displayed in the Rules pane for ChangeOrgerHeaderStageRuleSet.
-
Click the View Properties link that's beside the rule set name to see the Effective Date setting and the Active checkbox. The rule set needs to be effective and active to apply when people create workflow tasks. It's a good idea to leave the effective date set to Always.
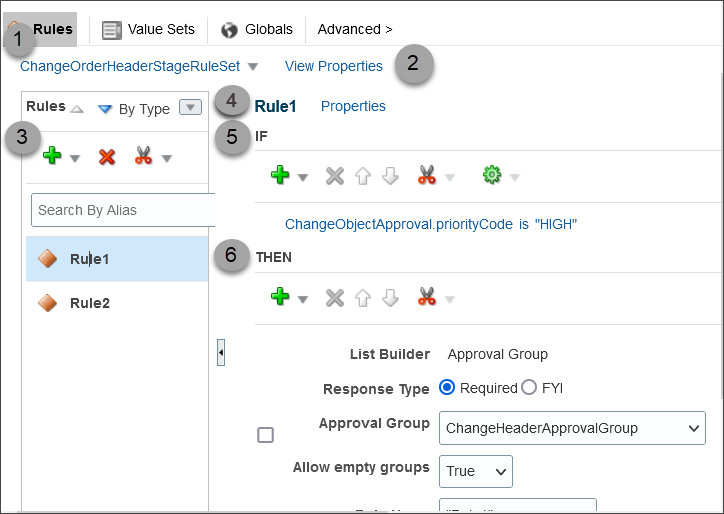
Here's a screenshot to help you understand what you see in the Rules subtab on the Assignees tab:
|
Callout Number |
What It Is |
|---|---|
|
1 |
The rule set drop-down list. Note that only ChangeOrderHeaderStageRuleSet is supported for change orders. |
|
2 |
The View Properties link that allows you to configure the effective date. It's a good idea to leave the effective date set to Always. |
|
3 |
The Rules pane that lists the rules within the ChangeOrderHeaderStageRuleSet and includes a toolbar for adding or deleting rules. |
|
4 |
The name of the rule. Can be modified by clicking the Properties link that's next to the rule. |
| 5 | The If section of the rule, where the conditions are defined and there’s a toolbar for working on those conditions. |
| 6 | The Then section of the rule, which defines what happens when the conditions are met. There’s also a toolbar specific to this section. |
Configure the If Section in Rules
In the If section of the rule, define conditions for the rule. Each line in this section is called a test.
- For existing conditions, select the rule that you want to edit. To add a new rule, click the Advanced Add or Modify Options icon and select simple test.
-
Click the Left Value icon to select an attribute in the Condition Browser dialog box. Click OK.
-
Select an operator. For example: is.
-
Click the Right Value icon to select something from the Condition Browser dialog box, or enter a value in the corresponding field. Click OK.
-
If you’re not working on the last line, you can click the and or or link at the end of the line to toggle between the two.
Caution: If the attribute you're evaluating in the condition is optional, users might not have entered a value for that attribute in the UI. For your rule to work properly, it's highly recommended that you first have a line in the condition that checks if the attribute isn't blank. So that means you select the attribute, select isn't as the operator, and enter null. Then add another line with the condition that you're evaluating the attribute for, and make sure you have an and between the two lines.
Configure the Then Section in Rules
In the Then section of the rule, define what happens when the conditions in the If section are met.
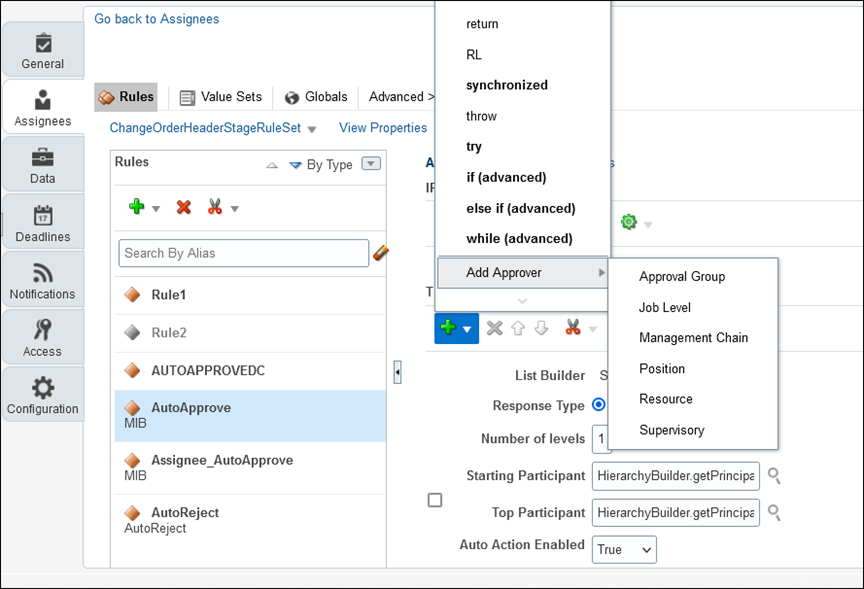
Here's how you configure the change assignee as auto approver using the Supervisory list builder.
- Click Insert Action(plus) icon > Add
Approver > Supervisory:The table shows the values you must enter in the Then statement when you want the change assignee as auto approver of the task.
Field Value List Builder Supervisory Response Type Required Number of levels 1 Starting Participant The user who's considered as auto approver. To configure the change assignee as auto approver, enter:
HierarchyBuilder.getPrincipal(Task.payload.COAssignee,-1,"","")
Top Participant The last participant in the approval. Approval does not go beyond this participant in a hierarchy. Enter:
HierarchyBuilder.getPrincipal("workflowsystem",-1, "","")
Auto Action Enabled True Auto Action APPROVE Rule Name "AutoApprove" Here's an image that shows how you add an approver.
Test and Apply Your Rule Set
- Click the Validate button in the Assignees tab to see if there’s anything wrong with the rules that needs to be fixed. Results appear in the Business Rule Validation – Log subtab after the Rules subtab.
- In the Tasks to be configured toolbar, click the Commit task icon when you're ready to roll out your changes.