Use Spreadsheets to Manage Pricing
Use a Microsoft Excel workbook to modify your setup in Oracle Pricing.
Summary of the Steps
-
Install the ADF Desktop Integration.
-
Download your workbook.
-
Search and download your data.
-
Modify and upload your data.
-
End your session.
Install the ADF Desktop Integration
-
Close all instances of Microsoft Excel on your local computer.
-
Sign into Oracle Pricing with administrative privileges.
-
Go to the Home page, then under Tools, click Download Desktop Integration.
-
In the status bar at the bottom of your browser, allow the download, then wait for the adfdi-excel-addin-installer.exe file to finish downloading. ADFDI means Application Development Framework Desktop Integration.
-
Open adfdi-excel-addin-installer.exe on your local computer.
-
In the ADF Desktop Integration Installer dialog, click Developer Options.
-
In the Developer Options dialog, click Enabled, click Install, wait for the installation to finish, then click Close.
-
Open the Control Panel on your local computer, click Programs and Features, then verify the list that displays includes your new installation.
For example, make sure it displays
Oracle ADF 11g Desktop Integration Add-In for Excel. -
Open Excel, then, in
Microsoft Office Customization Installer, click Install. -
Click File > Add-Ins, then verify that the Add-Ins submenu contains ADF Desktop Integration.
In some Excel versions, you might need to enable the add-in. For details about installing add-ins, see the documentation for Microsoft Excel at https://www.microsoft.com.
-
Close Excel.
Download Your Workbook
-
Go to the Pricing Administration work area.
-
Navigate to one of these pages, depending on the data you must download.
-
Manage Price Lists
-
Manage Discount Lists
-
Manage Customer Pricing Profiles
For this example, navigate to Manage Price Lists.
-
-
Click Actions > Download Spreadsheet to Maintain Price List Data.
-
In the Opening ManagePriceLists.xlsx dialog, set Open With to Microsoft Excel, then click OK.
-
In Excel, in the Connect dialog, click Yes.
Use this dialog to connect to the server that hosts your Oracle application.
-
In the Login dialog, enter your user name and password, then click Sign In.
Use the same user name and password that you use when you sign into Oracle Pricing with administrative privileges.
Your workbook opens.
Note
-
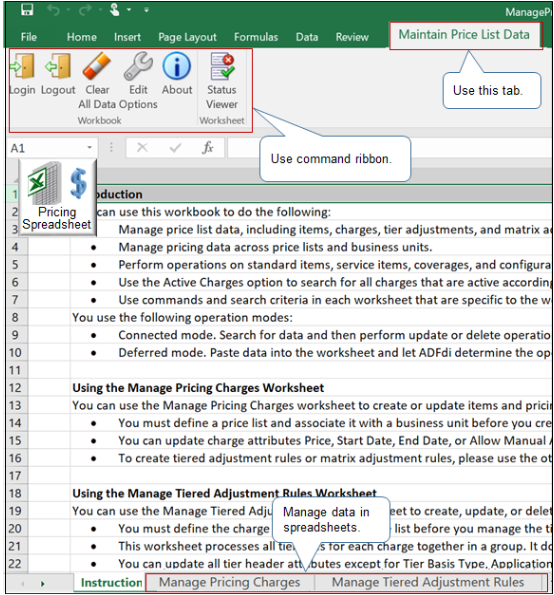
Use the Maintain Price List Data tab.
-
Use the command ribbon that ADF Desktop Integration installed, such as
LoginandLogout, to interact with the server. -
Use worksheets to manage your data, such as Manage Pricing Charges.
-
Download the workbook only one time.
-
Search and Download Your Data
Assume you're introducing a new line of computer products that use the AS prefix, and you must discontinue the old AS line. You will set the End Date for all AS items.
-
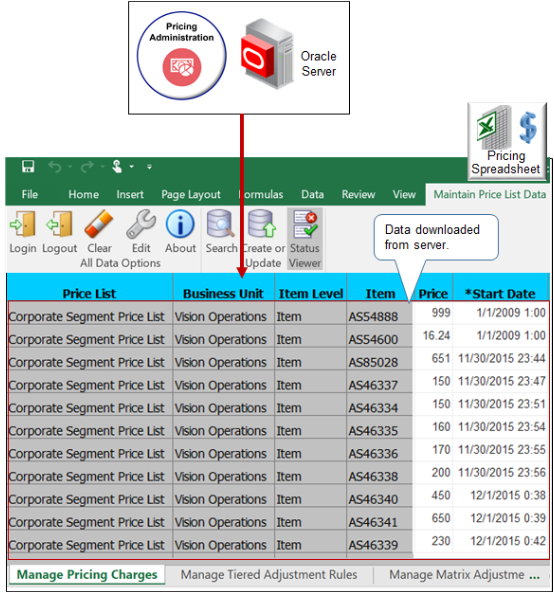
Click the Manage Pricing Charges tab, then wait a moment for the worksheet to display column headings.
-
It might take a few seconds for the worksheet to display column headings the first time you open a spreadsheet, depending on network speed and other factors.
-
Each column in the spreadsheet displays an attribute. These are the same attributes you can access on the Manage Price Lists page in the Pricing Administration work area.
-
-
In the ribbon, click Search.
-
In the Search Pricing Charges dialog, set the values, click OK, then wait for the spreadsheet to download and display your items.
Attribute
Value
Price List
Corporate Segment Price List
Business Unit
Vision Operations
Item
AS
Note
-
You must include a value in at least one of the attributes that the dialog displays with a double asterisk (**).
-
To improve performance, search for, filter, and download only the data you need for the subsequent action. For example, specify the Price List, Business Unit, and the beginning characters of the Item, instead of only the Business Unit.
-
-
Wait for the spreadsheet to download data from the server.
The spreadsheet downloads data that meets your search criteria.
Modify and Upload Your Data
-
Change the value in the End Date column to the current date, such as 12/12/2017 9:00:00 AM, for all rows.
You can copy and paste values just like you do in any Excel spreadsheet.
-
In the ribbon, click Create or Update.
-
Verify your upload.
-
In the Pricing Administration work area, on the Manage Price Lists page, search for Corporate Segment Price List.
-
In the search results, click Corporate Segment Price List.
-
On the Edit Price List page, in the Search area, search for the value.
Attribute
Value
Item
AS
-
In the Search Results, click the first row, and then in the Dates area, verify that the End Date contains the date you set in the spreadsheet, such as 12/12/2017 9:00:00 AM.
The hour might display a different value, depending on the time zone that the server uses.
For example, the Pacific time zone is one hour behind the Mountain time zone. If your local computer is in the Pacific time zone, and if you set the date to 12/12/2017 9:00:00 AM in the spreadsheet, and if the server uses the Mountain time zone, then the server might display 12/12/2017 10:00:00 AM in the Pricing Administration work area.
-
End Your Session
-
In Excel, click Clear All Data.
-
Click File > Close.
-
In the Microsoft Excel dialog that displays the text
Want to save changes?, click Don't Save. -
To start another session, in Excel, click File > Open, then click ManagePriceLists.xlsx.