Set Up an Integration Algorithm
Apply guidelines when you use an integration algorithm to integrate Order Management with another Oracle application.
Create Algorithm
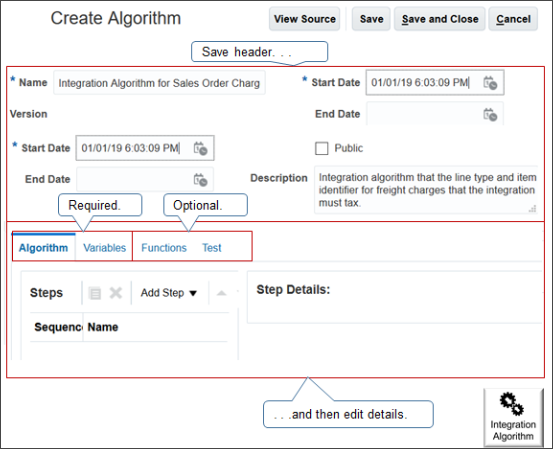
Note
-
When you create the algorithm, save the header before you work on details.
-
You must set up the algorithm and variables.
-
Functions are optional.
-
Test is a design time test. It isn't a run time test. It's optional, but we recommend it.
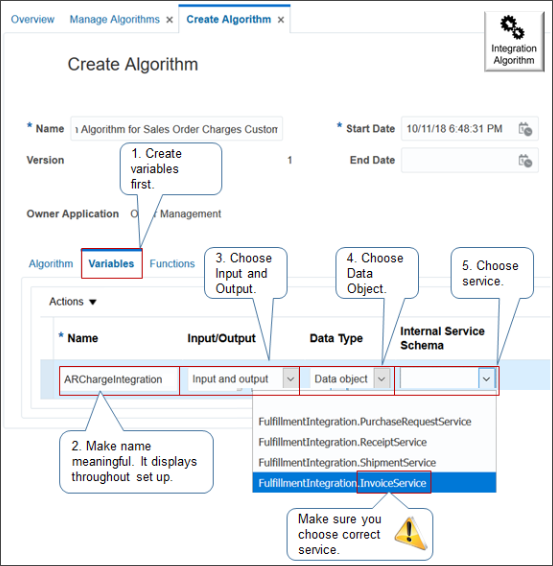
Use Variables
Note
-
Create and save the header first, and then set up the variables. Don't define the algorithm yet because you use variables in the algorithm. You must set up the variables first.
-
Click Variables.
-
Set attributes.
Attribute
Value
Name
Enter a meaningful name because the value you enter will display throughout the set up.
Input/Output
Select Input and Output.
Data Type
Select Data Object.
Internal Service Schema
Use FulfillmentIntegration.YourService
where
-
YourService specifies the service that your integration requires.
This example uses FulfillmentIntegration.InvoiceService
Caution:Its important to select the correct service. If you select the wrong service, the integration will fail.
-
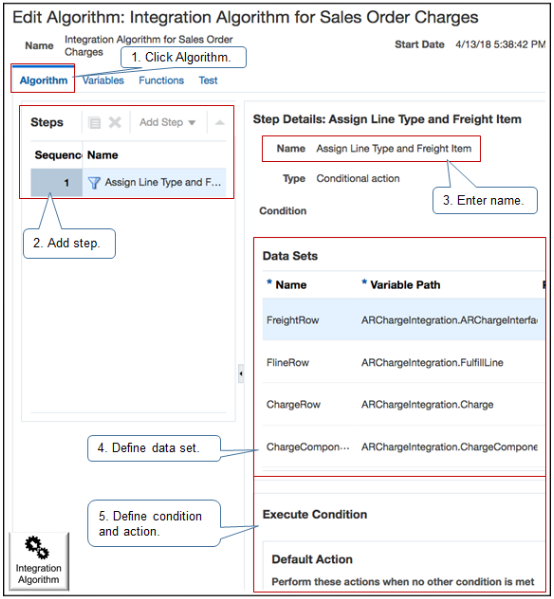
Add Step
Note
-
Click Algorithm.
-
Add steps. At run time, the algorithm runs the steps sequentially.
-
Enter a name.
-
Set up the data set that determines which records to process in this step.
-
Set up the condition and action that determines how to process records.
Create Data Set
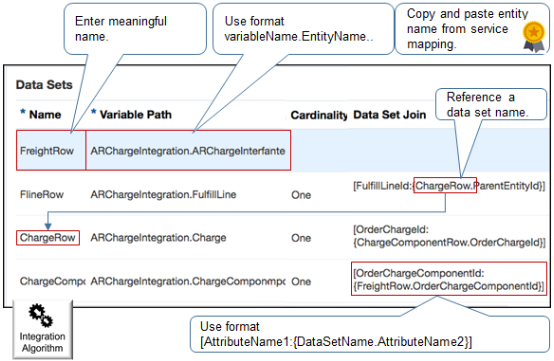
Specify the attributes.
|
Attribute |
Description |
|---|---|
|
Name |
Enter a meaningful name. Algorithm logic will reference it. |
|
Variable Path |
Use the VariableName.entity format. where
|
|
Cardinality |
For descriptive flexfield, you typically select Zero or One. If you join many order lines to one order header, then select Many. |
|
Data Set Join |
Use format where
|
Specify Condition and Action
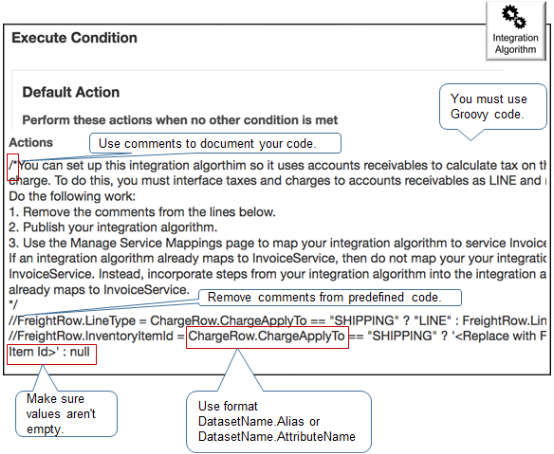
Note
-
The algorithm runs the default action when algorithm logic doesn't meet any other conditions.
-
This predefined action interfaces freight charges as a separate line item on the invoice.
-
Predefined code is commented. Remove comments to enable the action.
-
Write your code in Groovy script.
-
Use comments to document your code.
-
Make sure the variable isn't empty before you use it as the source for a value. In particular, make sure your extensible flexfield contains a value. If it doesn't contain a value, then you can't get a value from it, and your algorithm might fail.
-
Use format
DatasetName.Alias.where
-
DatasetName. Name of the data set that you defined in the integration algorithm. -
Alias. Alias or attribute name that you defined in your service mapping.For example,
ChargeRow.ChargeApplyTo.
-
For details, including the exact content of the Actions that this example uses, see Overview of Integrating Order Management with Accounts Receivable.
Specify Attributes Between Service Mapping and Integration Algorithm
Note
-
You must make sure the attribute names that you use in the service mapping and the attribute names that you use in the integration algorithm match each other exactly.
-
If you specify an alias in the service mapping, then also use this alias in the integration algorithm.
-
If you don't specify an alias, then use the attribute name that the integration algorithm uses.
-
Make sure the attribute names use the same upper case and lower case.
For example:
|
Setup |
Correct |
Not Correct |
|---|---|---|
|
You set up an attribute named TotalSale_Custom in the Sources tab of the service mapping, and you don't define an alias in the Services tab of the service mapping. |
This example code won't cause an error.
|
This example code will cause an error.
|
|
You set up TotalSale_Custom in the Sources tab of the service mapping, and you set up an alias as TotalSale in the Services tab. |
This example code won't cause an error.
|
This example code will cause an error.
|
Here's a message that's an example of the type of error you might encounter at run time. In this example, the Sources tab of the service mapping includes the totalSale_Custom attribute, but code in the integration algorithm uses TotalSale_Custom.
01.03:llLine><PurchaseRequestService:FulfillLineId>300000002330472</PurchaseRequestService:FulfillLineId><PurchaseRequestService:HeaderId>300000002330464</PurchaseRequestService:HeaderId>
</PurchaseRequestService:FulfillLine> <PurchaseRequestService:ChangeSummary
xmlns:sdo="commonj.sdo"/></PurchaseRequestService:PurchaseRequestServiceType>'-oracle.apps.scm.pricing.priceExecution.algorithms.publicQuery.exception.SetQueryException:
Step 'Step 1' not executed properly. Failed to execute onEach Closure.
DataObject com.oracle.xmlns.apps.scm.pricing.priceexecution.servicemappings.publicmappings.purchaserequestservicetype.HeaderEff_CustomTypeImpl@228c3b84
does not have property 'TotalSale_Custom' defined in the schema. Can
not get value from the property. null Payload: VariableName:'PRCIntegration'DateType:'commonj.sdo.DataObject'
IOType:'InOut' value:'<?xml version="1.0"encoding="UTF-8"?> <PurchaseRequestService:PurchaseRequestServiceType
xmlns:PurchaseRequestService
-
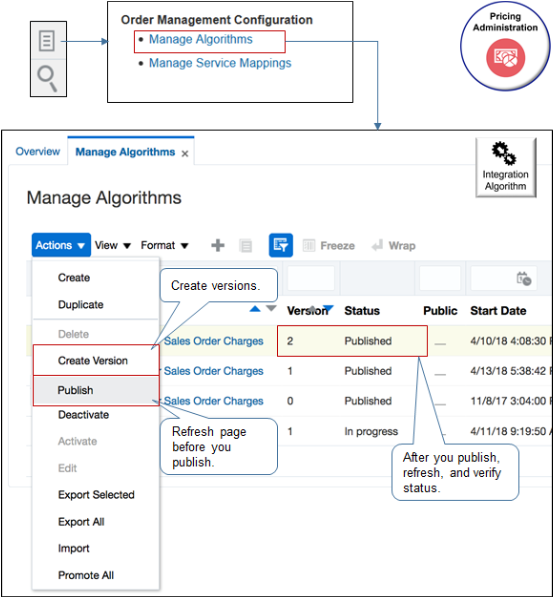
Go to the Pricing Administration work area.
-
Click Tasks, then under Order Management Configuration, click Manage Service Mappings.
-
On the Manage Service Mappings page, click FulfillmentIntegration.
-
On the Edit Service Mapping page, in the Entity list, click the line that has the value.
Attribute
Value
Entity
PurchaseRequestLine
-
In the Details list, click View > Columns, then add a check mark to Description.
Examine the description for the attribute you want to map.
If the Description Says
Then
This attribute is available
with the create and with the update operation
You can use PurchaseRequestService to update the attribute.
This attribute is available
only with the create operation
You can't use PurchaseRequestService to update the attribute.
Publish and Test
Publish your algorithm.
Note
-
. Go to the Pricing Administration work area.
- Click Tasks, then under Order Management Configuration, click Manage Algorithms.
-
Create different versions so you can test different set ups while maintaining a working copy.
-
You must publish your algorithm.
-
Before you publish, refresh the page: save, close the page, open the page, and requery algorithms.
-
After you publish, refresh, and verify that the status is Published.
-
You can't edit a published algorithm. You must create a new version instead, or deactivate, and then activate.
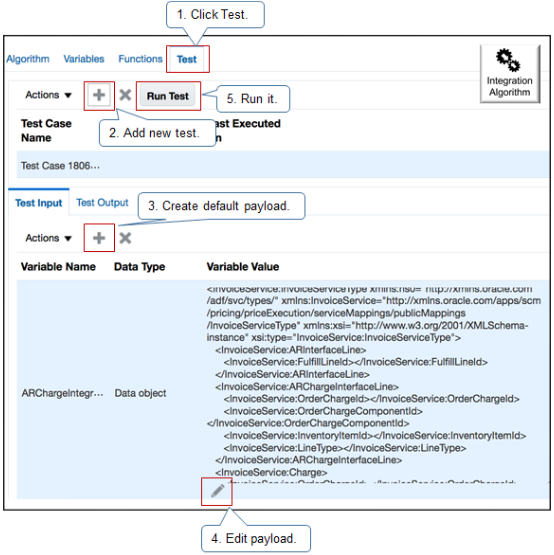
Test your algorithm.
Note
-
Click Test to run a design time test.
-
Add a new test.
-
Create a default payload. The test creates a default payload according to the structure you set up in the integration algorithm.
-
Edit the payload so it meets your requirements. For example, add values for important attributes that you know your fulfillment system expects.
-
Click Run Test.
-
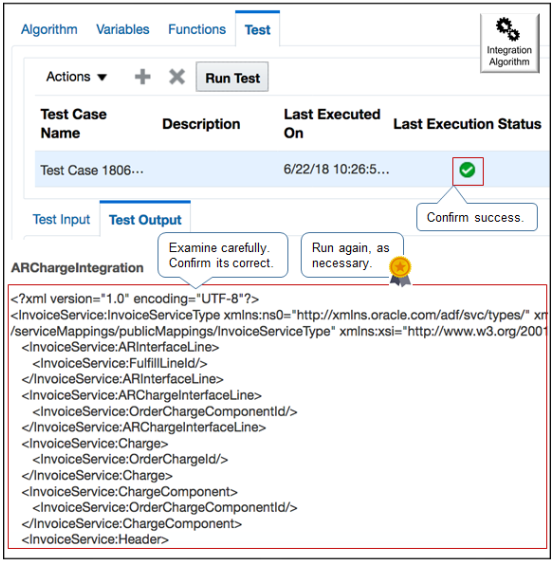
Examine the results.
Note
-
Notice value of Last Execution Status. Green check mark means success.
-
Examine test output carefully. Make sure output not only exists, but that it contains values you expect from your integration. For example, if you logic concatenates an item description, then make sure the test displays concatenated values that you expect.
-
If you modify logic or a data set, then delete your test data, recreate test data, and run test again.
-
You must submit your test sales orders from the same sandbox that you use for your service mapping. An integration algorithm doesn't require a sandbox but a service mapping does.
-
Test the business unit that you use to submit the sales order.
-
Verify attribute values throughout the sales order lifecycle, including before you submit it and in fulfillment views up through the point where the sales order is closed.
-
- Integrate Order Management with Accounts Receivable
- Use a Service Mapping to Integrate Order Management with Other Oracle Applications
- Use Descriptive Flexfields to Integrate Order Management with Oracle Applications
- Overview of Integrating Order Management with Other Oracle Applications
- Create a Sandbox So You Can Edit Service Mappings