Configure New Item Request Workflow
In this example, you're an administrator configuring the new item request workflow. The approval criteria is based on the attributes (or extensible flexfields) configured for the new item, and the criteria is configured using BPM worklist.
You can also use this topic as a reference to troubleshoot configuration errors. You must go through each subtopic to ensure that the configuration is complete and also review the privileges assigned to your role.
Prerequisite
As a prerequisite for this example:
-
Create an item class named Radios in the root item class.
To create an item class, use the Manage Item Classes task in the Product Management offering. See the related links for more information.
For the new item request type, ensure that you set the assignment method to Rules Based for Approval (in Activity Type).
To configure the assignment method, use the Manage New Item Request Type Details task in the Product Management offering. See the related links for more information.
Here's an image that shows the assignment method set to Rules Based.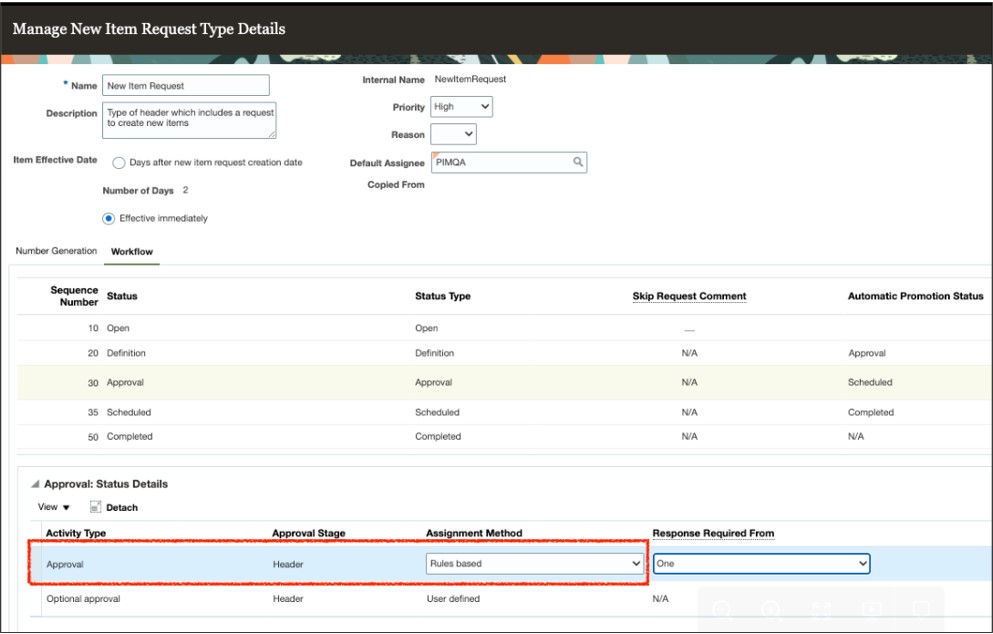
-
Create an approval group by using BPM Worklist.
Summary for New item request Workflow Configuration
-
Create an attribute group that includes attributes and associate it with the item class.
-
Configure the item class: Enable the item class for new item request.
-
Create a new item request approval rule that includes an approval criteria based on attributes.
How You Create an Attribute Group
Here's how you create an attribute group named Region, add an attribute named Country, and add a country in the list of countries.
-
In the Setup and Maintenance work area, select the following:
Offering: Product Management
Functional Area: Items
In the Show list, select All Tasks.
Task: Manage Item Attribute Groups and Attributes
-
Here's how you create a single row attribute group named Region:
-
On the Manage Attribute Groups page, click Create.
-
Enter the display name of the attribute group as Region. Note down the API name because this will be required later during the configuration.
-
Behavior: Select Single Row so that users can only set it once.
-
Click Save.
-
-
In Context Usages, you must set up at least one context:
-
Click Create.
-
Name: Select Item and click Save.
-
-
Attributes: Here's how you create an attribute named Country to include a list of countries.
-
Click Create. Enter the following values:
Name: Country
Internal Name: Country
API Name: country (this will be used later in the BPM configuration)
Data Type: Character
Display As: List of values
-
Click Create Value Set. Enter the following values:
Value Set code: Countries List
Module: Product Development
Validation Type: Independent
Value Data Type: Character
Value Subtype: Text
Maximum Length: 30
-
Click Save.
-
To add specific countries in the list, click Manage Values.
-
In the Manage Values dialog box, click Create.
Enter India.
Repeat this step to add other countries to the list.
Click Save and Close.
-
Configure the Item Class
Here's how you configure the item class named Radios (mentioned in the Prerequisite section).
-
In the Setup and Maintenance work area, select the following:
Offering: Product Management
Functional Area: Items
Task: Manage Item Classes
-
Search for the item class named Radios and click Edit. Note down the internal name. For example: RADIOS.
-
Enable the item class for new item request:
-
In the Edit Item Class page, click Item Management.
-
Select Enable New Item Request and click Save.
-
-
Configure the definition workflow. For more information, see the related links.
-
To assign an attribute group to the item class, click Pages and Attributes Groups.
-
In the Attribute Groups subtab, click Select and Add.
Search for the attribute group named Region that you created in a previous step and add that attribute group.
-
Click OK and click Save.
-
-
To assign the attribute group to a specific page, in Pages and Attributes Groups, click the Pages subtab.
-
In this example, select Product Development to add an attribute group to the Product Development page. Note that you must select the page based on your business requirement.
-
In Attribute Groups, click Select and Add.
-
Search for and add the attribute group named Region that you created in a previous step.
-
Click OK, and click Save and Close.
-
-
You must deploy the attribute group assigned to the item class. Here's how:
-
In the Setup and Maintenance work area, go to the following:
Offering: Product Management
Functional Area: Items
In the Show list, select All Tasks.
Task: Deploy Item Extensible Flexfields
-
In the Deploy Item Extensible flexfields page, search for "item" and select Item Extended Attributes.
-
Click Deploy Flexfield.
-
-
You must ensure that attributes appear as part of the item class in Product Development work area. Here's how:
-
Navigate to the Product Development work area.
-
Create an item in the Radios item class.
The attribute group named Region and the attribute named Country must appear in the General Information page of the item.
-
Create a Rule for New Item Request Approval
Here's how you create a rule using BPM Worklist to manage the approval workflow in a new item request.
-
In the Setup and Maintenance work area, go to the following:
-
Offering: Product Management
-
Functional Area: New Item Requests
-
Task: Manage Task Configurations for Supply Chain Management
-
-
Select NewItemRequestApprovalTask.
-
To make changes to the approval task, click Edit task.
If you receive a message prompting you to start synchronization, click Start Synchronization and wait for the synchronization to complete.
-
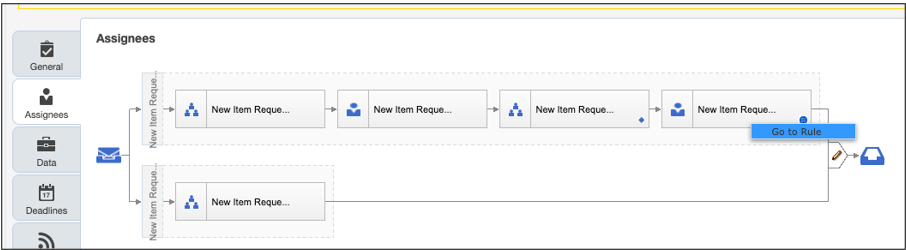
Click the Assignees tab. The New Item Request workflow appears.Note: Don’t delete any predefined rule sets available in BPM Worklist.
In New Item Request Header Rule Based Single Approver, click the diamond icon (within the workflow diagram) and click Go to rule.
-
To create a new rule, click Add Rule (plus icon), ), select General Rule.
-
Click Properties to enter a rule name. For example, India.
Expand the rule and enter its details.
-
Here's how you set up the IF condition based on an item class and an attribute you created in previous steps.
- Click Add, in drop-down list, select simple test.
- To set up condition based on an item class, enter Item followed by a dot.
The attributes and properties configured for Item appear in a list. Select the attribute based on which you want to create the rule.
Or
You can also use the condition browser so that you get a better view of attributes that you can use. Here's how:
- Click the Search icon. Enter Item in the Condition Browser dialog box.
Attributes appear in a node created by the application. It's recommended to expand each node to find and select the attribute you want to use.
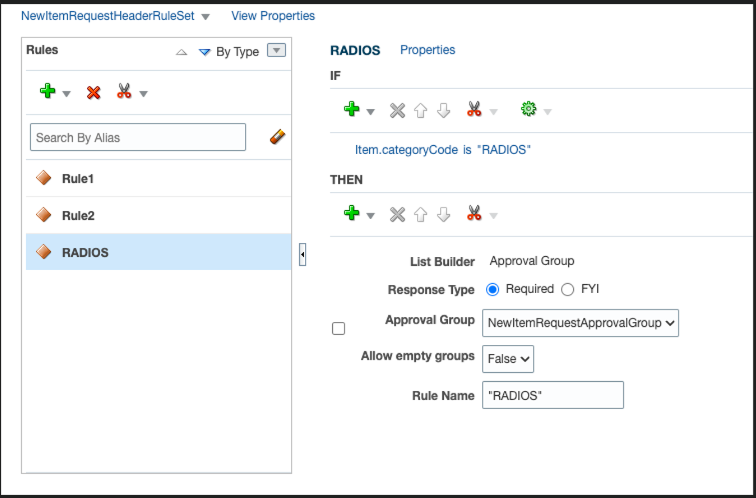
In this example, Item and CategoryCode are the nodes.
- To create a rule based on Item Class is Radios, select Item > Category Code and click OK.
- The expression Item.categoryCode is inserted in the IF condition.
- Let's say you want to route the approval of items category is Radios to a
group.
In the expression builder, select "is" as the operator and enter "RADIOS".
-
To set up condition based on the attribute group, refer to the topic on rule syntax with examples.
-
Here's how you set up the THEN condition:
-
Click Add >Add Approver > Approval Group.
Response Type: Required
Approval Group: Select an approval group for the new item request
Allow empty group: False
-
Click Validate and click the Save icon.
-
To activate the rule, click the Commit task icon.
Here's an image of a rule create to manage new item requests.
-
Rule Syntax with Examples
Here's what you need to keep in mind while writing approval rules:
If you're associating an attribute group to a non-root item class, and the item class and attribute group both have an internal name (API name) defined, use this syntax:
[<Attribute Group Name API>].[<Internal Attribute Name>]Example: Consider that the item class is Radio and country is India. The Approval Group is Technology Team. The rule is written as follows:
Item.categoryCode is "RADIOS" and
Region.country is "India"
THEN
Approval Group: TechTeam
Here's an image that shows the rule added fore new item request in BPM Worklist.
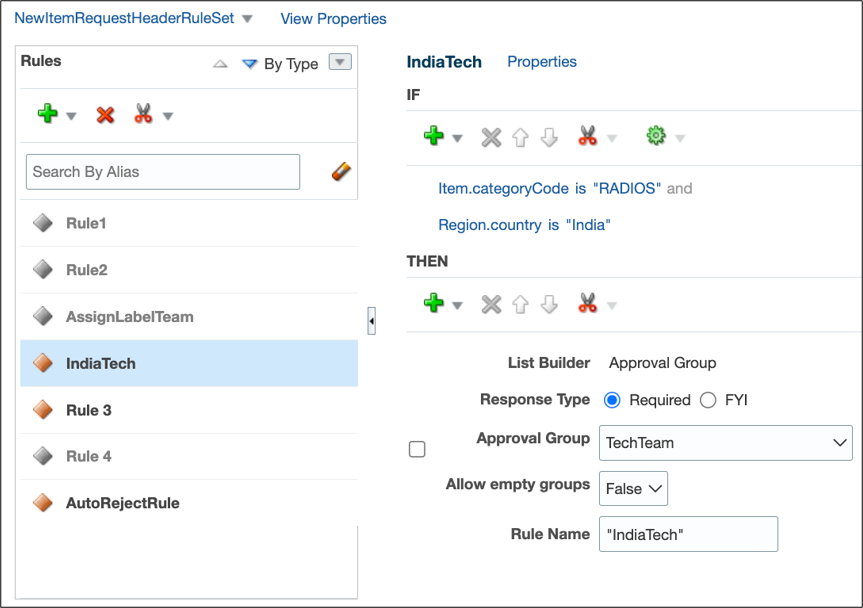
When the item class is RADIOS and the extensible flexfield named Region is defined in the new item request, and the value of the country attribute is India, users defined in the TechTeam approval group will receive an approval notification when the new item request moves to the approval status.
Best Practices
- When you create an item class or an attribute group, make sure you specify the API name.
- Avoid creating item classes with names such as Item, ItemCategory, ItemRevision, ItemSupplier, RevisedItemLineApproval, ChangeObjectApproval, Evidence, and Certificate. Or creating similar names for the item class and flexfield attribute groups. Distinct names help ensure that rules run without error.