Select Data for Related Customers
Set up Oracle Order Management so you can select data only for related customers on a sales order.
You can also import data for related customers through REST API or REST API with FBDI. You can import details for attributes on sales orders that display party data, such as ship-to address, bill-to address, contacts, and payment terms.
Control how Order Management displays customer details on sales orders, such as ship-to address, bill-to address, contacts, and payment terms.For example:
- Set the default value that the Order Management work area displays for each customer attribute and address attribute.
- Use an address from a related customer to set the default value for the ship-to address.
- Use data from the customer master to set the default value for preferences on each sales order.
Here's how Order Management displays customer data:
- Uses the party object to display data for customer attributes, such as Customer, Ship-to Customer, or Ship-to Address
- Uses the account object to display data for account attributes, such as Bill-to Account, Bill-to Address, or Ship-to Address
For example:
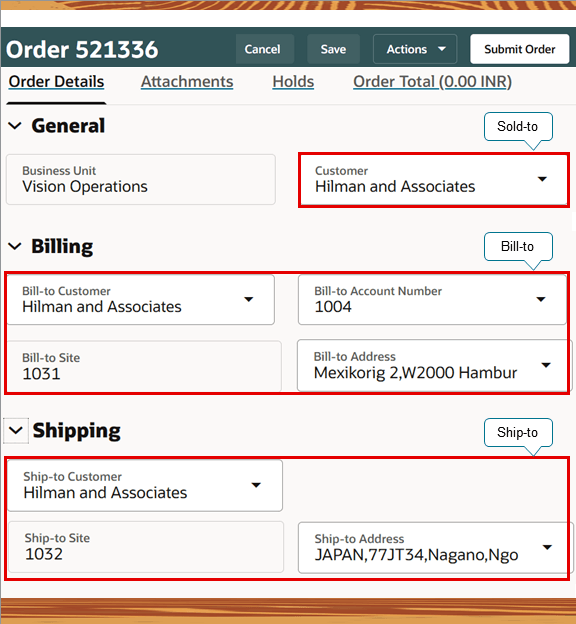
Order Management filters the values that you select for the bill-to addresses according to the business unit that you select on the order header.
Use this feature to filter data or to import orders so these attributes contain only data for related customers. For example, filter ship-to values according to how you set the Ship-to Customer attribute. Ship-to Customer can include the sold-to customer’s address and other addresses depending on the relationships that you set up and how you set the Relationship for Ship-To Customer order management parameter.
For background, see Overview of Displaying Customer Details on Sales Orders.
Create Account and Party Relationships
You will:
- Set up order management parameters.
- Create an account relationship.
- Create a party relationship.
Set Up Order Management Parameters
Set the Customer Relationship Type order management parameter to Related Customers. You must use this value for bill-to and for ship-to relationships.
You must also set the Relationship for Ship-To Customer parameter.
For details, see Manage Order Management Parameters.
Create an Account Relationship
You can set up customer relationship between accounts or parties. Order Management will use them when you select the Sold-To Customer attribute on the sales order.
Assume you need to create a relationship between these accounts:
- FOM-Customer-001
- FOM-Customer-002
Try it:
- Make sure you have the privileges that you need to manage Accounts Receivable.
- Go to the Accounts Receivable work area.
- On the Accounts Receivable page, click Tasks > Manage Customers.
- On the Manage Customers page, search the Organization Name attribute for your customer, such as Computer Service and Rentals.
- In the search results, click the link in the Account Number column, such
as CDRM_11120.
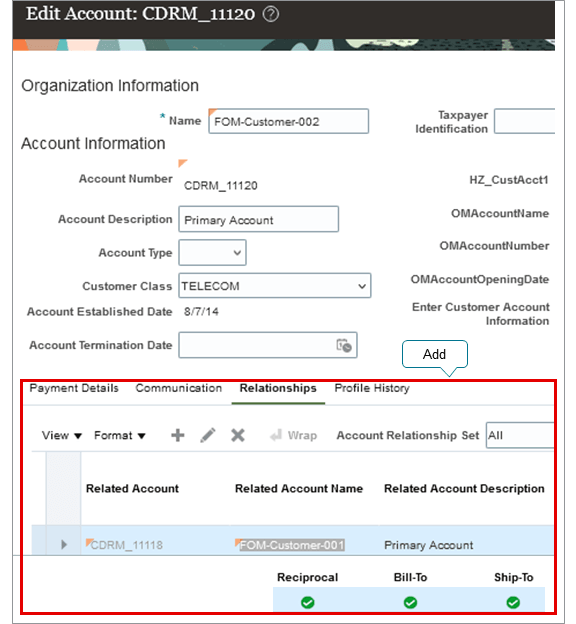
- Click Relationships, then add a row.
Attribute Value Related Account Name FOM-Customer-001 Reciprocal Enabled. See the subtopic later in this document for details. Bill To Enabled. Ship To Enabled. - Test your work. Use the Sales Orders for Order Hub Requests REST API to import
this sales order:
{
    "SourceTransactionNumber": "TEST_RELATED_BT_ST",
    "SourceTransactionSystem": "GPR",
    "SourceTransactionId": "TEST_RELATED_BT_ST",
    "BusinessUnitName": "Vision Operations",
    "BuyingPartyName": "FOM-Customer-001",
    "TransactionType": "Standard Orders",
    "RequestedShipDate": "2024-05-31T20:49:12+00:00",
    "RequestedFulfillmentOrganizationName": "Vision Operations",
    "PaymentTerms": "30 Net",
    "TransactionalCurrencyName": "US Dollar",
    "RequestingBusinessUnitName": "Vision Operations",
    "FreezePriceFlag": false,
    "FreezeShippingChargeFlag": false,
    "FreezeTaxFlag": false,
    "SubmittedFlag": true,
    "SourceTransactionRevisionNumber": 1,
    "CustomerPONumber": "TEST_RELATED_BT_ST",
       "billToCustomer": [{
        "CustomerAccountId": 300100046859307,
        "SiteUseId": 300100046859311
    }],
    "shipToCustomer": [{
        "PartyId": 300100046859306,
        "SiteId": 300100046859309
    }],
    "lines": [
        {
            "SourceTransactionLineId": "TEST_RELATED_BT_ST.01",
            "SourceTransactionLineNumber": "1",
            "SourceTransactionScheduleId": "TEST_RELATED_BT_ST.01.01",
            "SourceScheduleNumber": "1",
            "ProductNumber": "AS54888",
            "TransactionCategoryCode": "ORDER",
            "RequestedFulfillmentOrganizationId": 207,
            "TransactionLineType": "Buy",
            "OrderedQuantity": 1,
            "OrderedUOM": "Each"
        }
    ]
}
where
- BuyingPartyName identifies the sold-to customer, such as FOM-Customer-001.
- Go to the Order Management work area, open the sales order that you imported,
and verify that it has the values you specified in the import payload.
Order Management will use the value that your payload has for the CustomerAccountId attribute and the SiteUseId attribute in the billToCustomer entity when it examines the customer relationship that you set up. It uses them to determine whether you enabled the bill-to option and the ship-to option on that relationship. For example:
"billToCustomer": [{
        "CustomerAccountId": 300100046859307,
        "SiteUseId": 300100046859311
where
- 300100046859307 identifies the FOM-Customer-002 customer.
- SiteUseID identifies one of FOM-Customer-002's bill to sites.
This payload also specifies the ship to customer which is the party of the related customer account.
    "shipToCustomer": [{
        "PartyId": 300100046859306,
        "SiteId": 300100046859309
For another example, here's how the New Sales Order page displays relationships. Expand the Billing section, then verify that it includes details about FOM-Customer-001 and FOM-Customer-002:
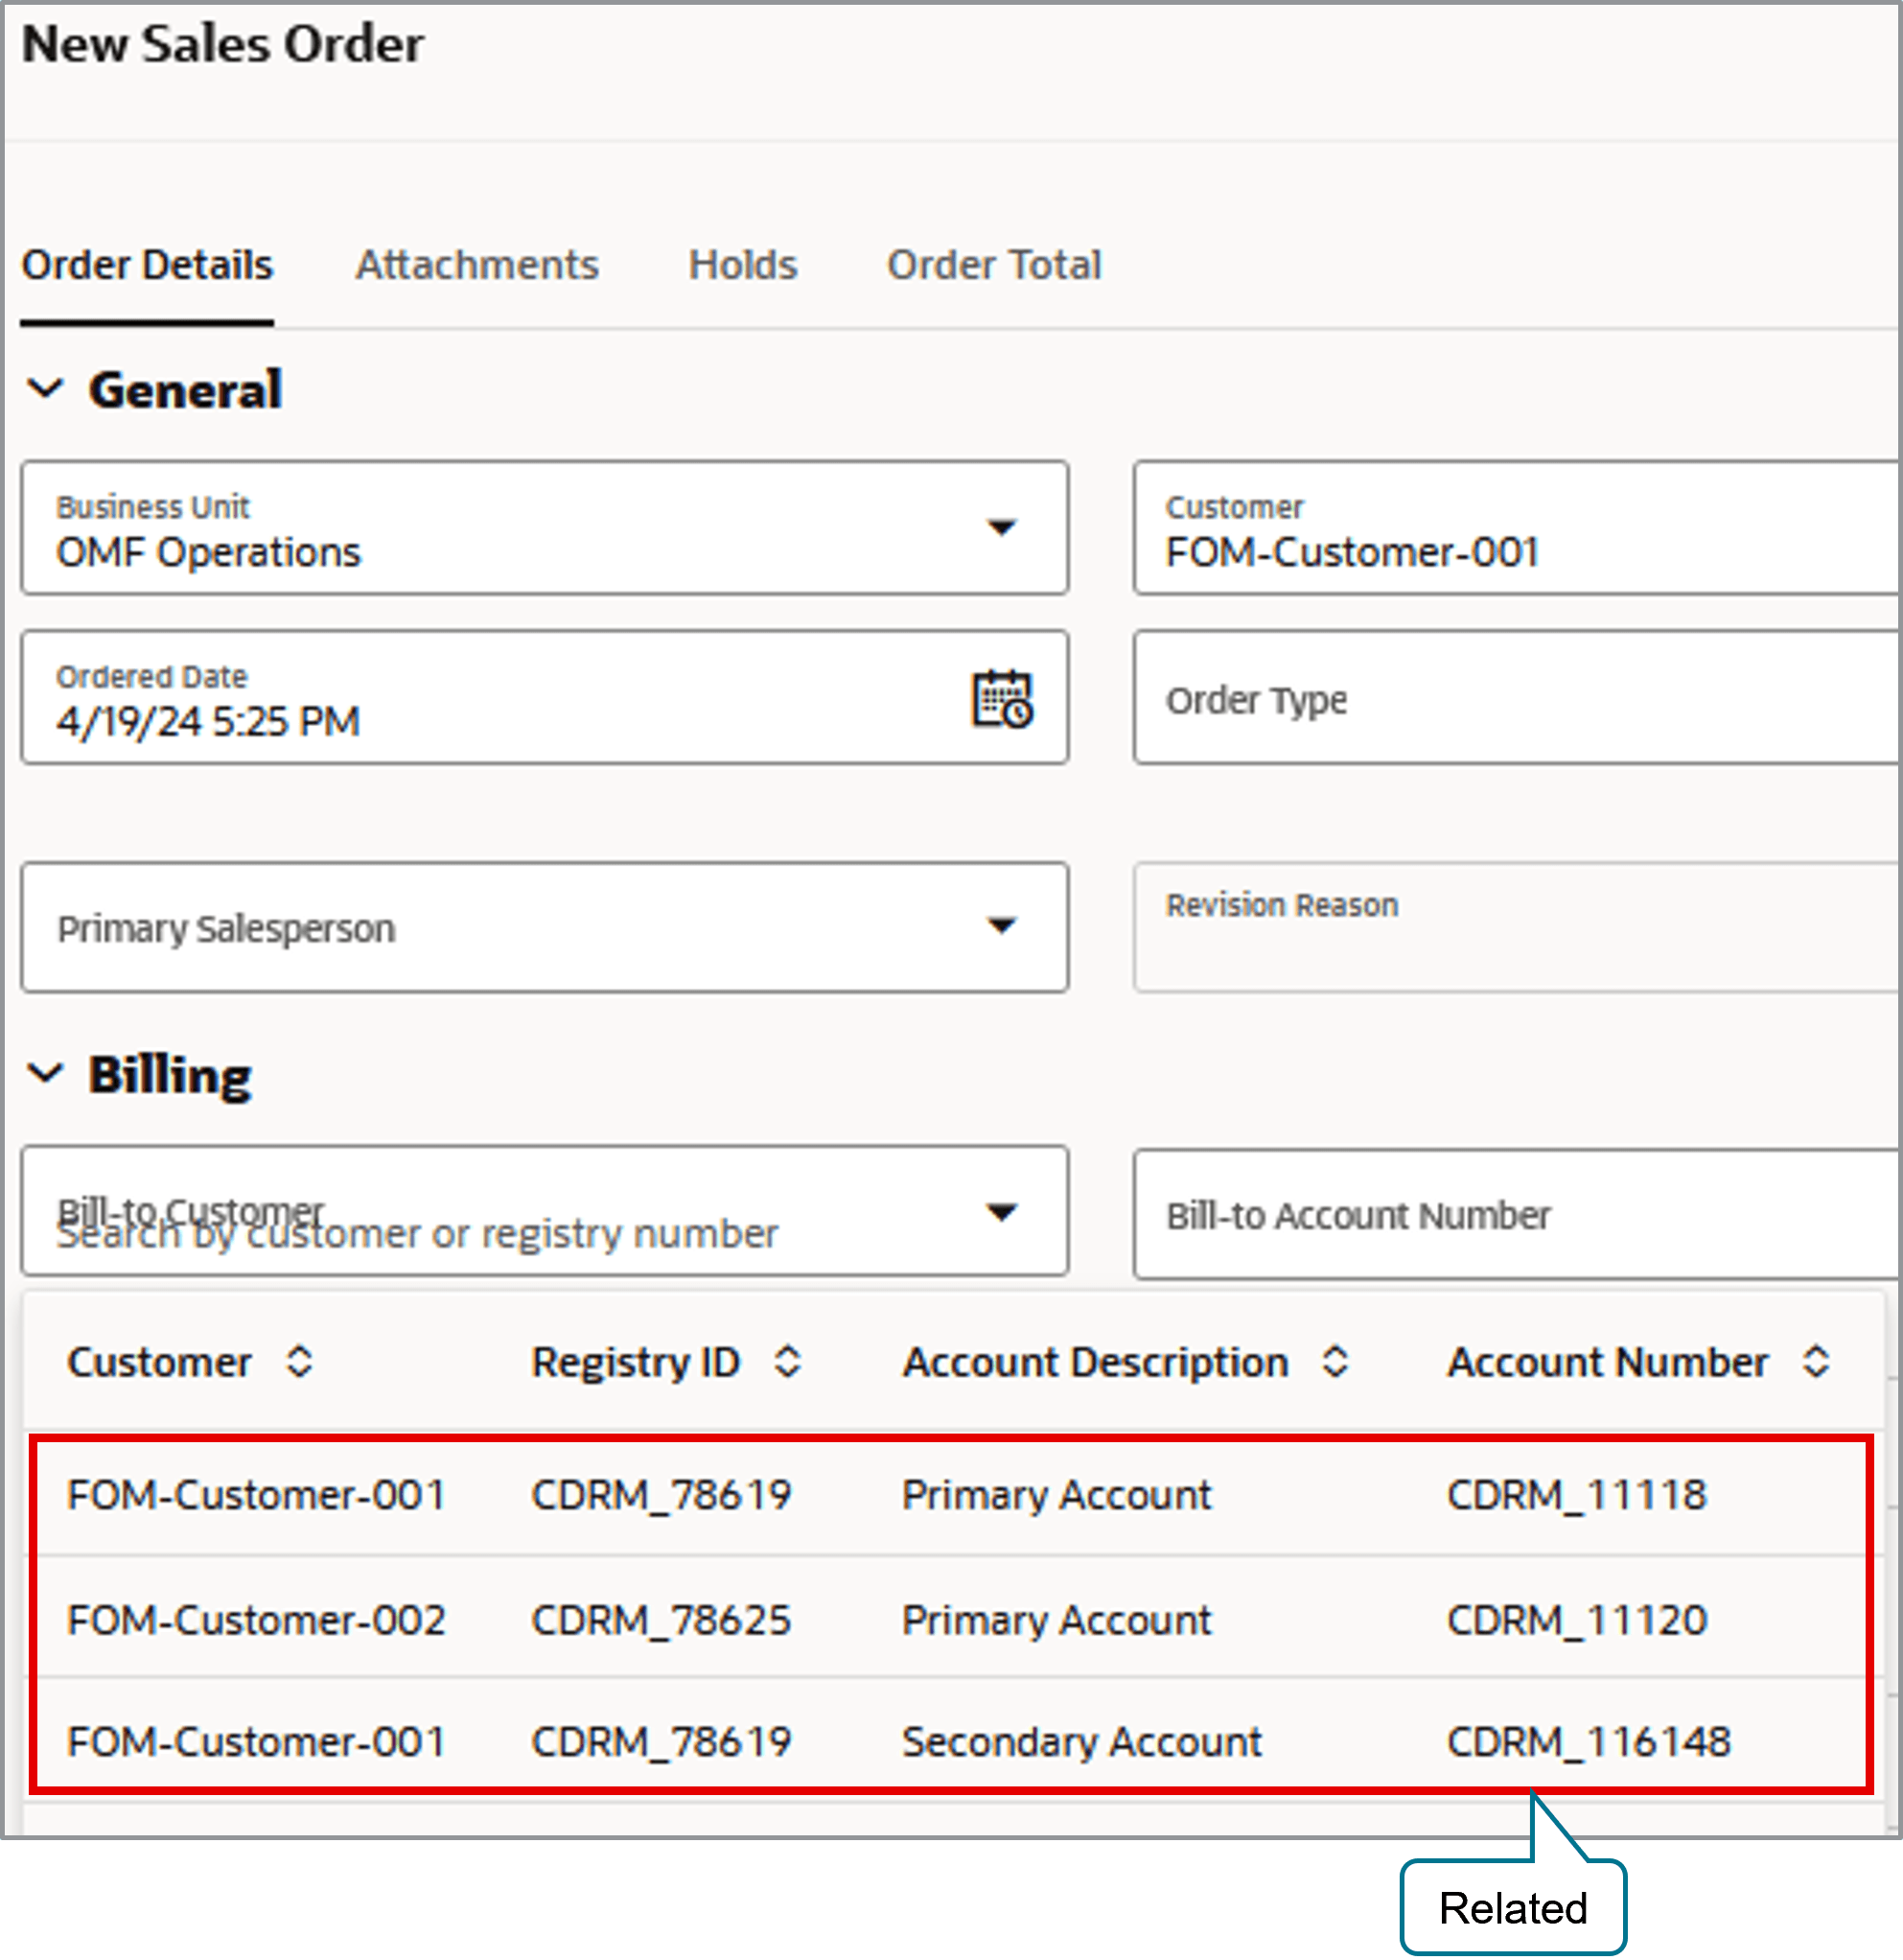
Expand the Shipping section, then verify that it also includes details about FOM-Custome-001 and FOM-Customer-002.
Remove the value from the Ship-to Customer attribute. Click the Ship-to Address attribute, then notice that the sales order displays sites for FOM-Customer-001 and FOM-Customer-002.
Set the PartyId
PartyId's value in the billToCustomer entity is different than PartyId's value in the shipToCustomer entity because Trading Community Architecture (TCA) stores data separately for each usage of ship-to or bill-to even though it's for the same site. You can use an SQL query to identify the values that you need for PartyId. See Match Import Data to Order Management Data.
Reciprocal Relationship
A reciprocal relationship is a relationship that works in both directions. Assume you
have two customers, Blowfish and Green Corp, and you create a
relationship for each of them:
- You don't enable the Reciprocal option for Green Corp on the Edit Account:
Blowfishpage. - You do enable the Reciprocal option for Green Corp on the Edit Account: Green Corp page.
| If Reciprocal Option Is | And If BuyingPartyName Contains | Then Validation for Ship-to and Bill-to Attributes Will |
|---|---|---|
| Not Enabled | Blowfish |
Not consider Green Corp's location |
| Not Enabled | Green Corp | Consider Blowfish's location |
| Enabled | Blowfish |
Consider Green Corp's location |
| Enabled | Green Corp | Consider Blowfish's location |
If you create a relationship to Blowfish on the Edit Account: Green
Corp page, and if you enable the Reciprocal option for Blowfish,
then the Edit Account: Blowfish page will automatically display a
new row in the Relationship tab for Green Corp.
For background, see Display Account Details on Sales Orders.
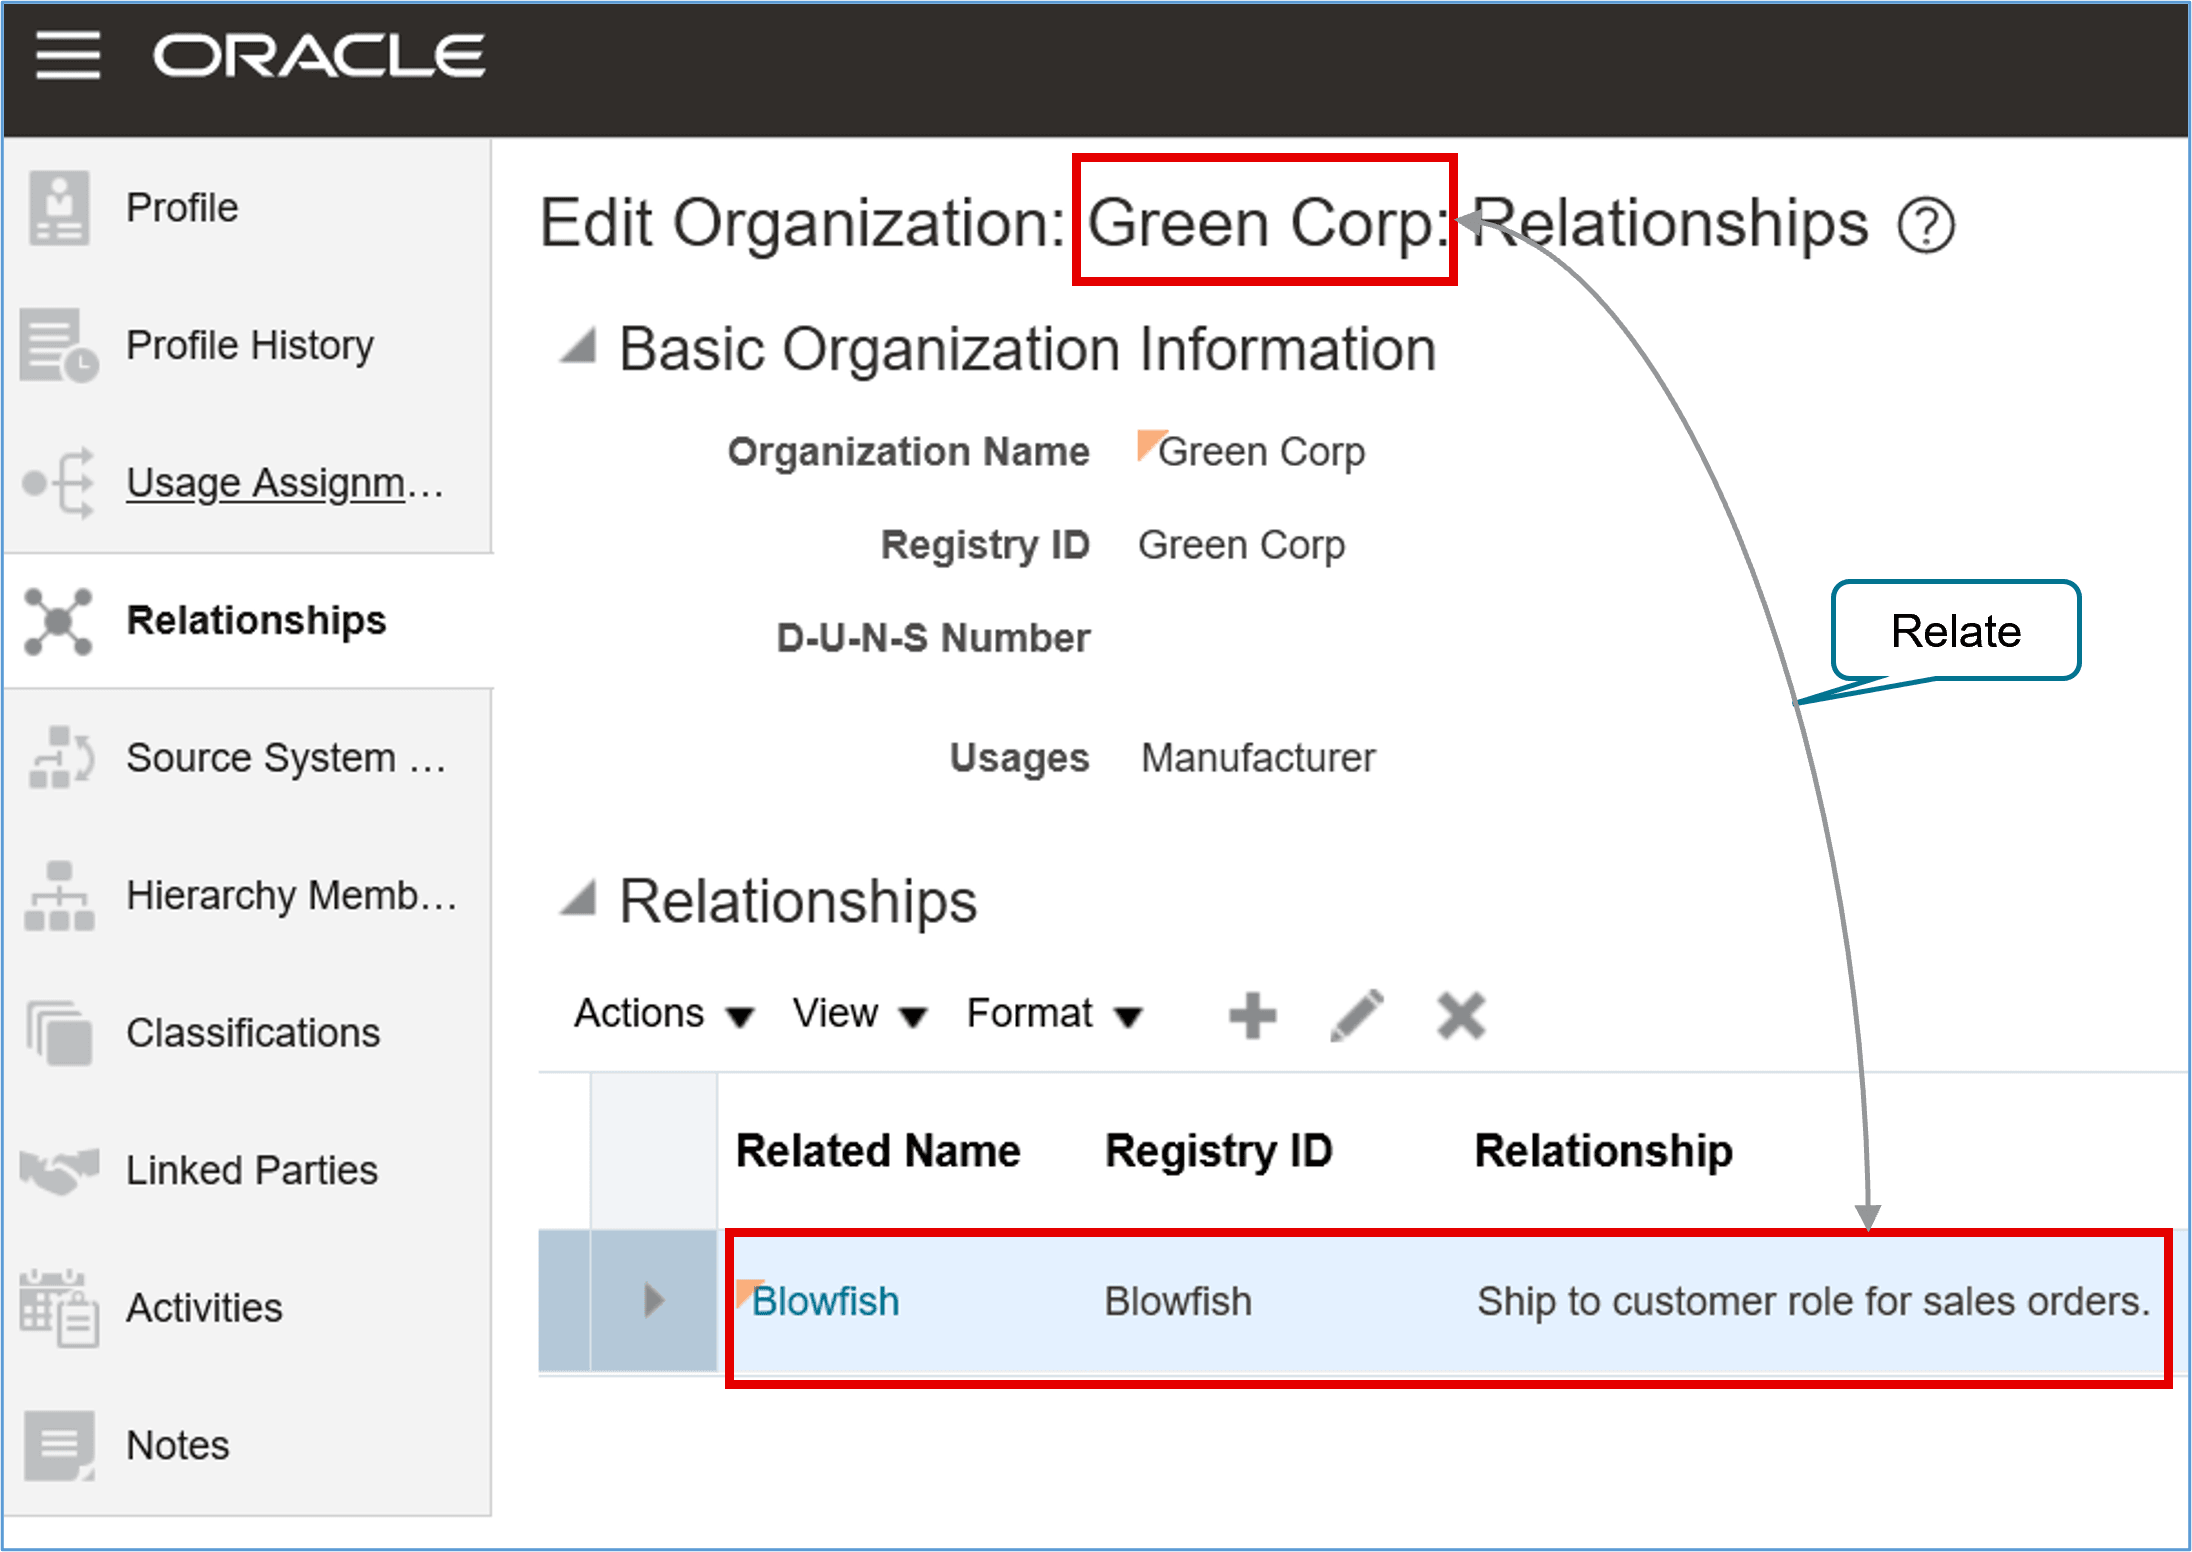
Create a Party Relationship
Try it:
- Go to the Organizations work area in Customer Data Management. For background, see Where You Perform Customer Data Management Setup Tasks.
- On the Organizations page, search for the organization that has your party data.
For example:
Attribute Value Name FOM-Customer-00 Registry ID CDRM_78619 - In the search results, click the link in the Registry ID attribute or the Name attribute.
- Create or edit the relationships.
Note
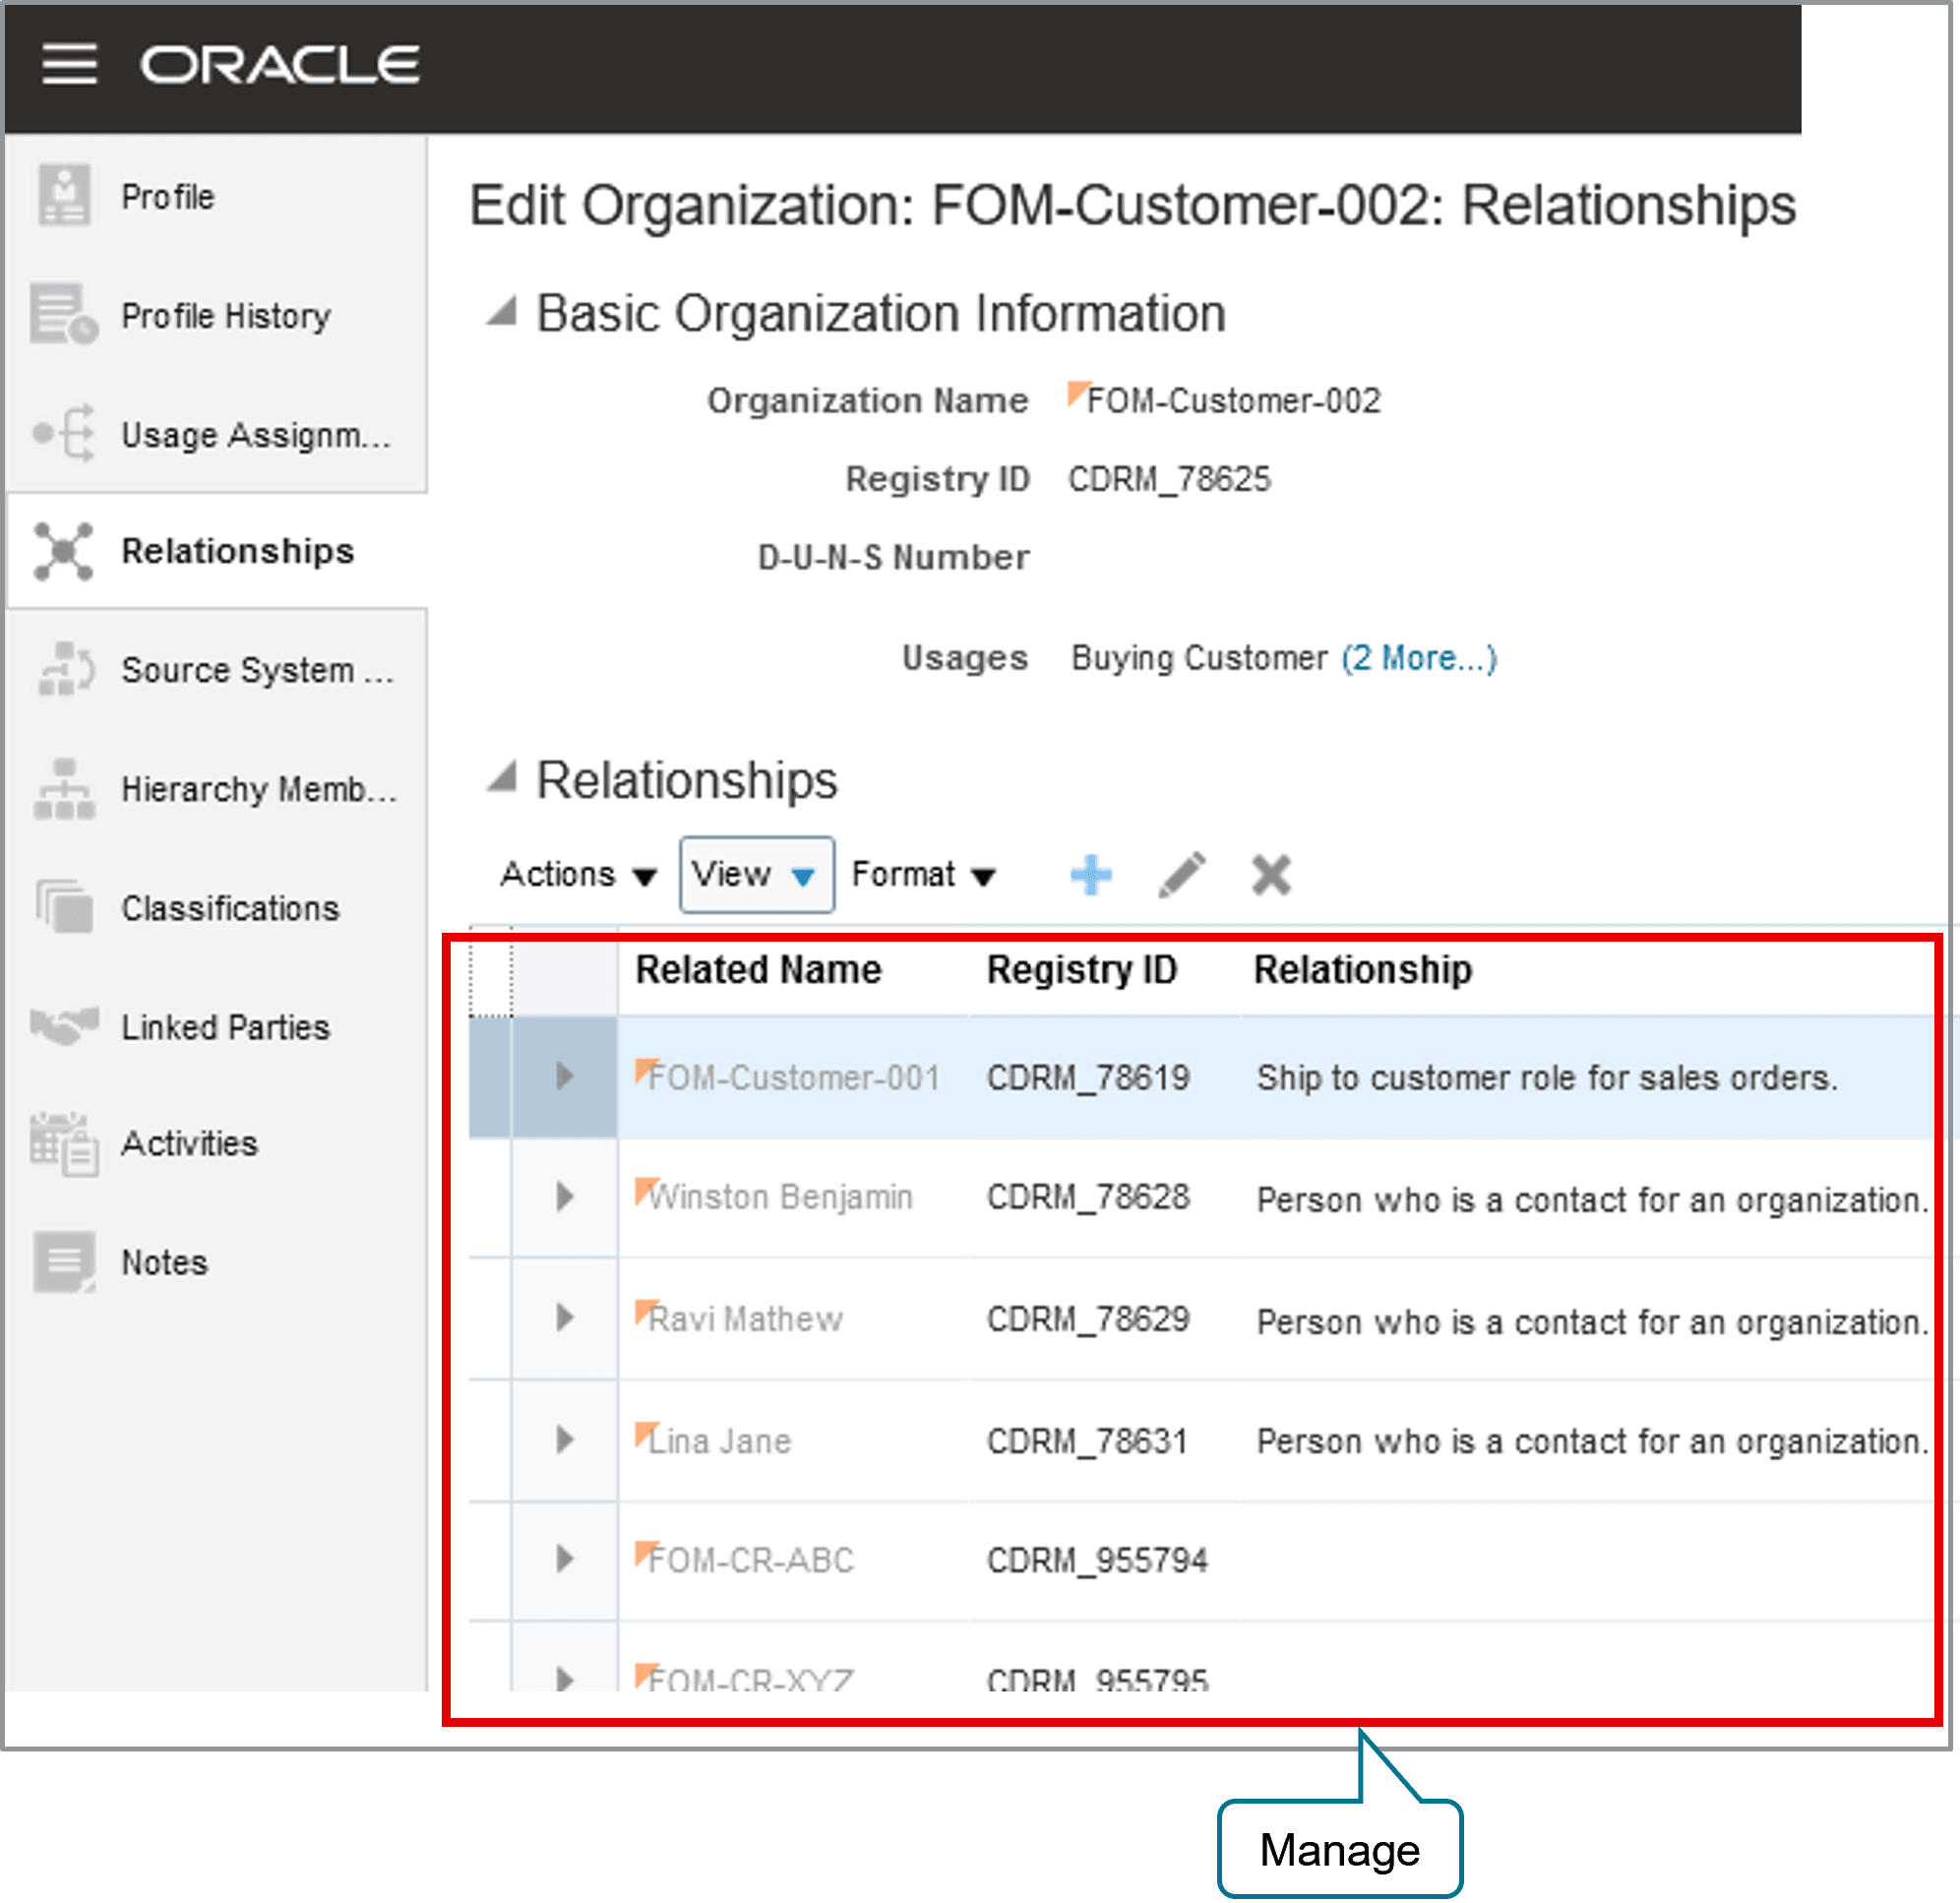
- You must set the Relationship attribute to Ship to Customer Role for Sales Orders.
-
You must set the Related Name attribute to the value that you plan to set on the Customer attribute on the sales order. Order Management will display the value that's in the Organization Name in the ship-to attributes on the sales order.
For example, FOM-Customer-001 is related to FOM-Customer-002. If you set the Customer attribute on the sales order to FOM-Customer-001, then Order Management will display FOM-Customer-002 and its addresses in the Ship-to Customer attribute and the Ship-To Address attribute.
- Test your work.
- Use the same payload that you used in the Create an Account Relationship topic of this document to import your sales order.
- Go to the Order Management work area, open the sales order that you imported, and verify that it has the values you specified in the import payload.
For another example, try it on the redesigned page:
- Go to the Order Management work area and create a sales order.
- Set the Customer attribute on the sales order to FOM-Customer-001.
- Verify that the Ship-to Address attribute displays sites for FOM-Cutomer-001 and for FOM-Customer-002.
- Remove the value from the Ship-to Customer attribute, click Ship-to Address, then verify that Ship-to Address displays all of FOM-Customer-002' sites.
For background, see Display Party Details on Sales Orders.
Import
You can import data for related customers only through REST API or REST API with FBDI (File Based Data Import). You can't import it through a web service.
REST API
Assume you need to import bill-to data for a related customer on the order header and ship-to data for related customer data on the order line. You can use this payload with the Sales Orders for Order Hub Requests REST API:
{
    "SourceTransactionNumber": " TEST_RELATED_BT_ST_HDR",
    "SourceTransactionSystem": "GPR",
    "SourceTransactionId": " TEST_RELATED_BT_ST_HDR",
    "BusinessUnitName": "Vision Operations",
    "BuyingPartyName": "Computer Service and Rentals",
    "TransactionType": "Standard Orders",
    "RequestedShipDate": "2024-04-20T20:49:12+00:00",
    "RequestedFulfillmentOrganizationName": "Vision Operations",
    "PaymentTerms": "30 Net",
    "TransactionalCurrencyName": "US Dollar",
    "RequestingBusinessUnitName": "Vision Operations",
    "FreezePriceFlag": false,
    "FreezeShippingChargeFlag": false,
    "FreezeTaxFlag": false,
    "SubmittedFlag": true,
    "SourceTransactionRevisionNumber": 1,
    "CustomerPONumber": " TEST_RELATED_BT_ST_HDR",
       "billToCustomer": [{
        "CustomerAccountId": 1001,
        "SiteUseId": 1006
    }],
    "lines": [
        {
            "SourceTransactionLineId": "KH_REST_2203-2.01",
            "SourceTransactionLineNumber": "1",
            "SourceTransactionScheduleId": "KH_REST_2203-2.01.01",
            "SourceScheduleNumber": "1",
            "ProductNumber": "AS54888",
            "TransactionCategoryCode": "ORDER",
            "RequestedFulfillmentOrganizationId": 207,
            "TransactionLineType": "Buy",
            "OrderedQuantity": 1,
            "OrderedUOM": "Each",
"shipToCustomer": [{
            "PartyId": 1002,
            "SiteId": 1026
             }]

        }
    ]
}
where
- BuyingPartyName specifies Computer Service and Rentals as the customer.
- CustomerAccountId specifies 1001 as the bill-to account.
- PartyId specifies 1002 as the ship-to account.
REST API with FBDI
Use the same values that you use with REST API, but use these attributes:
- For Ship-to data, set the Party Identifier attribute and the Party Site Identifier attribute.
- For Bill-to data, set the Customer Identifier attribute and Account Site Identifier attribute.
Note
- Use the SourceSalesOrderImportTemplate.xlsm template.
- Use the DOO_ORDER_ADDRESSES_INT worksheet.
- You must use FBDI and REST API together. For details, see Use REST API with FBDI to Import Large Volumes of Sales Orders.
Guidelines
Return Orders
If you set the Customer Relationship Type parameter to Related Customers, and if you set the bill-to attributes or the ship-to attributes on the return order to values that are different from the original order, then Order Management will display data that's related to the sold-to customer on the return. It won't display data that's related to the customer on the original order.
Dates
Order Management will consider relationship data only for:
- Active sites.
- Sites and relationships that are in effect on the order date.
The date when you create the sales order must happen on or after the start date and on or before the end date of each site and relationship.
Introduction to Examples
Have a look at various examples of how Order Management will display data according to your set up.
| Order Management Parameter | Value |
|---|---|
| Customer Relationship Type | Related Customers |
| Relationship for Ship-To Customer | Account Relationships |
| Filter Ship-To Addresses by Ship-to Usage | No |
Example Customer Account Relationships
Your data:
| Customer | Site | Bill-to Option is Enabled on the Site | Ship-to Option is Enabled on the Site |
|---|---|---|---|
Blowfish |
Blowfish - Site 1 |
Yes | Yes |
| Green Corp | Green Corp - Site 1 | Yes | No |
| Green Corp | Green Corp - Site 2 | No | Yes |
| Softgear | Softgear - Site 1 | Yes | Yes |
You need these relationships between these customers:
| Customer | Related Customer | Bill-to Option is Enabled on the Relationship | Ship-toOption is Enabled on the Relationship |
|---|---|---|---|
Blowfish |
None | - | - |
| Green Corp | Blowfish |
Yes | Yes |
| Softgear | - | - | - |
You don't set values for the Bill-to option and the Ship-to option in your REST API payload. Instead, Order Management will use the values in your payload that identify the related customer to determine whether you enabled these options on that relationship. For details, see the Create an Account Relationship subtopic in this document.
Example 1
If you set the BuyingPartyName attribute to Blowfish on the sales
order in your import payload, or if you create the order on the redesigned page and
set the Customer attribute to Blowfish, then you will see these
values:
| For Attributes That Contain | Values |
|---|---|
| Bill-to Data |
Green Corp Green Corp - Site 1 |
| Ship-to Data |
Green Corp Green Corp - Site 1 Green Corp Green Corp - Site 2 |
The BuyingPartyName attribute or the Customer attribute sets the value for the sold-to customer.
Example 2
Set the Filter Ship-To Addresses by Ship-to Usage parameter to Yes, then set the
BuyingPartyName attribute or the Customer attribute to
Blowfish:
| For Attributes That Contain | Values |
|---|---|
| Bill-to Data |
Green Corp Green Corp - Site 1 |
| Ship-to Data |
Green Corp Green Corp - Site 2 |
Example 3
Set the BuyingPartyName attribute to Green Corp, or set the Customer attribute to Green Corp:
| For Attributes That Contain | Values |
|---|---|
| Bill-to Data |
Green Corp Green Corp - Site 1 |
| Ship-to Data |
Green Corp Green Corp - Site 2 |
Example Ship-to Party Relationships
Your data:
| Party | Account | Account Site | Ship-to Data |
|---|---|---|---|
Blowfish |
Blowfish West |
Blowfish West-Site 1 |
Yes |
| Green Corp | Green Corp North | Green Corp North - Site 1 | Yes |
| Softgear | Softgear East |
Softgear East - Site 1 Softgear East - Site 2 |
No (Bill-to only) Yes |
You set up these relationships between parties:
| Customer | Related Customer |
|---|---|
| Green Corp | Blowfish |
| Softgear | Blowfish |
For example, create a relationship between Blowfish and Green
Corp:
Create a relationship between Blowfish and Softgear:
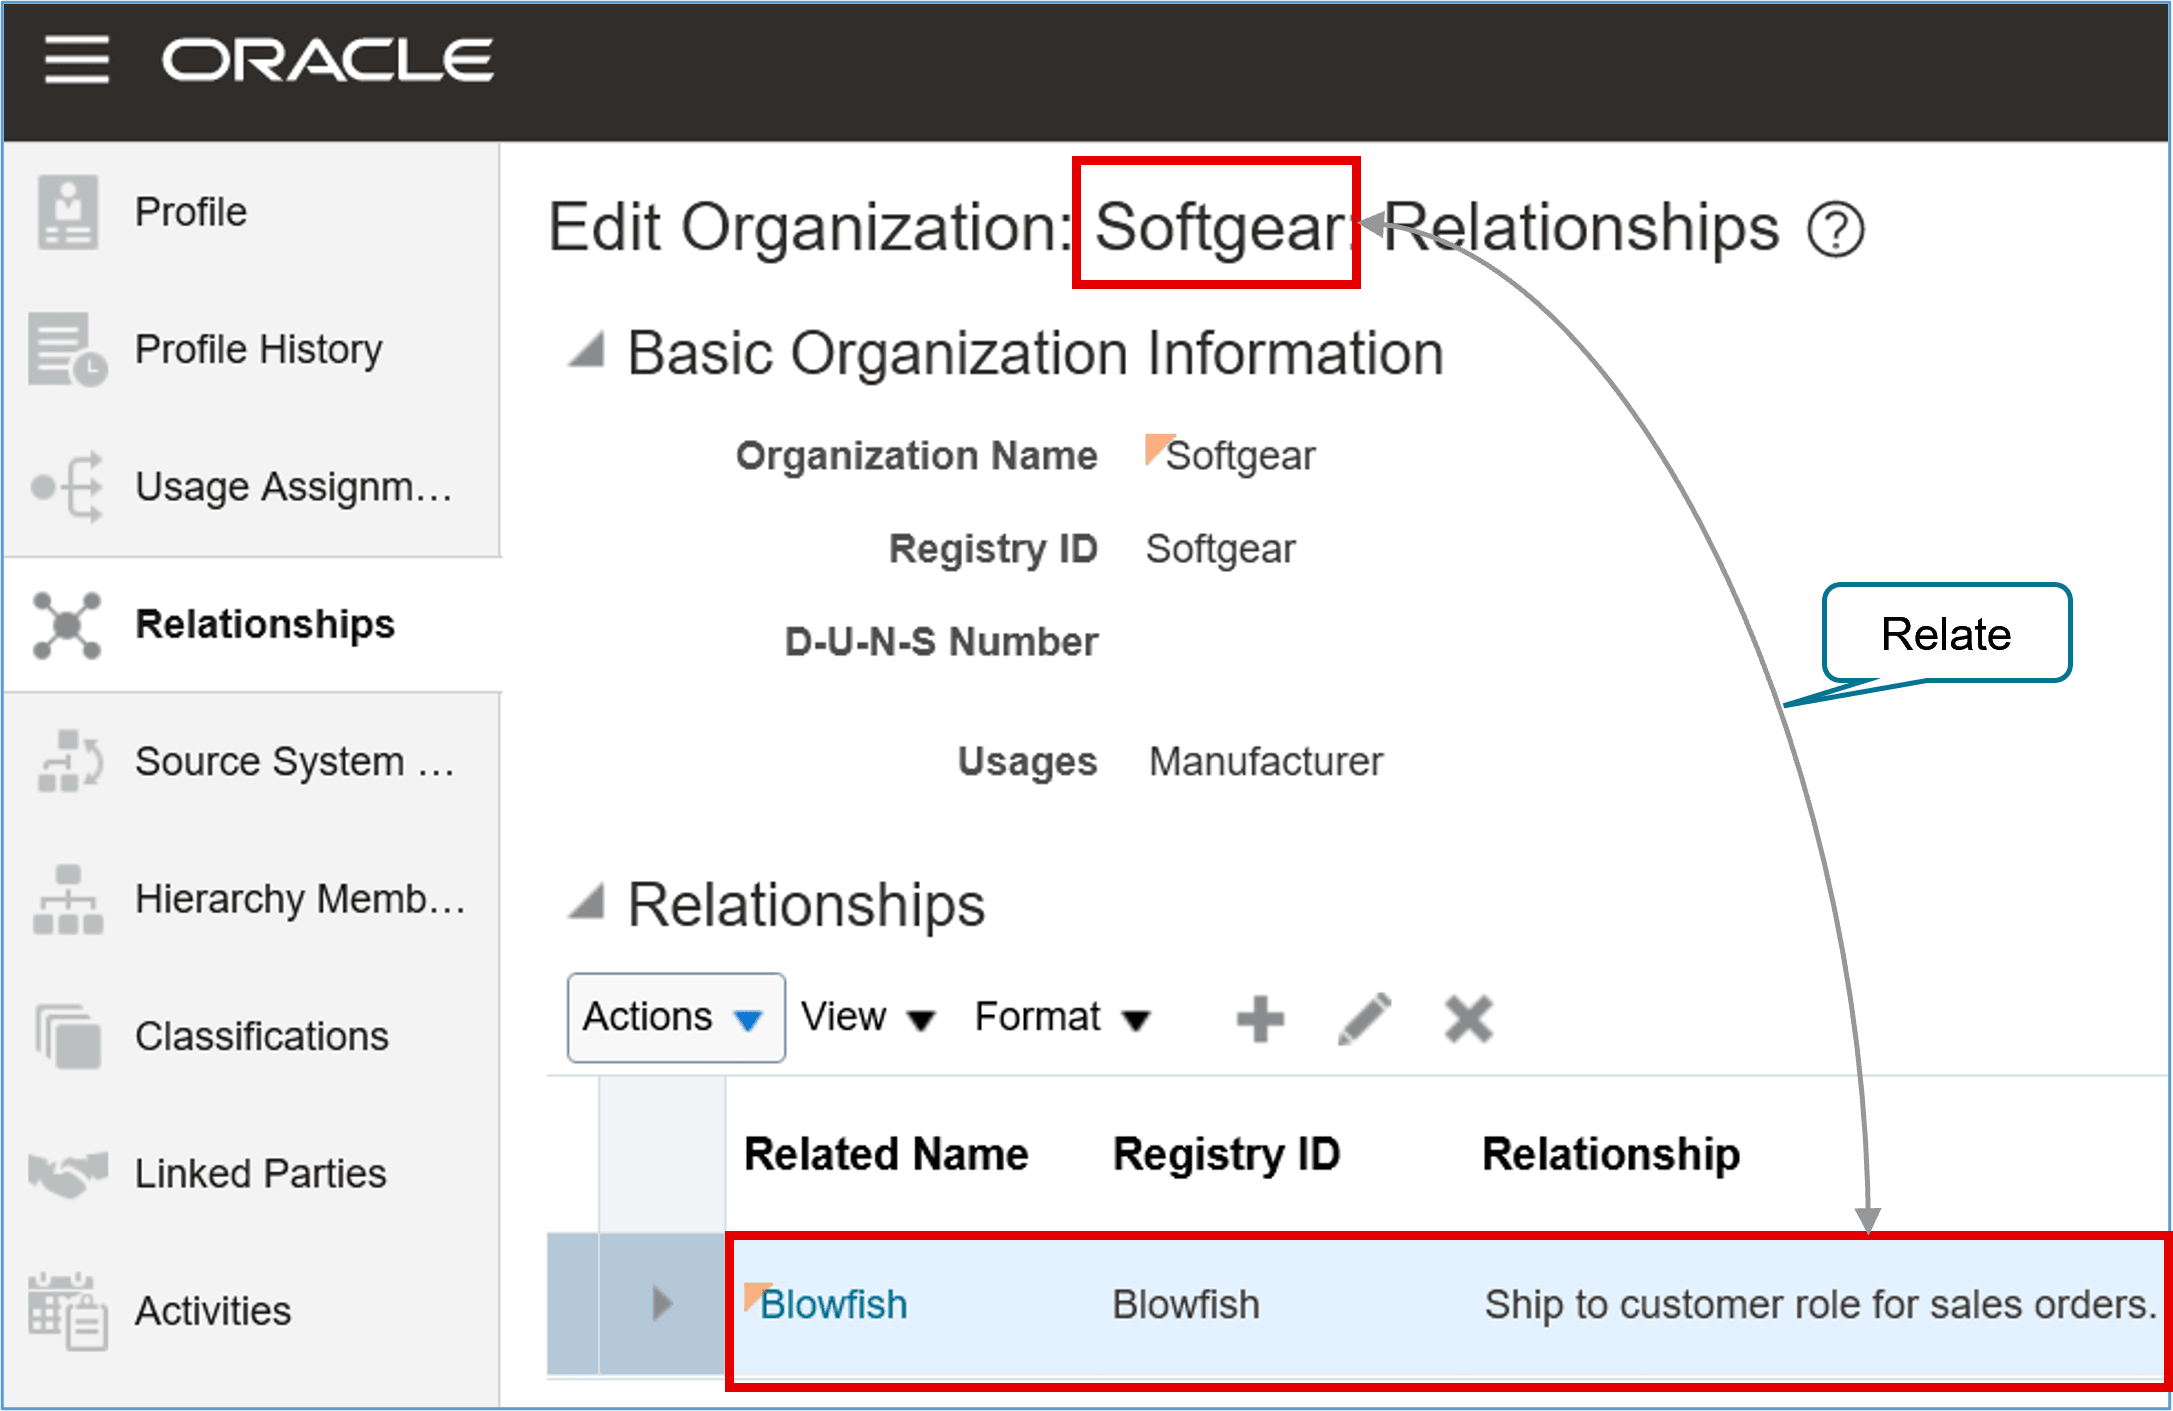
For these examples, assume you set the Relationship for Ship-To Customer parameter to Party Relationships.
Example 1
Import a sales order with the BuyingPartyName attribute set to
Blowfish:
| For Attributes That Contain | You Can Import These Values |
|---|---|
| Ship-to Customer |
Green Corp Softgear |
| Ship-to Address | Sites for the value that you select in Ship-to Customer |
Example 2
Create a sales order on the redesigned page, but don't set the Customer attribute. Click the Ship-to Address attribute, then notice that the attribute displays all addresses. This is the same behavior that you see if you set the Customer Relationship Type parameter to All Customers even though you currently have it set to Related Customers.
Set the address, and then notice that Order Management automatically sets the Bill-to Customer attribute and the Ship-to Customer attribute.
Example 3
Create a sales order, then set the Customer attribute to Blowfish.
Click Additional Details, click Ship-to
Customer, remove the value from the Ship-to Customer attribute, then
click Ship-to Address:
| This Attribute | Will Display |
|---|---|
| Ship-to Customer | Nothing |
| Ship-to Address |
Green Corp North - Site 1 Softgear East - Site 1 Softgear East - Site 2 |
Example 4
Do the same actions that you do in Example 3, except set the Filter Ship-To Addresses by Ship-to Usage parameter to Yes:
| This Attribute | Will Display |
|---|---|
| Ship-to Customer | Nothing |
| Ship-to Address |
Green Corp North - Site 1 Softgear East - Site 2 |
Example Ship-to Party Relationships with Party Sites
Your data:
| Party | Party Site | Purpose | Account | Site | Ship-to |
|---|---|---|---|---|---|
Blowfish |
Blowfish - Site 1 |
- | Blowfish West |
Blowfish West - Site 1 |
Yes |
| Green Corp | Green Corp - Site 1 | - | Green Corp North | Green Corp North - Site 1 | Yes |
| Softgear |
Softgear - Site 1 Softgear - Site 2 |
Sell - To Ship - To |
Softgear East |
Softgear East - Site 1 Softgear East - Site 2 |
No (only Bill-to) Yes |
You set up these relationships:
| Party | Related Party |
|---|---|
| Green Corp | Blowfish |
| Softgear | Blowfish |
Example 1
Import a sales order with the BuyingPartyName attribute set to
Blowfish.
| For Attributes That Contain | You Can Import These Values |
|---|---|
| Ship-to Customer |
Green Corp Softgear |
| Ship-to Address |
Green Corp North - Site 1 Softgear East - Site 1 Softgear East - Site 2 Softgear - Site 1 Softgear - Site 2 |
Example 2
Set the Filter Ship-To Addresses by Ship-to Usage parameter to Yes, then import a
sales order with the BuyingPartyName attribute set to Blowfish:
| For Attributes That Contain | You Can Import These Values |
|---|---|
| Ship-to Customer | Blowfish, Green Corp and Softgear |
| Ship-to Address |
Green Corp North - Site 1 Softgear East - Site 2 Softgear - Site 2 |
Example 3
Create a sales order on a redesigned page, then set the Customer attribute to
Blowfish. Click Additional Details,
click Ship-to Customer, remove the value from the Ship-to
Customer attribute, then click Ship-to Address:
| This Attribute | Will Display |
|---|---|
| Ship-to Customer | Nothing |
| Ship-to Address |
Green Corp North - Site 1 Softgear East - Site 1 Softgear East - Site 2 Softgear - Site 1 Softgear - Site 2 |
Example 4
Do the same actions that you do in Example 3, except set the Filter Ship-To Addresses by Ship-to Usage parameter to Yes:
| This Attribute | Will Display |
|---|---|
| Ship-to Customer | Nothing |
| Ship-to Address |
Green Corp North - Site 1 Softgear East - Site 2 Softgear - Site 2 |
Example Ship-to Account Relationships
Assume you have another customer, PennyPack. Here's your data:
| Party | Account | Account Site | Ship-to Data |
|---|---|---|---|
| Softgear | Softgear East | Softgear East - Site 1 | No (only Bill-to) |
| Softgear | Softgear East | Softgear East - Site 2 | Yes |
| PennyPack | PennyPack North | PennyPack North - Site 1 | Yes |
| PennyPack | PennyPack South | PennyPack South - Site 1 | Yes |
You set up these ship-to account relationships:
| Party | Account | Related Account |
|---|---|---|
| Softgear | PennyPack South | Softgear East |
Example 1
Import a sales order with the BuyingPartyName attribute set to Softgear:
| For Attributes That Contain | You Can Import These Values |
|---|---|
| Ship-to Customer |
Softgear PennyPack |
| Ship-to Address |
Softgear East - Site 1 Softgear East - Site 2 PennyPack South - Site 1 |
Example 2
Create a sales order on the redesigned page and set the Customer attribute to Softgear:
| This Attribute | Will Display |
|---|---|
| Ship-to Customer |
Softgear PennyPack |
| Ship-to Address, set to Softgear |
Softgear East - Site 1 Softgear East - Site 2 |
| Ship-to Address, set to PennyPack | PennyPack South - Site 1 |
Example 3
Create a sales order on the redesigned page, then set the Customer attribute to Softgear. Click Additional Details, click Ship-to Customer, remove the value from the Ship-to Customer attribute, then click Ship-to Address:
| This Attribute | Will Display |
|---|---|
| Ship-to Customer | Nothing |
| Ship-to Address |
Softgear East - Site 1 Softgear East - Site 2 PennyPack South - Site 1 |