Overview of Configuring Email Properties
You can send a B2B message as an attachment to an email.
You can configure some of the data attributes of the XML payload and their layout to be included in the body of the email. You then have to modify the XSL file associated with the user-defined message definition.
For a user-defined outbound message definition, you can define:
-
The subject line of the email.
-
An XPath from which to extract the email IDs of the recipients.
-
The layout of attributes in the XML payload.
You then have to modify the XSL file associated with a message definition to extract the data attributes from the payload for the email.
Configure Email Properties
Here's how you can configure email properties for an outbound user-defined message:
-
In the B2B Messaging work area, select the B2B Message Definitions task.
-
On the Message Definitions tab, search for and select the user defined outbound collaboration message definition that you want to configure email properties for.
-
Select Actions > Configure Email Properties.
-
In the Configure Email Properties drawer, enter these details:
Field
Description
Default Subject Line
The default subject line for the email.
Recipient Email ID Path
Location in the payload where the recipient email address is listed.
Header Titles
Select Header Titles and then Add to define the order and titles of the data attributes to be included in the header area of the email.
Column Titles
Select Column Titles and then Add to define the order and column titles for the table area in the email.
-
Click Submit.
Include Data Attributes from XML Payload in Email Body
Here's how you can include data attributes from the XML payload to be included in the body of an email associated with a user-defined message definition:
-
Select the message definition for the outbound message that you configured and export the transformation package.
-
Modify the XSL file that downloads to set the data attributes that you configured.
-
For a trading partner or service provider, set up email as a delivery method and associate the delivery method to that message definition.
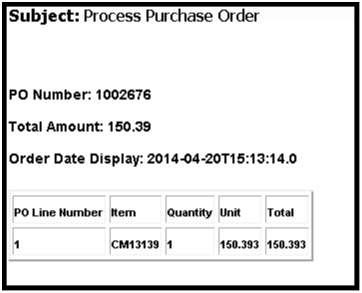
Examples for Configuring Email Properties
Here's an example of values for email properties for a message definition, the modified XSL, and the resulting email:
Default Subject Line: Process Purchase Order
Header Titles:
- PO Number
- Total Amount
- Order Date Display
Column Titles:
- PO Line Number
- Item
- Quantity
- Unit
- Total
Here's an example of a modified XSL file:
<cmk:OutboundCollaborationMessage>
  <xsl:attribute name="xsi:type">
   <xsl:text disable-output-escaping="no">cmk:ProcessPurchaseOrderOAGIS721OutboundType</xsl:text>
  </xsl:attribute>
       <cmk:EmailContent>
       <cmk:Body>
         <cmk:EmailBodyHeader>
           <cmk:PropertyName RowNumber="1">
             <cmk:RowValue>
               <xsl:value-of select="/cmk:processOutboundCollaboration/cmk:OutboundCollaboration/tns:findOrderByPoHeaderIdResponse/tns:result/ns1:Segment1"/>
             </cmk:RowValue>
           </cmk:PropertyName>
           <cmk:PropertyName RowNumber="2">
            <cmk:RowValue>
              <xsl:value-of select="/cmk:processOutboundCollaboration/cmk:OutboundCollaboration/tns:findOrderByPoHeaderIdResponse/tns:result/ns1:Ordered"/>
            </cmk:RowValue>
           </cmk:PropertyName>
           <cmk:PropertyName RowNumber="3">
             <cmk:RowValue>
               <xsl:value-of select="/cmk:processOutboundCollaboration/cmk:OutboundCollaboration/tns:findOrderByPoHeaderIdResponse/tns:result/ns1:OrderDateDisplay"/>
             </cmk:RowValue>
           </cmk:PropertyName>
         </cmk:EmailB dyHeader>
         <xsl:for-each select="/cmk:processOutboundCollaboration/cmk:OutboundCollaboration/tns:findOrderByPoHeaderIdResponse/tns:result/ns1:PdfDraftPurchaseOrderLine">
           <cmk:EmailBodyTableHeader>
             <cmk:ColumnName ColumnNumber="1">
               <cmk:ColumnValue>
                 <xsl:value-of select="ns1:LineNum"/>
               </cmk:ColumnValue>
             </cmk:ColumnName>
             <cmk:ColumnName ColumnNumber="2">
               <cmk:ColumnValue>
                 <xsl:value-of select="ns1:ItemNumber"/>
               </cmk:ColumnValue>
             </cmk:ColumnName>
             <cmk:ColumnName ColumnNumber="3">
               <cmk:ColumnValue>
                 <xsl:value-of select="ns1:Quantity"/>
               </cmk:ColumnValue>
             </cmk:ColumnName>
             <cmk:ColumnName ColumnNumber="4">
               <cmk:ColumnValue>
                 <xsl:value-of select="ns1:UnitPrice"/>
               </cmk:ColumnValue>
             </cmk:ColumnName>
             <cmk:ColumnName ColumnNumber="5">
               <cmk:ColumnValue>
                 <xsl:value-of select="ns1:Amount"/>
               </cmk:ColumnValue>
             </cmk:ColumnName>
           </cmk:EmailBodyTableHeader>
         </xsl:for-each>
       </cmk:Body>
     </cmk:EmailContent>

<oa:PROCESS_PO_007>
Here's the resultant email body content: