Set Up Numbers for Configuration Models
Set up the item class so that the item name for each configured item is unique. A unique name can be useful to help track and manage each item.
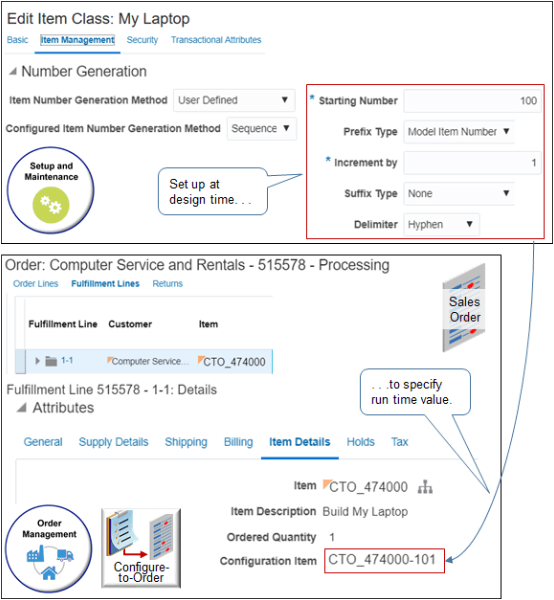
Here's what your setup looks like after you complete the procedure:
Note
-
You use the Edit Item Class page in the Setup and Maintenance work area to specify the number at design time.
-
Order Management displays the number in the Configuration Item attribute on the order line at run time.
Let's say you need to add a suffix to the item name for each unique configuration of item CTO_474000. You need to start the suffix with the number 100, increment it by 1 each time a user orders the item, and use a hyphen (-) to separate the suffix from the name. For example, here's the name that the flow creates the first time the user adds the item.
CTO_474000-100where
-
CTO_474000 is the name of the configured item
-
- (the dash) is the delimiter
-
100 is the starting number of your sequence
Here's the name for the next time a user adds the item.
CTO_474000-101The number is unique across order lines, sales orders, and users.
Summary of the Setup
-
Get the name of the class.
-
Modify the class.
-
Verify your setup.
Get the Name of the Class
-
In the Product Information Management work area, click Tasks > Manage Items.
-
On the Manage Items page, search for CTO_474000, then open it for editing.
This topic assumes you already created the CTO_474000. For details, see Create Configuration Models.
-
On the Edit Item page, note the value in the Item Class attribute.
Assume the class for the CTO_474000 is named My Laptop.
Modify the Class
-
Go to the Setup and Maintenance work area, then go to the Manage Item Classes task.
-
On the Manage Item Classes page, in the search results list, search for, then open the My Laptop class for editing.
-
On the Edit Item Class page, click Item Management, then set the values:
Attribute
Value
Item Number Generation Method
User Defined
This means you, the administrator, defines numbering. Not the end-user who creates the sales order.
Configured Item Number Generation Method
Sequence
-
In the Details area, set the values:
Attribute
Value
Starting Number
100
Prefix Type
Model Item Number
Specify what displays before the starting number.
Increment By
1
Suffix Type
None
Specify what displays after the starting number.
Delimiter
Hyphen
Specify the character that separates the starting number from the prefix or the suffix.
-
Click Save and Close.
Verify Your Setup
-
Go to the Order Management work area and create a sales order.
-
Add the CTO_474000 item to order line 1.
-
Add the CTO_474000 item again, but this time add it to order line 2. Set the options for CTO_474000 on order line 2 different that the options you set for it on line 1.
-
Click Submit.
- Notice that the value of the order line's Configuration Item attribute is CTO_474000-100.
-
Notice that the value of the Configuration Item attribute on the next order line is CTO_474000-101.
You can see the number throughout the configure-to-order flow:
-
On order lines in the Order Management work area.
-
In the Item column of the Supply Lines section of the Supply Order Details page in the Supply Orchestration work area.
-
In the Item column of the Review Dispatch List in the Inventory Management work area.