Track Dual Measures
Use Oracle Inventory Management and Oracle Order Management together to track your dual measures during fulfillment:
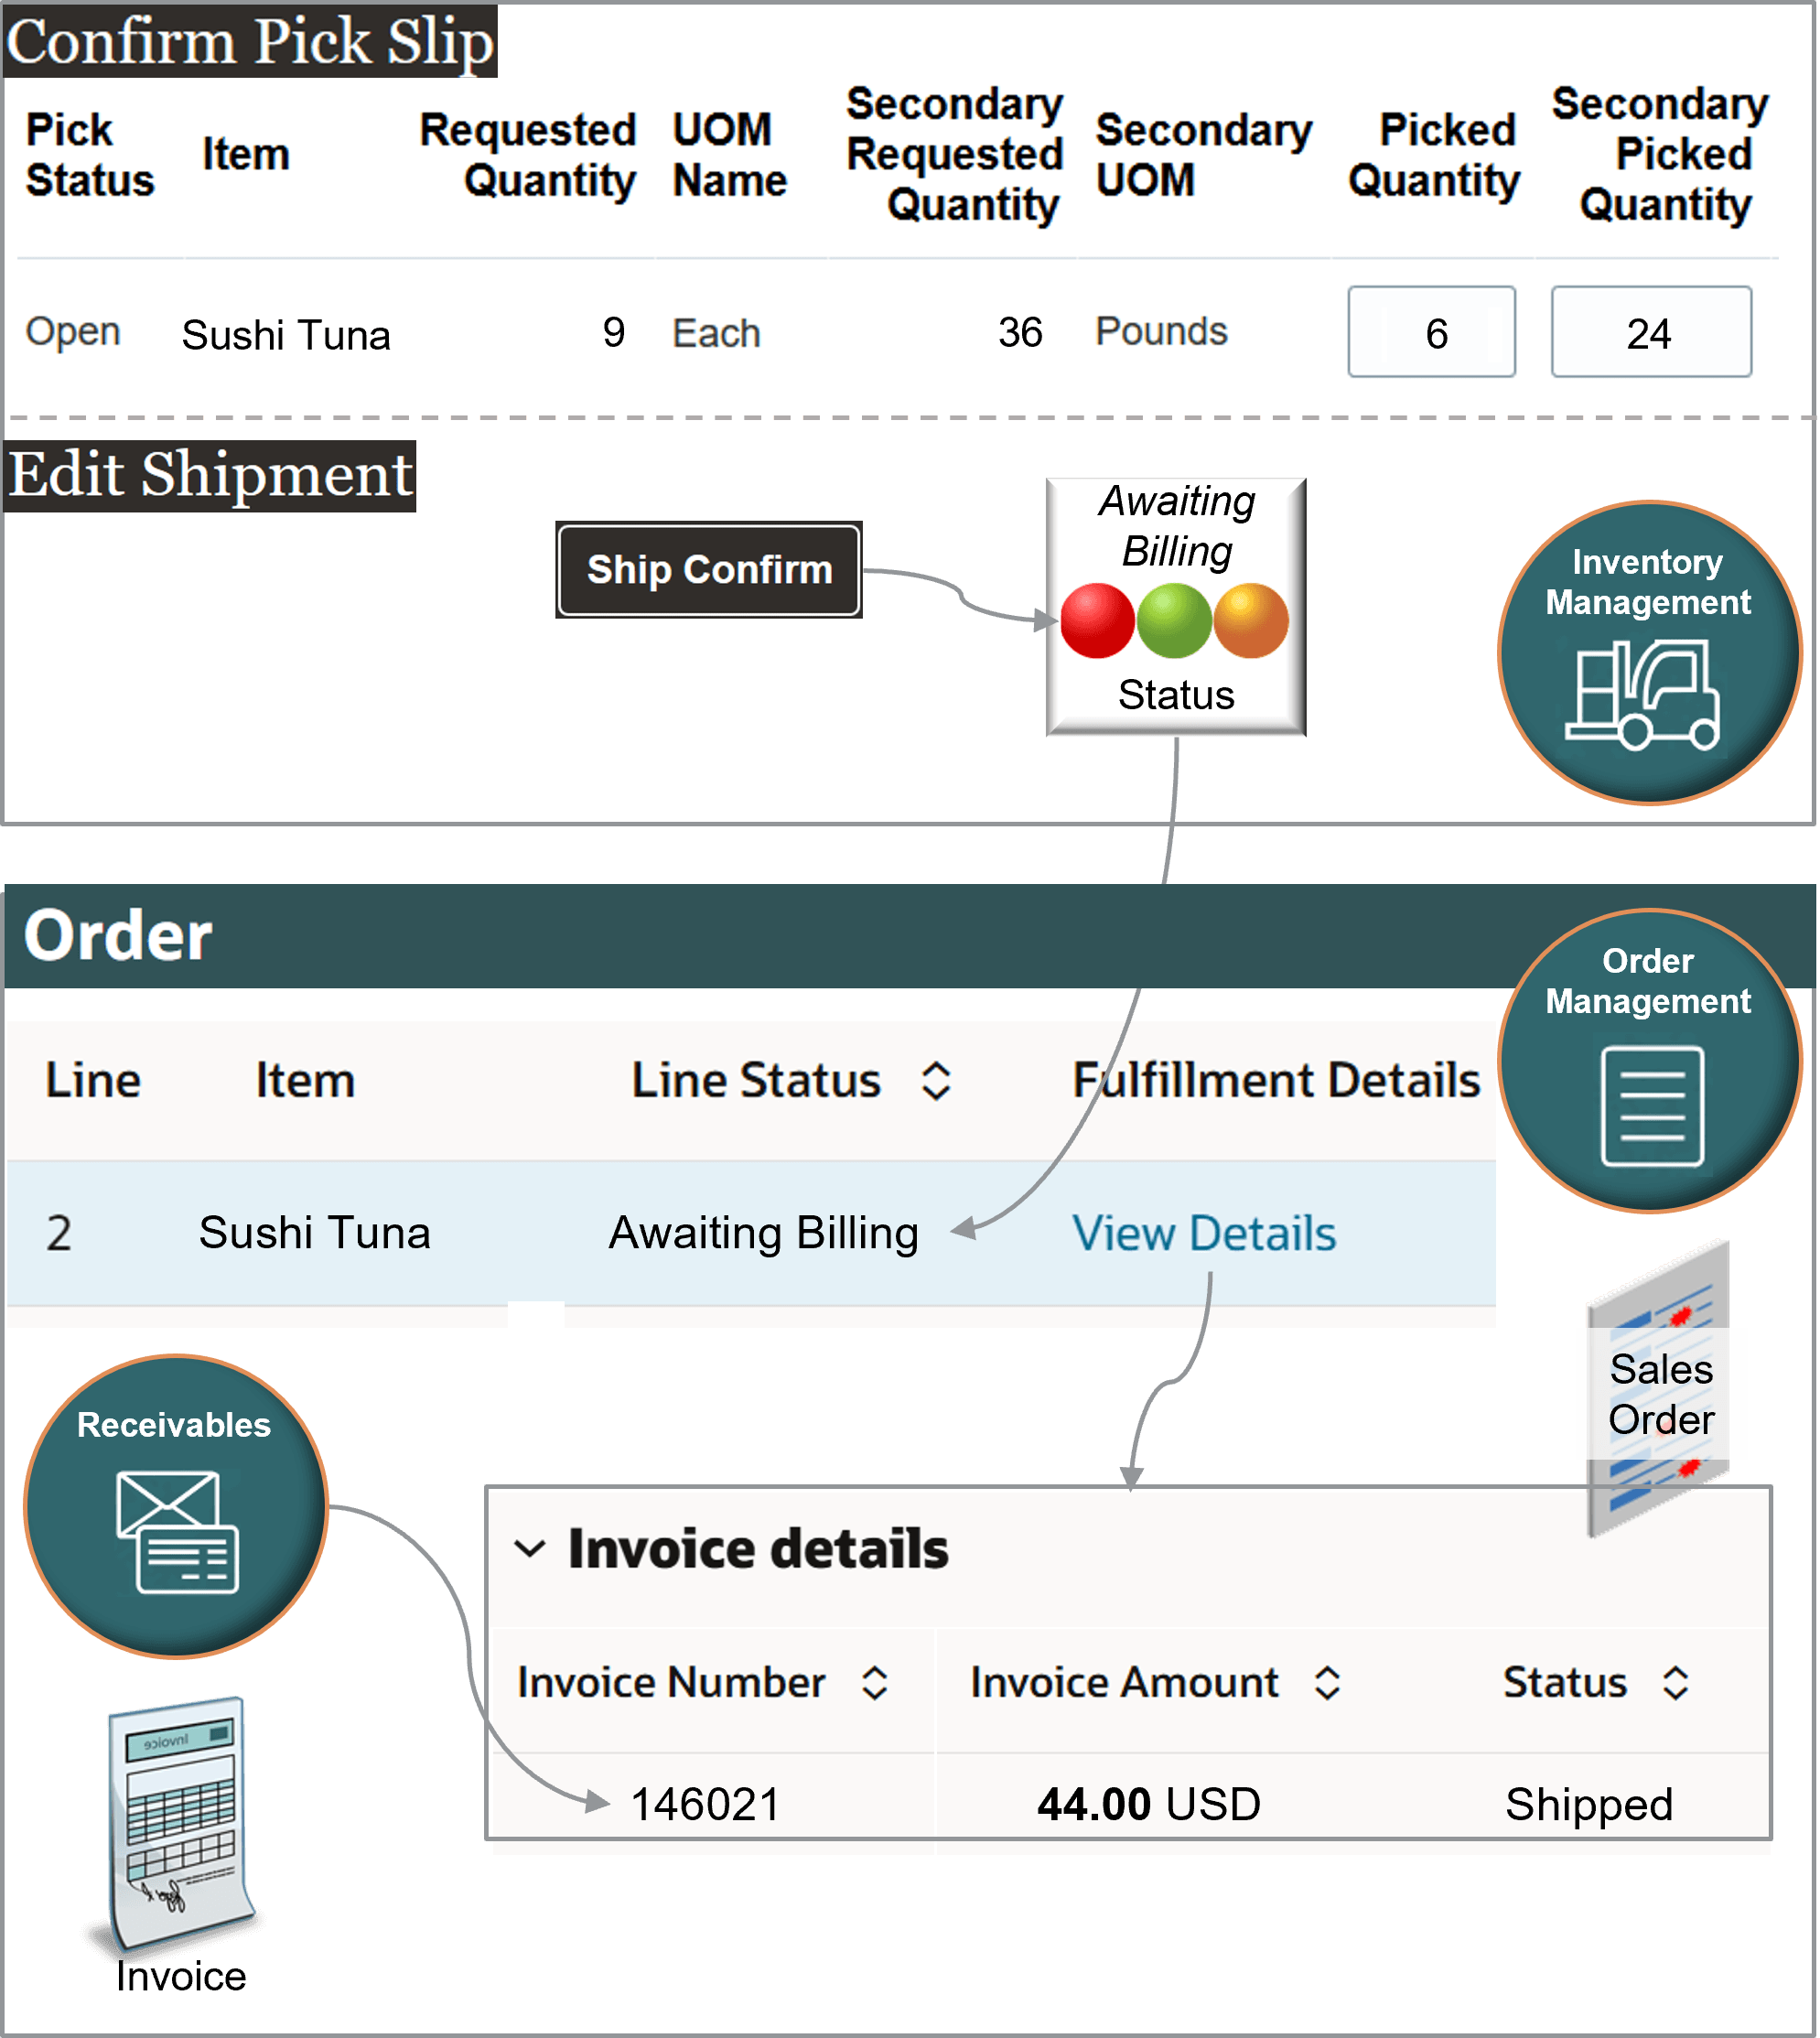
Here's what's happening:
-
You click Submit on the sales order, then Order Management creates and sends a request to Oracle Shipping.
-
Oracle Shipping creates a shipment request and populates the requested quantity and the secondary requested quantity according to the standard conversion that you set up for the item.
-
You can also use the Inventory Management work area to manually create a pick wave, confirm the pick slip, and confirm the shipment.
-
This feature maintains values for various attributes, such as Secondary Requested Quantity and Secondary UOM. It maintains and displays them throughout your flow across applications.
-
Inventory Management lets Order Management know that it confirmed the shipment, then you use the Order Management work area to see that it updated the status on the order line to Awaiting Billing.
-
You can also use the Order Management work area to examine the order line's status, such as Shipped, and to get the same invoice details that Oracle Receivables has on its invoice for the order line.
Note
-
The Requested Quantity is in the primary Each measure. It contains 9 because you ordered 3 cases, and each case has 3 tuna.
-
Assume a case sits too long on the shelf and spoils, you pick only 2 cases instead of the requested 3. The Picked Quantity is in the primary Each, so you set Picked Quantity to 6 because each case has 3 tuna. Each tuna weighs 4 pounds each, so Inventory Management automatically sets the Secondary Picked Quantity to 24 because each case weighs 12 pounds and you picked 2 cases.
Assume you already Set Up Dual Measures. Here's a summary of what you can do now:
- Create pick wave.
- Confirm pick slip.
- Examine sales order.
- Invoice sales order.
- Examine invoice details on order lines.
- Examine receivables.
- Fix the order total.
Create Pick Wave
In this example, you set the picked quantity to a value that's different from the requested quantity. To start, you create a pick wave:
-
Go to Home Page > Supply Chain Execution > Inventory Management (Classic) > Tasks > Show Tasks > Shipments > Create Pick Wave.
-
On the Create Pick Wave page, set the values:
Attribute
Value
Release Rule
Standard
Ship From Organization
M1
Order
525940
Customer
Fancy Fish
-
Click Show More > Options, then set the value:
Attribute
Value
Autoconfirm Picks
Not selected.
You can normally leave this enabled, but disable here so you can examine the confirm flow.
-
Click Release Now.
-
In the Confirmation Dialog, notice the text
Number of shipment lines released to warehouse: 1.Assume Inventory Management creates pick wave 1307257.
Confirm Pick Slip
-
On the Inventory Management page, click Tasks > Confirm Pick Slips.
-
On the Confirm Pick Slips page, search for the value:
Attribute
Value
Pick Wave
1307257
-
In the search results, click the link in the Pick Slip column.
-
In the Picks area, note the values:
Attribute
Value
Requested Quantity
Maximum Picked Quantity
9
Its the quantity in the primary measure, Each. You ordered 3 cases of tuna, and each case has a quantity of 3, so the total is 9.
Secondary UOM
Pounds
Secondary Requested Quantity
36
The conversion rule that you created calculates this value, which is a conversion between the item's primary Each measure and the item's secondary Pounds measure.
Secondary Picked Quantity
Empty
-
Set the value:
Attribute
Value
Picked Quantity
9
It's the quantity in the primary Each measure.
-
Notice that the work area automatically updates the Secondary Picked Quantity according to the value that you set in the Picked Quantity:
Attribute
Value
Secondary Picked Quantity
36
It's the quantity in the secondary Pounds measure.
-
You set the Deviation Factor earlier in this procedure to +/- 10%. 10% of 36 is 3.6, so you can set the Secondary Picked Quantity to a:
-
Low of 32.4 (36 minus 3.6).
-
High of 39.6 (36 plus 3.6).
You measure the weight of the two cases that you picked and find that they lost weight through evaporation. They actually weigh 34 pounds, not 36 pounds. So you manually decrease the value from 36 to 34, which is above the low range that the deviation allows:
Attribute
Value
Secondary Picked Quantity
34
The Deviation Factor attributes that you set for the item in Product Management controls the value that you can set.
If you find that the cases you picked weigh less than 32.4 or more than 39.6, then you can't use them. You must pick some other cases.
-
-
Set the value, then click Confirm > Confirm and Go to Ship Confirm:
Attribute
Value
Ready to Confirm
Selected.
-
Confirm the shipment. On the Edit Shipment page, confirm the values, then click Ship Confirm:
Attribute
Value
Line Status
Staged
Requested Quantity
Staged Quantity
9
It's the quantity in the primary measure, Each.
Secondary Picked Quantity
34
Secondary Requested Quantity
36
Inventory Management sends an update to Order Management that it confirmed the shipment, and Order Management updates the order's status to Awaiting Billing.
Here's a summary of the shipment line:
|
Item |
Order Line |
Line Status |
Quantity UOM |
Requested Quantity |
Staged Quantity |
Secondary Picked Quantity |
Secondary Quantity UOM |
|---|---|---|---|---|---|---|---|
|
Sushi Tuna |
1 |
Staged |
Each |
9 |
9 |
34 |
Pounds |
Examine Sales Order
-
Go to the Order Management work area and open sales order 525940.
-
Notice that the order's total is different than when you submitted it. This happens because you reduced the quantity that you actually picked.
Here's the order line:
Item
Quantity
Status
UOM
Your Price
Amount
Sushi Tuna
3
Awaiting Billing
Case of 3
2
68
Order Management uses the quantity that it receives from Shipping to recalculate the amount so it reflects that actual quantity that you shipped.
-
Notice the order line's values:
Attribute
Value
Shipped Quantity
Fulfilled Quantity
3
You shipped and fulfilled all 3 cases of tuna in the primary, Each.
Secondary Shipped Quantity
Secondary Fulfilled Quantity
34
You shipped and fulfilled a total of 34 in the secondary, Pounds.
Order Management:
-
Uses the standard conversion that you created and the line's Quantity attribute to set the Secondary Quantity.
-
Order Management populates the Secondary Fulfilled Quantity attribute after the fulfillment completion step finishes. See Guidelines for Setting Up Orchestration Process Steps.
Invoice Sales Order
-
Make sure you have the privileges that you need to administer Oracle Maintenance Management.
-
Go to Home Page > Supply Chain Execution > Maintenance Management > Tasks > Manage Assets.
-
Click Show Filters, then search for the values:
Attribute
Value
Item
Sushi Tuna
Sales Order Number
525940
-
In the search results, click the link in the Number attribute, such as 100100375360194.
100100375360194 identifies the asset that Inventory Management created for the item.
-
On the Asset page, notice how the feature brought values from Order Management into Maintenance Management:
Attribute
Value
Asset Number
100100375360194
Description
The world's tastiest tuna.
Item
Sushi Tuna
Quantity
3 Case of 3
Secondary Quantity
34 Pounds
Customer
Computer Service and Rentals
-
Click Last Sales Order Details. Its the fourth icon from the top.
-
Notice how the Last Sales Order Details page contains a pricing breakdown:
Attribute
Value
Charge Definition
Sale Price
Priced Quantity UOM
Pounds
Product Unit Price
2
Primary
Contains a check mark.
Price Element
Your Price
Recall that the order line is still in the Awaiting Billing status. It means that Order Management sent the line to Oracle Receivables, and the order line is ready to invoice.
Now let's see how we get that to Closed status.
-
Go to Home Page > Tools > Scheduled Processes, then run the Import AutoInvoice scheduled process to invoice the sales order:
Attribute
Value
Business Unit
Vision Operations
Transaction Source
Distributed Order Orchestration
From Sales Order Number
525940
To Sales Order Number
525940
-
Go to the Order Management work area and open sales order 525940.
-
Look:
Attribute
Value
Item
Sushi Tuna
Status
Closed
It means Oracle Receivables successfully invoiced the line.
Examine Invoice Details on Order Lines
-
Look:
Attribute
Value
Status
Shipped
-
Notice the billing attributes on the line. They indicate that the flow successfully invoiced the sales order:
Attribute
Value
Invoice Number
146021
Invoice Amount
68.00 USD
Order Management creates and sends a request to Oracle Receivables to create an invoice. Receivables uses the pricing unit of measure:
|
If You Use This Attribute on the Order Line To Price the Item |
Receivables Will Use These Attributes From the Order Line When It Creates the Invoice |
|---|---|
|
UOM |
Fulfilled Quantity UOM |
|
Secondary UOM |
Secondary Fulfilled Quantity Secondary UOM |
Examine Receivables
-
Go to Home Page > Receivables > Billing > Tasks > Manage Transactions.
-
Search for the value:
Attribute
Value
Transaction Number
146021
It's the invoice number that you noted on the order line in Order Management.
-
Click 146021 in the search results, then, in the Invoice Details area, notice the values on the invoice line:
Attribute
Value
Item
Sushi Tuna
UOM
Pounds
It's the item's secondary measure.
Order Management only sends the measure that it used to price the item to Oracle Receivables. In this example, Order Management priced the item in the secondary, so it doesn't send the primary quantity or primary measure to Oracle Receivables.
Quantity
34
It's the quantity that Oracle Shipping actually shipped, in the secondary measure.
Unit Price
2
Amount
68
Fix the Order Total
-
Examine the order's total:
-
Go to the Order Management work area, then open order 525940.
-
On the order page, notice the value at the top of the page:
Attribute
Value
Total
86.40
The order total is 86.40 but the amount on the invoice is 68. Why?
-
Click the warning icon next to the order total, then examine the warning:
The total amount for sales order 525940 isn't correct. The
                                    order fulfillment process updated the amount on one or more
                                    order lines in sales order 525940, but the order total doesn't
                                    include these updates. To update the total, someone with a job
                                    role to manage scheduled processes must go to the Scheduled
                                    Processes work area, then run the Update Sales Order Totals
                                    scheduled process. Specify order number 525940 when you run the
                                    scheduled process. You can also set it up to run automatically
                                    on a schedule.
This happens because Oracle Receivables recalculated the order line's extended amount according to the actual quantity that Shipping shipped, but Shipping hasn't sent this change to Order Management. Recall that you changed the quantity during shipping.
-
Click the 86.40 total, then examine the price breakdown:
Attribute
Value
Total List Price
72.00
Total Tax
14.40
Pay Now
86.40
86.40 reflects the quantity that existed when you submitted the sales order, not that you actually shipped.
-
-
To get the order total back in sync with the invoice, go to the Scheduled Processes work area, then run the Update Sales Order Totals scheduled process. For this example, set these values when you run it:
Attribute
Value
From Order Number
525940
To Order Number
525940
We recommend that you run the process only after you invoice the sales order. This makes sure that the order total will match the invoice total.
-
Go to the Order Management work area, open your sales order, click the 81.60 total, then verify that the sales order's total now matches the invoice total:
Attribute
Value
Total List Price
68.00
Total Tax
13.60
Pay Now
81.60