19Evaluation Management
Evaluation Management
Evaluation Management
Evaluation Management allows organizations to electronically capture, review, and analyze an evaluator's input obtained during a screening process.
Several participants are involved in the evaluation process:
The Library Manager creates evaluation categories, evaluation questions, evaluation skills, and skill rating scales.
The Library Manager creates evaluation questionnaires and adds questions and skills to them.
The Library Manager adds evaluation questionnaires to requisition templates.
Recruiters add evaluation questionnaires to requisitions.
Recruiters ask evaluators to evaluate candidates.
Evaluators provide feedback on candidates they interview.
Recruiters view evaluation questionnaires completed by evaluators.
Recruiters create interviews.
Recruiters view interviews and evaluations details.
Interview participants respond to interview invitations.
Configuring Evaluation Management
The configuration of Evaluation Management consists of the following steps.
-
Enabling the Evaluation Questions and Questionnaires Activation setting to make Evaluation Management available in the Recruiting Center.
Granting Evaluation Management permissions to allow users to use Evaluation Management in the Recruiting Center and administrators to set up the feature.
Adding Evaluation Management columns in list formats. These columns are available in the Recruiting Center when users customize list formats.
Creating skill rating scales to allow users to evaluate candidates' skills using simple rating scales.
Configuring Evaluation Management message templates. These are used to send notifications and reminders throughout the interview process.
Enabling the Evaluation Questions and Questionnaires Activation Setting
Refine the settings list using the Interview Evaluations category.
Click the Evaluation Questions and Questionnaires Activation setting.
Click Edit.
Select Yes.
Click Save.
When this setting is enabled, Recruiting Center users have access to the following:
Evaluation Questions Library
Evaluation Questionnaires Library
Evaluation Categories Library
Evaluation Skills Library
Evaluation Skill Rating Scales Library
Interviews tab in requisition templates
Requisitions and candidate submissions provided they also have the proper user type permissions
If you enable the Evaluation Questions and Questionnaires Activation setting, it is recommended to turn off the Interview Management Activation setting (Configuration > [Recruiting] Settings) to avoid confusion for users. These are two separate and distinct features and neither functionality works with the other.
Granting Evaluation Management Permissions
Grant the following Evaluation Management permissions to users.
| Permission | Description | Location |
|---|---|---|
| Manage questionnaires, questions, skills and categories | Users can access the following libraries in the Recruiting Center:
|
Configuration > [SmartOrg] Administration > Users > User Types > Recruiting > Prescreening and Electronic Feedback > Interviews and Evaluation Questionnaires |
| Manage skill rating scales | This permission controls the display of the Skills Rating Scales link in the Evaluation Management Administration page. Administrators can create, edit, and deactivate Skill Rating Scales library content. | Configuration > [SmartOrg] Administration > Users > User Types > Recruiting > Prescreening and Electronic Feedback > Interviews and Evaluation Questionnaires |
| Manage Microsoft Exchange and Active Directory integrations | Users can create, edit and deactivate integrations for Microsoft Exchange and Active Directory using the Evaluation Management Administration menu. | Configuration > [SmartOrg] Administration > Users > User Types > Recruiting > Prescreening and Electronic Feedback > Interviews and Evaluation Questionnaires |
| Access interview information | Users can access the Interviews tab in requisitions they can view. The Add and Remove buttons are controlled by the Add and remove participants permission. | Configuration > [SmartOrg] Administration > [Users] User Types > Recruiting > Requisitions > Interviews and evaluation questionnaires in requisitions |
| Add and remove questionnaires | Users can access the Interviews tab in requisitions and also add and remove questionnaires. | Configuration > [SmartOrg] Administration > [Users] User Types > Recruiting > Requisitions > Interviews and evaluation questionnaires in requisitions |
| Add and remove participants | Users can add and remove participants in requisitions. | Configuration > [SmartOrg] Administration > [Users] User Types > Recruiting > Requisitions > Interviews and evaluation questionnaires in requisitions |
| Access interview information | Users can access the Interviews tab in requisition templates they can view. | Configuration > [SmartOrg] Administration > [Users] User Types > Recruiting > Requisitions > Interviews and evaluation questionnaires in requisition templates |
| Add and remove questionnaires | Users can access the Interviews tab in requisition templates and add and remove questionnaires. | Configuration > [SmartOrg] Administration > [Users] User Types > Recruiting > Requisitions > Interviews and evaluation questionnaires in requisition templates |
| Access interview information | Users can access the Interviews tab in candidate submissions to which they have access. | Configuration > [SmartOrg] Administration > [Users] User Types > Recruiting > Candidates > Interviews and evaluation questionnaires in candidate submissions |
| Remove completed questionnaires | Users can remove any completed feedback questionnaires in candidate submissions to which they have access. The ability to remove completed evaluations from the requisition is also managed by this permission. | Configuration > [SmartOrg] Administration > [Users] User Types > Recruiting > Candidates > Interviews and evaluation questionnaires in candidate submissions |
| Add and remove participants | Users can add and remove evaluators in candidate submissions. | Configuration > [SmartOrg] Administration > [Users] User Types > Recruiting > Candidates > Interviews and evaluation questionnaires in candidate submissions |
| Manage interviews | Users can create interview events in the Recruiting Center. Users who do not have this permission can only view details of interview events. The ability to edit and cancel interviews at the requisition level is also managed by this permission. | Configuration > [SmartOrg] Administration > [Users] User Types > Recruiting > Candidates > Interviews and evaluation questionnaires in candidate submissions |
| Manage evaluation expirations | This permission controls which Evaluation Management users (recruiters, hiring managers, interview coordinators) have the ability to manage the default expiration date when making standalone feedback requests. By default, evaluation expirations are calculated based on the value set in the Evaluation Expiration setting available in the Evaluation Management Administration page. Users can renew a request, which will send the evaluator a link to complete the evaluation. The Renew Request button will become visible. |
Configuration > [SmartOrg] Administration > [Users] User Types > Recruiting > Candidates > Interviews and evaluation questionnaires in candidate submissions |
Adding and removing evaluators in candidate submissions and requisitions
When users only have the permission to add evaluators in candidate submissions, the evaluators are only linked to candidate submissions.
When users have the permission to add evaluators in requisitions or both in requisitions and candidate submissions, the evaluators are linked to the requisitions and all associated candidate submissions.
When users only have the permission to remove evaluators in requisitions, the evaluators are removed from requisitions only. All previously created candidate submissions are not affected. However, new candidate submissions created after an evaluator has been removed will not have that evaluator.
When users only have the permission to remove evaluators in candidate submissions, the evaluators are removed from candidate submissions only.
When users have the permission to remove evaluators in requisitions as well as in candidate submissions, the evaluators are removed from requisitions as well as from candidate submissions that do not have any requests or completed feedback from the removed evaluator. If a request has been made or an evaluation has been completed, the evaluator is removed from the list of evaluators for that candidate submission and can no longer be sent feedback requests (unless that evaluator is added to the Evaluators section again).
Adding Evaluation Management Columns in List Formats
Click the Candidate tab.
Select a variation in the Show list.
Click the name of a context.
In the Columns in this Context tab, click Add...
Select these two fields:
Completed Questionnaires: displays the number of completed questionnaires out of the total number of requested questionnaires.
Questionnaire Average Score: displays the average question score of all completed questionnaires.
Click Add.
Click Done.
The columns appear in the Columns in this Context tab. The columns are available to Recruiting Center users when they customize list formats. In the Recruiting Center, the name of the two columns are: Q'naire Avg Score, Completed Q'naires.
Creating Skill Rating Scales
Skill based rating questions are available in Evaluation Management. Recruiters can evaluate candidates' skills using simple rating scales and they can compare candidates against each other and the desired skill level for the position. Charts provide users with a visual means of reviewing results and comparing responses.
In the Evaluation Management Administration page, the Skills Rating Scales link directs system administrators to the Skills Rating Scales library where they have the ability to create rating scales if they were granted the Manage rating scales permission.
The Skills Rating Scales library provides quick filters to filter and search skill ratings according to the following criteria:
Name of the skill rating scale.
Status (Active, Inactive, Draft, All).
Category: categories available in the Evaluation Categories library.
Scale value: the number of rating values in the rating scale. For example, the rating scale "Needs Development-Meets Expectations-Exceeds Expectations" would have a scale value of three.
Quick filter criteria can be used individually, or several criteria can be used together. Once the skill rating scales are filtered, sorting can also be performed on the list by clicking on the column header.
Creating a Skill Rating Scale
Click Create.
Complete the fields. See Skill Rating Scale Properties.
Click Save.
Skill Rating Scale Properties
| Property | Description |
|---|---|
| Skill Rating Scale | The name of the skill rating scale. For example: Hourly Employee Scale. |
| Short Label | Limited to 30 characters. The short label is not required. However, it is recommended to define one if using the functionality with an iPad. |
| Select the scale to be applied to ratings | The numerical value selected determines the number of scale labels (text input fields) for that rating scale. |
| Rating Value and Rating Label | The rating value represents the number of labels in the rating scale. The rating label represents the choices displayed to users. For example: Skill Rating Scale: Hourly Employee Scale Rating Values and Rating Labels:
|
| Status | Skill rating scales can have one of three statuses:
|
| Activated Languages | While creating a new skill rating scale, translations can be created through the Activated Languages drop-down. Languages that have translated content are displayed in blue in the list. Translations should be entered prior to saving the rating scale as active. |
| Category | The category can be used to classify the skill rating scale. It is optional. |
Configuring Evaluation Management Message Templates
Evaluation Management message templates are available to support evaluation and interview notifications and reminders and to keep everyone more informed throughout the interview process.
| Message Template | Recipient |
|---|---|
| Accepted Interview Invitation | Interview creator. |
| Cancellation of Request to Complete an Evaluation, Evaluator | Interview participant or person asked to complete an evaluation questionnaire via an evaluation feedback request. |
| Declined Interview Invitation | Interview creator. |
| Evaluation Completed, Evaluation Requester | Interview creator (if it included questionnaires) or person who created the evaluation feedback request. |
| Evaluation Completed, Evaluator | Interview participant or person asked to complete an evaluation questionnaire via an evaluation feedback request. |
| Evaluation Expiry Reminder, Evaluation Requester | Interview creator (if it included questionnaires) or person who created the evaluation feedback request. |
| Evaluation Expiry Reminder, Evaluator | Interview participant or person asked to complete an evaluation questionnaire via an evaluation feedback request. |
| Evaluation Expiry, Evaluation Requester | Interview creator (if it included questionnaires) or person who created the evaluation feedback request. |
| Final | Person asked to complete an evaluation questionnaire via an evaluation feedback request (this template can be selected when creating a feedback request). |
| Follow-up | Person asked to complete an evaluation questionnaire via an evaluation feedback request (this template can be selected when creating a feedback request). |
| General | Person asked to complete an evaluation questionnaire via an evaluation feedback request (this template can be selected when creating a feedback request). |
| Initial | Person asked to complete an evaluation questionnaire via an evaluation feedback request (this template can be selected when creating a feedback request). |
| Interview Cancellation | Interview participant. |
| Interview Confirmation | Interview participant. |
| Interview Details Changed | Interview participant. |
| Interview Invitation | Interview participant. |
| Interview Reminder | Interview participant. |
| Interview Rescheduled | Interview participant. |
| Prescreen | Person asked to complete an evaluation questionnaire via an evaluation feedback request (this template can be selected when creating a feedback request). |
| Request to Reschedule an Interview | Interview creator. |
Displaying the Feedback Request URL as Text in Message Templates
When configuring Evaluation Management message templates, system administrators can put a URL token in the body of the message and to have the URL displayed as text instead of the entire URL string.
When evaluators receive a feedback request, the URL in the message appears as an hyperlink. When evaluators click the link, they are redirected to the appropriate questionnaire form.

Displaying the Feedback Request URL as Text
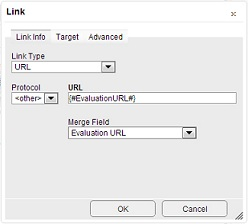
In the Link Info tab:
Select URL in the Link Type drop-down.
Select <other> in the Protocol drop-down.
Select Evaluation URL in the Merge Field drop-down (which only appears after selecting <other>). The URL field will then display the following value: {#EvaluationURL#}.
Configuring the System to Automatically Send Reminders
System administrators can configure the system to automatically send notifications to interview participants and evaluators to remind them that an interview is approaching or an evaluation will be expiring.
The following message template settings are available. Notifications can be sent 1, 2, 6, 12, 24, or 48 hours before the interview or evaluation expiry. By default, these notifications are configured to be sent 1 hour before the interview or evaluation expiry.
Path: Configuration > Evaluation Management > Administration > Message Template Settings
| Message Template | Trigger Notification |
|---|---|
| Interview Reminder | Prior to interview |
| Evaluation Expiry Reminder, Evaluator | Prior to expiration |
| Evaluation Expiry Reminder, Evaluation Requester | Prior to expiration |
Interviewer Notification with Attachments
Interview participants can get candidate artifacts as attachments instead of an unsecured link. The security is enhanced because it prevents unauthorized sharing of candidate artifacts and its corresponding indexing in search engines.
Use the setting Interviewer Notification with Attachment and sent it to Yes (Path: Configuration > Evaluation Management > Administration > Settings)
When the feature is enabled and interviews are being rescheduled, interview participants will get candidate artifacts as attachments. Previous emails with links to attachments will not be accessible. Web forms continue to be available through a link.
Selecting Evaluation Management Time Zones
Evaluation Management time zones are configured in the Evaluation Management Administration page. Time zones must be configured correctly to send evaluation requests.
There are two time zone settings in the Evaluation Management Administration page:
Time Zones: Select which time zones are available for use in Evaluation Management. Recruiters will have access to these time zones when sending feedback requests.
Default Time Zone: Select a default time zone for Evaluation Management. The default time zone is used when sending feedback requests.
By default, the system displays the user's preferred time zone (defined under Recruiting Center > Resources > My Setup > Preferences > Time Zone and also under Configuration > [SmartOrg] Administration > User Accounts > General Preferences > Time Zone). That default time zone must be activated in Evaluation Management (Configuration > [Evaluation Management] Administration > [Display] Time Zones) to properly reflect this setting in Evaluation Management.
If the user's time zone is not defined in Recruiting or SmartOrg, the system will display the default time zone set in Evaluation Management.
If the default time zone set in Evaluation Management does not match the time zone set in Recruiting or SmartOrg setting, the Recruiting or SmartOrg default time zone will be reflected in Evaluation Management.
Selecting Evaluation Management Time Zones
Click Time Zones.
Select the desired time zones.
Click Save.
Selecting a Default Evaluation Management Time Zone
Click Default Time Zone.
Select a time zone.
Click Save.
Selecting Evaluation Management Languages
Evaluation Management languages are configured in the Evaluation Management Administration page.
System administrators can select which languages are available in Evaluation Management.
The application language in Evaluation Management (the language used to display UI labels) aligns with the application language usage in Recruiting.
The content language (the language used to display the content in requisitions and candidate submissions) is preserved during navigation. For example, if a user changes the language of a requisition, the language of the evaluation questions in the requisition will be adjusted accordingly.
Content languages defined within Evaluation Management must be manually aligned with content languages activated in the Organization Content Languages setting (Configuration > Career Section Administration > Settings).
-
The base language in Evaluation Management aligns with the base language usage in Recruiting. The base language of an entity is aligned with the user preferred language. However, please note these differences in Evaluation Management:
The base language cannot be modified since no language configuration tool is available.
The base language is displayed in the list of evaluation questions.
The word (Base) does not appear next to the base language in the language drop-down list.
Additional languages do not have statuses but are automatically made available upon saving.
Languages for which a translation was provided are displayed in blue.
Selecting Evaluation Management Languages
Click Languages.
Select the desired languages.
Click Save.
Configuring Microsoft Office 365 and Azure Active Directory Integration
If your organization wants to integrate Microsoft Office 365 and Azure Active Directory (Azure AD) in Evaluation Management, perform the following configuration steps.
Enabling the Evaluation Interview Integrations Activation setting to display the Integrations menu in the Evaluation Management Administration page and configure the integration.
Granting the Manage Microsoft Exchange and Active Directory integrations permission to grant set up privileges.
Registering Oracle Talent Acquisition Cloud on Microsoft Azure portal.
This integration allows interview coordinators to view free / busy calendar information of interviewers on Microsoft Office 365. The interview coordinator can browse Microsoft Office 365 directory to add participants to an interview. Once the desired participant is added and a target date and time is set for the interview, the interview coordinator can view the free / busy availability grid to determine the optimal time to schedule an interview with the interviewer.
Prerequisites for integrating Microsoft Office 365:
Oracle Talent Acquisition Cloud release 17.5.2 or later.
Active subscriptions to Microsoft Office 365 and Azure AD.
Seamless integration of Azure AD with Microsoft Office 365.
Renewal of Azure AD symmetric key when the subscription expires or when moving to a different subscription.
Secure access to Microsoft Office 365 from Oracle Talent Acquisition Cloud.
Registration of Oracle Talent Acquisition Cloud on Azure AD portal.
Creation of user in Microsoft Office 365 which is used by Oracle Talent Acquisition Cloud to pull free / busy calendar information.
Other considerations:
It is the customer's responsibility to have Microsoft Office 365 and Azure AD properly connected. Oracle does not support issues related to Microsoft Office 365 and Azure AD interconnection.
It is the customer's responsibility to choose and activate the correct integration options in Oracle Talent Acquisition Cloud. Oracle does not support integration between products such as Microsoft Office 365 with on-premises Active Directory or Azure AD with Exchange server.
It is the customer's responsibility to enable single sign-on to Microsoft Office 365.
Enabling the Evaluation Interview Integrations Activation Setting
Refine the settings list using the Interview Evaluations category.
Click the Evaluation Interview Integrations Activation setting.
Click Edit.
Select Yes.
Click Save.
When this setting is enabled, the Integrations menu in the Evaluation Management Administration page becomes available.
Granting Evaluation Management Permissions
Grant the following Evaluation Management permissions to users.
| Permission | Description | Location |
|---|---|---|
| Manage questionnaires, questions, skills and categories | Users can access the following libraries in the Recruiting Center:
|
Configuration > [SmartOrg] Administration > Users > User Types > Recruiting > Prescreening and Electronic Feedback > Interviews and Evaluation Questionnaires |
| Manage skill rating scales | This permission controls the display of the Skills Rating Scales link in the Evaluation Management Administration page. Administrators can create, edit, and deactivate Skill Rating Scales library content. | Configuration > [SmartOrg] Administration > Users > User Types > Recruiting > Prescreening and Electronic Feedback > Interviews and Evaluation Questionnaires |
| Manage Microsoft Exchange and Active Directory integrations | Users can create, edit and deactivate integrations for Microsoft Exchange and Active Directory using the Evaluation Management Administration menu. | Configuration > [SmartOrg] Administration > Users > User Types > Recruiting > Prescreening and Electronic Feedback > Interviews and Evaluation Questionnaires |
| Access interview information | Users can access the Interviews tab in requisitions they can view. The Add and Remove buttons are controlled by the Add and remove participants permission. | Configuration > [SmartOrg] Administration > [Users] User Types > Recruiting > Requisitions > Interviews and evaluation questionnaires in requisitions |
| Add and remove questionnaires | Users can access the Interviews tab in requisitions and also add and remove questionnaires. | Configuration > [SmartOrg] Administration > [Users] User Types > Recruiting > Requisitions > Interviews and evaluation questionnaires in requisitions |
| Add and remove participants | Users can add and remove participants in requisitions. | Configuration > [SmartOrg] Administration > [Users] User Types > Recruiting > Requisitions > Interviews and evaluation questionnaires in requisitions |
| Access interview information | Users can access the Interviews tab in requisition templates they can view. | Configuration > [SmartOrg] Administration > [Users] User Types > Recruiting > Requisitions > Interviews and evaluation questionnaires in requisition templates |
| Add and remove questionnaires | Users can access the Interviews tab in requisition templates and add and remove questionnaires. | Configuration > [SmartOrg] Administration > [Users] User Types > Recruiting > Requisitions > Interviews and evaluation questionnaires in requisition templates |
| Access interview information | Users can access the Interviews tab in candidate submissions to which they have access. | Configuration > [SmartOrg] Administration > [Users] User Types > Recruiting > Candidates > Interviews and evaluation questionnaires in candidate submissions |
| Remove completed questionnaires | Users can remove any completed feedback questionnaires in candidate submissions to which they have access. The ability to remove completed evaluations from the requisition is also managed by this permission. | Configuration > [SmartOrg] Administration > [Users] User Types > Recruiting > Candidates > Interviews and evaluation questionnaires in candidate submissions |
| Add and remove participants | Users can add and remove evaluators in candidate submissions. | Configuration > [SmartOrg] Administration > [Users] User Types > Recruiting > Candidates > Interviews and evaluation questionnaires in candidate submissions |
| Manage interviews | Users can create interview events in the Recruiting Center. Users who do not have this permission can only view details of interview events. The ability to edit and cancel interviews at the requisition level is also managed by this permission. | Configuration > [SmartOrg] Administration > [Users] User Types > Recruiting > Candidates > Interviews and evaluation questionnaires in candidate submissions |
| Manage evaluation expirations | This permission controls which Evaluation Management users (recruiters, hiring managers, interview coordinators) have the ability to manage the default expiration date when making standalone feedback requests. By default, evaluation expirations are calculated based on the value set in the Evaluation Expiration setting available in the Evaluation Management Administration page. Users can renew a request, which will send the evaluator a link to complete the evaluation. The Renew Request button will become visible. |
Configuration > [SmartOrg] Administration > [Users] User Types > Recruiting > Candidates > Interviews and evaluation questionnaires in candidate submissions |
Adding and removing evaluators in candidate submissions and requisitions
When users only have the permission to add evaluators in candidate submissions, the evaluators are only linked to candidate submissions.
When users have the permission to add evaluators in requisitions or both in requisitions and candidate submissions, the evaluators are linked to the requisitions and all associated candidate submissions.
When users only have the permission to remove evaluators in requisitions, the evaluators are removed from requisitions only. All previously created candidate submissions are not affected. However, new candidate submissions created after an evaluator has been removed will not have that evaluator.
When users only have the permission to remove evaluators in candidate submissions, the evaluators are removed from candidate submissions only.
When users have the permission to remove evaluators in requisitions as well as in candidate submissions, the evaluators are removed from requisitions as well as from candidate submissions that do not have any requests or completed feedback from the removed evaluator. If a request has been made or an evaluation has been completed, the evaluator is removed from the list of evaluators for that candidate submission and can no longer be sent feedback requests (unless that evaluator is added to the Evaluators section again).
Registering on Microsoft Azure Portal
For Recruiting to communicate with Azure Active Directory, you must register Oracle Talent Acquisition Could on the Azure Cloud portal to create a secure connection between Recruiting and Azure Active Directory. This will generate a key that you must copy in OTAC.
Go to the Azure portal and log in to your Azure Account.
Select Azure Active Directory in the left menu.
Select App registrations.
Select New application registration.
Enter the following information:
- Name: Choose a name for the application.
- Application type: Select Web app/ API.
- Sign-on URL: Enter the URL pointing to the OTAC zone of your choice. For example: https://customer.taleo.net.
Click Create. The Client ID and Symmetric Key are generated. These are required when configuring Active Directory for Microsoft Office 365.
Click Settings.
Click Required Permissions.
Select the option Read Directory Data.
Click Save.
Click the Grant Permissions button.
Click Keys.
Add a description and duration for the key.
Copy the key displayed and paste it on a document. You will not be able to see it again later.
Configuring Microsoft Office 365
You must have a user created in Microsoft Office 365 with the ability to read calendars.
Click Integration Configuration.
Click Create next to Exchange Integrations.
Enter a name for the integration.
Enter the Microsoft Office 365 domain name. This information is provided by Microsoft when subscribing to Office 365.
Set the status to Active.
Select Office365 for the version.
Enter the Exchange Web Services URL. The default value is https://outlook.com/EWS/Exchange.asmx.
Enter the user name of the registered Office 365 user. If you use a vanity domain, use this domain. Example: john.doe@vanity.com.
Enter the password provided for the Office 365 user.
Click Save.
Configuring Active Directory for Microsoft Office 365
Oracle Talent Acquisition Cloud must be registered on the Microsoft Azure portal.
Click Integration Configuration.
Click Create next to Active Directory Integrations.
Enter a name for the integration.
Enter the Active Directory domain name. This information is provided by Microsoft when subscribing to Office 365. Use the full domain name with onmicrosoft.com. Do not use the vanity domain.
Set the status to Active.
Set the active directory type to Cloud AD to enable the supported AD configuration with Microsoft Office 365.
Set the authentication method to NA - Cloud AD.
The Active Directory URL is defaulted to Microsoft’s graph API’s URL for Cloud AD.
Enter the Client ID. The Client ID is generated when registering Oracle Talent Acquisition Cloud on the Azure AD portal. Ask Azure administrator to provide you with the value.
Enter the symmetric key. The symmetric key is generated when registering Oracle Talent Acquisition Cloud on the Azure AD portal. Ask Azure administrator to provide you with the value.
Click Save.