2Jobs Configuration
Jobs Configuration
Jobs Configuration
Uploading Jobs
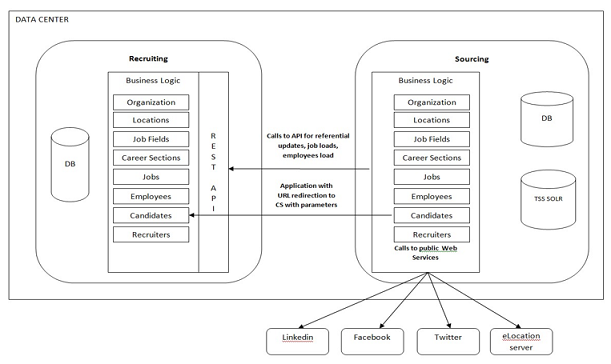
Sourcing directly integrates with OTAC Recruiting providing full autonomy to the Sourcing Administrator and multilingual support with no integration to maintain.
-
Select which of the Career Sections will feed Sourcing.
-
Filter jobs by country or company.
-
Group several Career Sections for each site.
-
Use different Career Sections for each site.
Path: Sourcing > Configuration > Taleo > [Taleo Enterprise Edition Job Connector
-
Req ID
-
Application URL
-
Posting Date
-
Hot Flag
-
Location ID
-
Job ID
-
Job Field ID
-
Title
-
External Description
-
External Qualifications
-
Education Level
-
Employee Status
-
Job Level
-
Job Type
-
Schedule
-
Shift
-
Travel
-
User Group
-
Internal Description
-
Internal Qualifications
-
Minimum Salary
-
Maximum Salary
-
Hiring Manager
-
Internal Contact Name
-
Internal Contact Email
-
Internal Referral Bonus Flag
-
External Referral Bonus Flag
-
Status ID
Organization, Location and Job Field (Category)
Job Category
When an Administrator sets up a Job Feed integration between OTAC and Sourcing, they can map which fields in the OTAC Job Field correspond to the Sourcing Job Category. In the Sourcing Configuration area a read-only browser is populated for viewing the Job Field (Job Category level) tree information. The Sourcing tree is updated when job fields are changed in OTAC. The data feed from OTAC also populates the corresponding Job Category facet in Sourcing, which is used throughout Sourcing (e.g. for Category Landing pages and job searches).
Job Location
When an Administrator sets up a Job Feed integration between OTAC and Sourcing, they can map which fields in the OTAC Location correspond to the Sourcing city, state/province and country. In the Sourcing Configuration area a read-only browser is populated for viewing the location tree information. The Sourcing tree is updated when location fields are changed in OTAC. The data feed provides Sourcing all the different OTAC job locations, including secondary locations for a job, so that Sourcing can use them in job searches.
Job Organization
Customers that have different companies in TEE and who want to be able to use them as facets in Sourcing (while running the Job Feed API), can map the Organization in the OLF to a Company facet.
-
When used, the mapping function maps Organization to a company or brand.
-
When activated, this creates a facet in the Job Results page from which users can filter jobs.
-
When activated, this allows the Administrator to filter sites based on company (organization).
Note: For a job to show up on the Job Details page, the Company filter must be enabled in the Site Builder.
To use this feature, users must go into the configuration and set the Organization level. It is recommended that customers minimize the number of times that the Organization mapping is changed; this should only happen during setup or while changing the organization in SmartOrg.
Multilingual Capabilities
When an Administrator sets up a Job Feed integration between OTAC and Sourcing, OTAC sends job fields that are translated or relate to the job requisition language (e.g., title, description internal, description external, qualifications internal, qualifications external, base language). Translated information from OTAC is mapped to the locales/languages in Sourcing.
Troubleshooting Issues Uploading Jobs
If a job is posted in Recruiting, but is not loaded in Sourcing, there are several entities that should be verified and additional steps that can be taken to integrate the missing job.
If it is discovered that a job that resides in Recruiting did not come over into Sourcing, consider the following:
-
Date override on Manual Job Synchronization
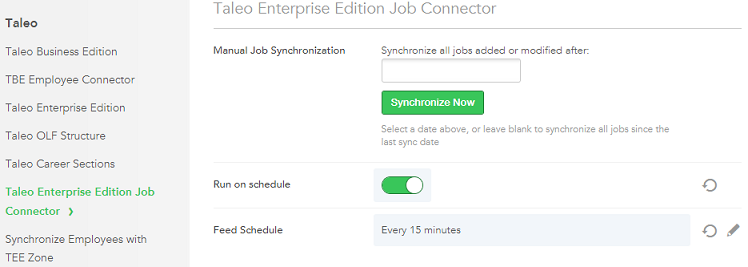
Using the Manual Job Synchronization feature enables the Administrator to bring over jobs that did not come over through the feed. The scheduled Job Connector requests requisitions with a last modification time and date since the last time it ran. If there are jobs, which for some anomaly did not synchronize into Sourcing, the Manual Job Synchronization can be invoked to retrieve the missing jobs. Administrators enter a date into the Manual Job Synchronization and the synchronizer will request all jobs that are currently posted on the tethered career sections with a last modification date on or after the date selected.
When no date is selected, clicking the Synchronize Now button will request jobs from Recruiting that were modified or posted after the last time the Job Connector ran. Selecting a specific date will request jobs from Recruiting which were modified or posted after the date entered.
-
Check the frequency set for the job feed
For the initial loads or when adding some Career Sections to the configuration in Sourcing, it is recommended that a low synchronization frequency is used; e.g., every three hours. If there is large volume of jobs to load its best to let the synchronization complete before a new sync is performed.
If an internal job is not visible in Sourcing, consider the following:
-
Internal Only Jobs Setting
The Internal Only Jobs Setting must be enabled for internal jobs to be visible to employees in Sourcing. Verify that this is enabled by going to Sourcing > Configuration > Jobs > Internal Information
Career Sections
The jobs are loaded from the Career Sections that are linked with Sourcing. Administrators are easily able to select which Career Sections to sync through the Sourcing configuration.
Path: Sourcing > Configuration > Taleo > [Taleo Career Sections]
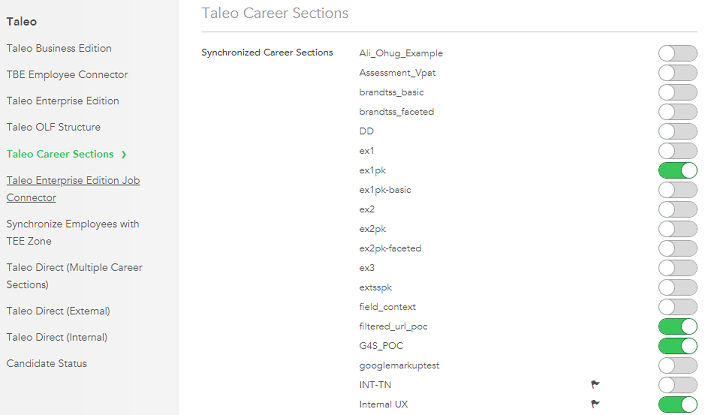
The list displays all of the Career Sections that are active, public and on which there is at least one job posted. The jobs from each of the selected CS's will be loaded into Sourcing. The flag icon indicates that the CS is internal. When an Administrator runs the Career Section synchronization between OTAC and Sourcing, and subsequently a candidate applies to a job, Sourcing can route the candidate to the most appropriate CS application flow.
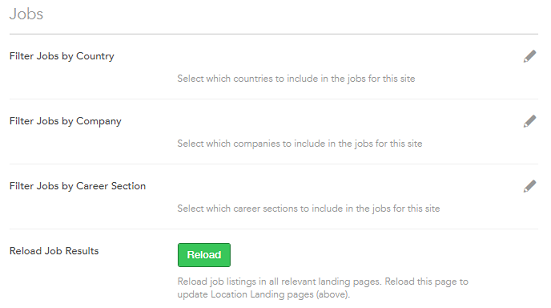
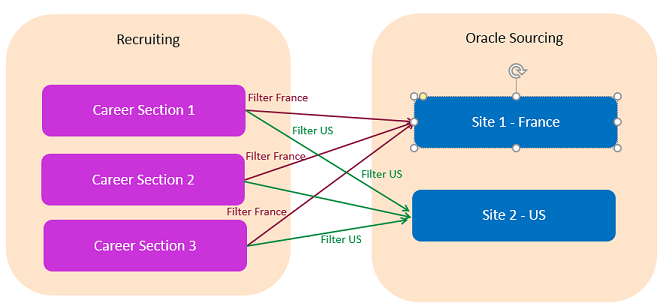
Filtering can be applied to refine the list of jobs that are displayed at the Site level. Administrators can choose to filter jobs by country, by company (uses the Organization level) or by Career Section. It is possible to select just one CS or several CS's from which you want the jobs retrieved. This is done in the Site Builder settings. Once you change your filtering options, click Reload Job Results to apply the new filters.
Path: Sourcing > Configuration > Site Builder > Edit Site Settings
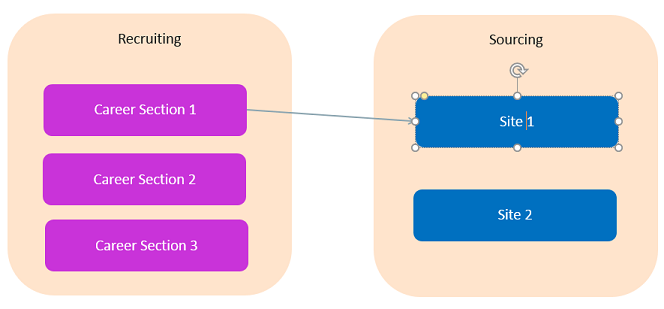
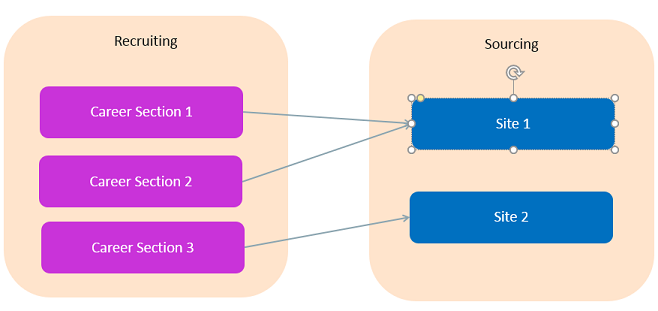
The Relationship Between Career Sections and Sites
In addition to having a 1:1 relationship between a Career Section and a Site, it is possible to create multiple Sites from a single instance of Sourcing. Each Site can have its own branding, job feed and vanity URL using a single Career Section or multiple Career Sections. Supporting multiple Sites allows for complex business cases and aligns with Recruiting configuration and the strategy in place when several Career Sections are being used. Supporting multiple sites is useful in that customers can choose to progressively roll out Sourcing as a solution; they can create a Site for each country, business line, job category, and so on.
Smart Redirection to Career Sections
When applying for a job, the candidate will be redirected to the appropriate apply flow and Career Section automatically.
The candidate is redirected to a Career Section:
-
Where the job is posted.
-
In the same language the applicant was viewing the requisition.
-
In respect of the candidate type; internal, external or mobile.
-
With the highest sequence number if there are multiple Career Sections that match the above criteria.
Candidates can apply in different languages and on multiple devices.
Alternate Job List URL
This feature provides OTAC Career Section (CS) customers, who want to use Sourcing (or another product) as the primary career site, the ability to redirect users from the CS Job Search tab back to Sourcing (or other product).
When a customer uses Sourcing as the Job Search front-end for OTAC, and a candidate searches for jobs and finds one they are interested in applying to, the candidate is handed off to CS for the application flow. During the application process, if the candidate decides to search for more jobs and this feature is enabled, when the user clicks the Taleo Enterprise Job Search tab they are navigated back to Sourcing via the configured URL. They can then use Sourcing to search for more jobs.
Candidates using external URLs which point to a CS job search or job list page are also redirected to the configured Sourcing job search.
The settings to enable this feature are located in the Taleo Enterprise Configuration module under the Career Section Administration section. See the table below for the full navigation path and settings names.
Configuration properties for this feature are listed in the table below.
| Property Name | Location |
|---|---|
| Alternate Job List URL text box | [TEE Career Section] Configuration > [Career Section] Administration > Career Sections(click career section name) [Properties] Edit |
| Apply Alternate Job List URL to Job Search Tab dropdown list (Yes or No) | [TEE Career Section] Configuration > [Career Section] Administration > Career Sections(click career section name) [Properties] Edit |
One of the CS portal pages for job search needs to be activated, to display the Job Search tab for a navigation link that can be redirected.
Job Description Redirect URL
For customers who want to use Sourcing as their primary career site, this feature provides a configuration setting in Oracle Taleo Enterprise Edition to redirect the Career Section (CS) job description pages to the Sourcing equivalent Job Details pages.
When Sourcing is used as the primary career site, external links to job descriptions normally take users (candidates from a job board, or from a URL embedded in an email) to the TE job descriptions. Administrators can use a setting in TE configuration, on a Career Section basis, to have external links to job descriptions get redirected to a Job Details page on the Sourcing default site or a targeted Sourcing site. The Job Description Redirect URL setting is a text box into which a Sourcing page URL can be entered by an Administrator. When this setting is configured, candidates who come from job boards or links from correspondence sent by TE, can be redirected to the job descriptions in Sourcing.
Redirecting to the Default Sourcing Site
In the Job Description Redirect URL setting (in TE Configuration) the URL format must be:
https//zone.referrals.selectminds.com/taleo/jobdetails
Where:
-
zone = to be replaced with customer name
-
referrals = to be the zone type, 'referrals' or 'upgrade'
If the original URL doesn't include a language parameter, the base language of the requisition will be included in the redirection. Sourcing renders the job description in the language specified in the URL, if the language exists in Sourcing. If the language is unavailable in Sourcing, the job description is rendered in the Sourcing default locale.
If the original URL is carrying a source parameter (src= ), Sourcing will carry that source into the application into the career section. No interface element will tell the user they are redirected, unless they monitor the changing URL in the browser.
Redirecting to a Targeted, Branded Sourcing Site
-
The Job Description Redirect URL setting on each Career Section is to be populated with the URL for the appropriate Sourcing site.
-
The site URL fragment you need to include in the URL which is entered in this Career Section setting is found in the Sourcing configuration.
-
[Sourcing] > Configuration > Site Builder > Edit Site Settings > [General]
Under General, you will see the Site URL setting. That value will be included in the URL string.
-
[Career Section] > Configuration > Administration > [Career Sections] > Career Sections
Click on the name of the Career Section you wish to modify. (Note that it must be inactive to display an edit option).
-
[Properties] > Edit
Scroll down to the URL section and enter the appropriate URL in the Job Description Redirect URL field.
To direct candidates to a targeted Sourcing site, enter the URL obtained from Sourcing, i.e., http://customer.referrals.selectminds.com/Site URL/taleo/jobdetails.
-
Save
On each Career Section which is tethered to a Sourcing site, be sure to target the correct Sourcing site you wish job seekers who come from Career Section URLs to be directed to. Ensure that the site you are targeting is also tethered to that site for the Job Connector API.
Role-Specific Links and Application Flow Properties
The links Go to Profile and My Submissions target career sections configured for their Sourcing privilege class, or role, and users will be directed to the appropriate profiles and submissions (external and internal) based upon those privileges. The settings that allow candidates to go through the targeted flows are:
-
Submit Profile URL – Guests
-
My Submissions URL – Guests
-
Submit Profile URL – Employees
-
My Submissions URL - Employees
For customers who tether multiple career sections with different application flows to a single Sourcing site, the following is recommended:
For the career sections which are targeted by these Site Builder settings, it is best practice for customers to configure the “Always force this Career Section’s job-specific application flow” setting in Career Section to No.
-
Having this setting configured to No, ensures that candidates who edit their job submissions using the deeplink in Sourcing will be directed to the correct application flow; the flow in which the submission was originally created. A value of No here translates to saying, “Force the application flow on which this submission was originally created.” If a candidate applies to multiple jobs which are on multiple Career Sections, each with their own application flow, this allows that candidate to view or edit their submissions using the correct flow for a particular job.
-
This configuration mitigates any perceived need for multiple links to multiple career sections for accessing the My Submissions page.
Path: Career Section Configuration > Administration > Career Sections > Select a career section > Properties (not Application Flow Properties) > Scroll down to Application Flow Properties

Internal Mobility
Market data recommends that you source your candidates in the following order:
-
Internal candidates
-
Referrals
-
External candidates
Because your employees, or internal candidates, are the most important population to consider when you're recruiting, Sourcing offers multiple features for ease and promotion of internal mobility.
Jobs published on Internal-Only Career Sections are visible only to employees. The setting, Internal Only Jobs controls this. If this setting is disabled, Internal-Only jobs are not visible at all. If it is enabled, Internal-Only jobs are visible to employees, recruiters and administrators only.
Path: Sourcing > Configuration > Jobs
In addition to providing Internal-Only job requisitions, the following features are also available to promote internal mobility:
-
Sourcing can upload jobs from both external and internal Career Sections if they are public.
-
Employees can sign up for Job Alerts.
-
Job searches only display internal jobs for internal users.
-
On the Job Details page the Recommend to a Friend and Upload Resume buttons are hidden for internal jobs. Only the Apply button is displayed.
-
Employees cannot share or refer internal jobs to other candidates. Links pointing to Internal-Only jobs will get the message, "You do not have the necessary permissions to access the page" unless the user is logged in as employee.
-
Campaigns (Automated Referrals Marketing, Referrals On-Demand and Social Jobs Distribution) do not show internal jobs.
-
If an employee is applying for a job posted on both an external and internal Career Section, the employee is automatically sent to the internal Career Section.
-
Employees are prevented from applying to External-Only jobs.
-
Internal job descriptions and qualifications are indexed enabling employees to search keywords. In the search results list, an excerpt of the internal job description is displayed for employees.
-
Employees can sign up for Job Alerts.
Job Alerts
Candidates, both employees and non-employees (other, alumni and external referral), are offered the opportunity to sign up for Job Alerts.
When a candidate applies for a job the checkbox to register for Job Alerts is selected by default. Candidates should deselect this box if they do not wish to receive Job Alerts. Candidates can indicate their preferences for jobs by selecting their interests (job category) and job locations at the time they sign up for Job Alerts. A user who has opted-in to Job Alerts, will not receive Job Alerts emails unless they have at least one interest selected. They also will not receive the emails if they have opted out of receiving all email from the system. The Job Alert email provides one link to unsubscribe and another to manage the Job Alerts. Job Alerts can also be managed in the User Settings.
Job Alerts for Existing Users
Existing users can add a Job Alert opt-in, or expand their job field and location interests. Both external candidates and employees with existing accounts can add a Job Alert opt-in to those accounts without signing in. Job seekers can use the Job Alert sign-up capability repeatedly to expand their job field and location interests. This feature supports all cases of Job Alert opt-in where the user is not authenticated, such as Home pages, Landing pages, Settings and widgets.
The display of the Job Alert section respects the Allow Employees to Sign Up for Job Alerts setting. When the Allow Employees to Sign Up for Job Alerts setting is enabled, the section only displays to employees and Administrators who edit employees.
Opting-out of Job Alerts will still require a user to authenticate. Removing locations or job fields in the Interests will still require a user to authenticate.
Hierarchical Location Selector
The Hierarchical Location Selector enhances usability by allowing the selection of locations through choosing levels such as country, state or province, city, and address.
Administrators can choose to display the hierarchical selector to users that are:
-
Signing up for Job Alerts
-
Managing location preferences in Settings
-
Creating a user account using the Sign Up button (if displayed)
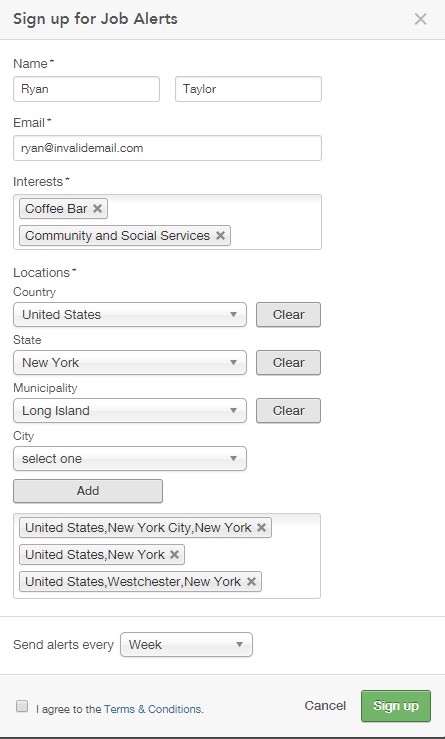
Users select locations by drilling into the location levels displayed. Locations can be added at any level by clicking Add. Individual levels can be cleared by clicking Clear.
The Hierarchical Location Selector setting must be enabled for the hierarchical selector to display. This setting resides in Configuration > Users. The setting is delivered disabled; to enable the setting click on the toggle.
Two other settings drive which levels display in the hierarchical selector and, in which order those levels display. The Location User Preferences setting (Configuration > Users > User Settings) determines which levels display in the Hierarchical Location Selector. Only the levels configured here will display in the hierarchical selector as choices for users. However, the order in which the levels are listed in this setting does not determine the order in which they will display in the hierarchical selector. Only levels that contain elements will be displayed.
The OLF Locations Levels setting (Configuration > Taleo > Taleo Enterprise Edition) determines in which order the levels are displayed. Having the order of the levels configured with respect to this setting ensures that the Hierarchical Location Selector displays the levels in the same location hierarchy as in SmartOrg.
Talent Community
When a candidate signs up for Job Alerts we register them in the Talent Community. Talent Communities contain the candidates that have applied for jobs and signed up for Job Alerts within the site, or that have applied for a job within the site and checked the box to opt in to receive Job Alerts. Each Talent Community is site-specific and allows recruiters to create campaigns and send emails and jobs to passive candidates.
Enabling and Disabling Job Alerts
Job Alerts for employees can be disabled by toggling the Allow Employees to Sign Up for Job Alerts setting to off. This setting is found in Sourcing > Configuration > Jobs.
Job Alerts for external candidates can be disabled by toggling the Talent Community Enabled setting to off. This setting is found in Sourcing > Configuration > Talent Community.
Requisition Data on Job Details Page
There are four sections on which to display up to twenty standard and user-defined fields total for each requisition. Customers can choose which fields to display on job requisitions at the site level and can further specify whether to show those fields to internal, external or both types of job seekers. This functionality allows job seekers to better evaluate if a job is right for them by learning more details about the job using this additional job-specific information.
An editor, the Field Display and Layout Editor, is available in Site Builder which provides the interface for Administrators to configure which fields and various sections display on the Job Details page for each site.
The four section titles can be relabeled in the dictionary if desired. Any field can reside in any section. The default sections are:
-
Additional Information
-
Bonus Eligibility
-
Compensation
-
Contact Information
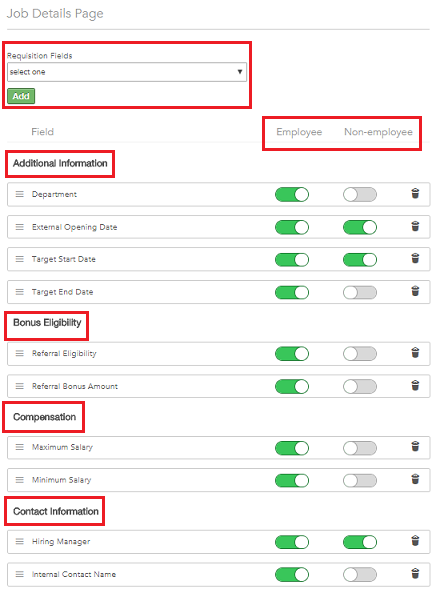
New fields that are added appear in the Additional Information section and inherit the existing styling, colors and fonts used to show requisition data. Drag-and-drop allows Administrators to easily move the newly added fields to different sections and to reorder the fields within sections. Fields are easily removed by clicking the Trash icon. Fields which are not populated do not appear as blank to job seekers; the label is suppressed. When a section has zero displayed fields for a user the section title is suppressed.
Fields can be activated for display to employees, non-employees, or both by using the toggle next to each field. Note that non-employees are defined as users with a relationship of Other, Alumni or Referral.
Keyword Search
The fields can also be included in the index for keyword search by job seekers. This allows job seekers to search for jobs using keyword search criteria beyond the title and job description to include additional requisition data. Both standard and user-defined fields configured to display across all sites on the Job Details page are now searchable. Keyword searches by employees query the requisition data configured for display to employees, while non-employees query the data configured for display to them.
To enable keyword search, login to Sourcing as an Administrator and go to Configuration > Search and toggle the Index Supplementary Fields on Job Details Page setting to enable.
Location Display Behavior
Duplicate Location Display Solution
Administrators define the location levels in Sourcing using the Location User Preference setting, Configuration > Users > [User Settings]. Previously, if the location data that came over from SmartOrg had levels below what was defined in Sourcing, Sourcing would show multiple, duplicate locations representing those lower levels. If, for example, Sourcing was configured with Country, State and City (US, CA, San Francisco) and SmartOrg went a level below that (Country, State, City, Address), each location with a different address would show as a duplicate result, displaying only as US, CA, San Francisco; Sourcing hid the children. If US, CA, San Francisco had Folsom Street, Lombard Street and Post Street in SmartOrg, Sourcing displayed US, CA, San Francisco three separate times. Now, there are no more duplicate locations representing the elements on the hidden level. Selecting the parent will include the elements for all its children resolving duplicate locations being listed for levels lower than the Location User Preference setting in Sourcing.
Places within Sourcing where this is resolved include:
-
Job Search (with Geolocation Search disabled)
-
Location Selector on Sign-Up page
-
Location Facet in Job Search
-
Location Facet in Campaigns
-
Preferred Locations on Settings page
-
Preferred Locations on Job Alerts sign-up
-
Location picklist in Analytics
Increased Location Display
The limit for the location list in Sourcing is 9,999. Organizations with even larger location tables and a need for more than 9,999 locations may contact Oracle Support and log a Service Request to increase their limit.
Display Jobs on Children of Search String
If users are searching for jobs with Geolocation Search disabled, historically an exact match of the search string must be entered to find jobs in that location. However, now we've added children to the search results of the exact matches for the levels configured in the Location User Preference setting. For example, if the Location User Preference has been configured for the Country, State and City levels (US, CA, San Francisco), and there are children of that string, i.e., Address levels (US, CA, San Francisco, Folsom Street), those children of exact matches are now included in the search results as well.
Jobs Marketing
Sourcing offers a wide variety of features that will support marketing your jobs. You can present the details of your job with rich content that includes text, pictures and videos. The Job Details pages are SEO optimized so that search engines index them accurately and present them with a high ranking when candidates search for positions. You can leverage Landing pages that group jobs with common attributes. You can use Category Landing pages, Location Landing pages and Custom Combination Landing pages that allow you to target both a job category and a location. These Landing pages can be enriched with videos, text and pictures.
Sourcing also offers the ability to create promotion campaigns for your jobs. You can create campaigns to promote your jobs on social media for both your corporate Facebook pages or Twitter accounts. With these campaigns you can share links to jobs or links to Landing pages to inform your followers about new opportunities. You can also reach out to your Talent Community, all candidates that have signed up for Job Alerrts, and send them emails with these links to new jobs or links to Landing pages. You can use their Job Alerts preferences to target the right populations. You can also promote your jobs internally using the referrals campaigns to source referrals from your employees. Sourcing also offers three different widgets; a list of jobs based on search criteria, a search bar and a Sign Up button for Job Alerts, that you can include in your corporate website.
Adding Videos at the Country and Company Level
Sourcing Administrators can post a video to a Job Requisition at the Country and Company (organization) levels.
Videos that are attached to Job Requisitions can be made available to all jobs within a country and/or an organization. For example, a video can be used to enhance all job requisitions across Canada and/or across all jobs within the Facilities Management organization. When activated, the selected video gets pushed to every job requisition within a particular country or organization.
Configuration
If the Country filter is off in the Site Builder, then there is no ability to push the video to the Country on the job requisition. Likewise, if the Company filter is off, then there's no option to push the video company-wide.
When a new job requisition is added, the most recent rule is followed.
| Settings | |
|---|---|
| Name | Location |
| Country Filter | [Sourcing] Login as Administrator > Configuration > Site Builder > Edit Site [Settings] > Jobs |
| Company Filter | [Sourcing] Login as Administrator > Configuration > Site Builder > Edit Site [Settings] > Jobs |
Widget Creation and Sharing
The Widgets feature provides administrators the ability to embed certain Sourcing functionality (such as job searches or Job Alert signups) on other websites.
Search Result (Job Listing)
Search Bar
Sign Up for Job Alerts
Widget Creation
Functionality to create and manage widgets is in the Configuration area, under Widgets. The section lists all previously created widgets; which you can edit, preview and save. You can edit the Name, Notes, Descriptive Text, Width, Height, Header, Button Text and Button Color of a widget. The settings available vary depending on the type of widget.
Search Result (Job Listing) Widget
Use the Job Search to perform a search and generate a search result (list of jobs) based on category and/or location. (Job listing results can only be created from a search.)
Click the Create a Widget button that appears at the top of the page.
This opens the Configuration > Widgets page.
Click the Edit button (Pencil icon).
Check the page layout, the Job Search ID is prepopulated.
Enter a Title, Notes (for internal use), and style features.
Preview and save the widget information. Or you can Cancel.
In preview mode the first few job search results display in the widget.
Upon Save, code for the widget displays in the text field. It is read only and not editable.
The widget code can be copied and pasted (embedded) into HTML code on other web pages.
Search results in embedded widgets update as new jobs meeting the criteria used to create the widget become available.
Users can view and interact with the job list from any web page the code is added to.
When a user clicks on a job in the list, they are redirected to Sourcing to view the job description details.
Search Bar Widget
Use the settings in the Configuration area, under Widgets > Search Bar Widgets.
Click Create New Search Widget button.
Create and style the search bar by editing the Title, internal only Notes, Description, Placeholder Text and Button Text.
Set style features: Width (pixels), Height (pixels), Include Header toggle, Include Button toggle, Button Color.
Preview and save the widget information. Or you can Cancel.
In preview mode the first few job search results display in the widget.
Upon Save, code for the widget displays in the text field. It is read only and not editable.
The widget code can be copied and pasted (embedded) into HTML code on other web pages.
Users can view the widget advertising your company and the job search results.
Users can interact with the search bar. Upon clicking Go they are redirected to the Sourcing host site, and complete the search and view results from there.
Sign Up for Job Alerts Widget
Use the settings in the Configuration area, under Widgets > Email Sign Up Widgets.
Click Create New Email Widget button.
Create and style the widget by editing the Title, internal only Notes, Description, and Button Text.
Set style features: Width (pixels), Height (pixels), Include Header toggle, Include Button toggle, Button Color.
Set the Location and/or Category and/or Company information for the alert.
Preview and save the widget information. Or you can Cancel.
In preview mode the first few job search results display in the widget.
Upon Save, code for the widget displays in the text field. It is read only and not editable.
Widget code can be copied and pasted (embedded) into HTML code on other web pages.
Users see the widget advertising your company and the Job Alerts.
Users can initiate signing up for alerts, and are redirected to a Sourcing modal to register.
Configuration
Configuration settings for this feature are listed in the following table.
| Settings | |
|---|---|
| Name | Location |
|
Configuration > Widgets |