1Getting Started
Getting Started
User Guide UI
These user interface elements are present on the Sourcing user pages for administrators, recruiters, employees, alumni and other end-users.
| UI Element | Description |
|---|---|
| Buttons (e.g. Manage Landing Pages or Get New Employees) | Use to perform a system action or run a process. Some have associated text describing the action or process. |
| Checkbox and Checkmark | Checkboxes are for selecting from a group of options. Checkmarks indicate a value is selected. |
| Down Arrow (Triangle) | Click to view a dropdown list of options. |
| Gear icon | Click to configure an element (e.g. upload a video). |
| Gray text | Provides a brief description of the associated setting, action or process. Text is read-only and not editable. |
| Information icon (i) | Provides explanatory information for the associated field(s). |
| Link Text (underlined when you hover over it) | Click to open another page, modal or other feature. |
| Magnifying Glass icon | Indicates a search criteria entry area or field. |
| Modal | Some links or buttons trigger the opening of a popup window or dialog, termed a modal. The modal window is a child window that requires you to interact with it before you can return to operating the parent application. Use a modal to perform text entry, data entry, or select options or values, in support of the function from which the link or button originated. |
| Pencil icon | Use to initiate editing of a configuration setting or text entry into a text area. In Configuration usually leads to a text box or selector, with Save and Cancel options. Longer text boxes are scrollable. |
| Plus and Minus signs | Click to maximize or minimize a feature, respectively. |
| Social Channel icons | Identify a link to a particular social network channel (e.g. Facebook, Twitter, LinkedIn or Weibo). |
| Tags (NEW, HOT, STAR) | Indicate a system or user tagging of an item (e.g. NEW for a new job, HOT for an important job, STAR for a job you want to track). |
| Text field with date | Some text entry fields display a calendar selector when you click in them. Use to enter a date in the format dd/mm/yyyy. |
| Text field with selector | Some text entry fields display dropdown selectors when you click in them, presenting a list of options to choose from. |
| Text field with plus sign | Indicates to use the field to add a value by entering text. |
| Toggle button | Use to turn a setting or feature on or off. |
| X button | Use to close a window or modal. |
About This Guide
This guide documents the Sourcing views and product functionality available to customer users with administrator, recruiter and other access roles.
Sourcing allows administrators and recruiters to easily and effectively share your company’s open jobs with your employees, alumni and other followers, through referrals, direct-marketing emails and social networks.
Category, Location and Custom Landing pages.
Job List, Search Bar, and Email Signup widgets.
Automated Referral Marketing (ARM) campaigns.
Referrals On-Demand (ROD) campaigns.
Social Jobs Distribution (SJD) campaigns.
Talent Community (TC) messages.
Facebook Jobs application.
The administrator and recruiter roles also feature comprehensive Analytics, empowering them to track and analyze all site activity.
Search the site for jobs.
Apply for jobs.
Share job postings with their friends.
Users of all types can view online Help in the form of Frequently Asked Questions (FAQs). The Help content available to a person is role dependent.
Chapters in this guide cover each of these main modules and sections. A Glossary is included to help explain important terms and acronyms.
Access Social Sourcing
Signing Up for Job Alerts
Sourcing sends job alert emails to users who want to receive them.
You want to sign up for Sourcing job alerts (no login account needed).
You are signed up to receive Sourcing job alerts relevant to your selected interests, location and company; for the interval indicated.
User Accounts and Settings
User Accounts
A user account is needed for administrator, recruiter and front-end users of Sourcing to log into the application through the Portal page.
Front-End User accounts are allowed when the Site Mode is set to Referrals. They are created when a potential user (e.g., employee or alumni) clicks the Sign Up button from the Portal page and completes the registration process.
Recruiter accounts are set up when an administrator sends an Invitation to Recruiter email to a potential recruiter, and the recruiter follows the link in the email and completes the registration process.
Administrator accounts are set up by Oracle. To perform configuration, branding and integration work on your organization's Sourcing zone, submit a service request to Oracle to have Administrator role privileges assigned to you.
The Email Domains configuration setting enables a check of a user's login email address against your organization's email domains to verify whether the user is an employee.
The Choose Relationship configuration setting requires registrants to select their relationship to the company during the registration process.
If Choose Relationship is enabled, the Employee Number Validation configuration setting requires registrants to input their Employee Number when selecting an Employee relationship.
If the Partially Log in Trusted Referrers configuration setting is enabled, employees who are trusted referrers, and are navigating in from recruiter emails, get partially logged in as likely users. This allows them to access Sourcing to refer a candidate without signing in, and still get referral credit.
Employees can sign in through Twitter, Facebook or LinkedIn, and access Sourcing without the need for a separate login and password.
Configuration
Configuration settings affecting user accounts are listed in the following table.
| Settings | |
|---|---|
| Name | Location |
| Invite a Recruiter | [Sourcing] Administrator login > Configuration > Users > Recruiters |
| Email Domains | [Sourcing] Administrator login > Configuration > Company > Company URLs |
| Choose Relationship | [Sourcing] Administrator login > Configuration > Users > Registration |
| Employee Number Validation | [Sourcing] Administrator login > Configuration > Users > Registration |
| Partially Log In the Likely User | [Sourcing] Administrator login > Configuration > Users > Login |
User Settings
Use the Settings area to update your user account information and personal settings, connected social channels, Jo Alerts, privacy settings and more. Depending upon your role, you may also have access to functions such as Invite a Recruiter, Manage My Channels and Sign Out.
-
Configuration
-
Settings
-
Invite a Recruiter
-
Manage My Channels
-
Sign Out
Settings
-
Unique Link
-
Job Alerts
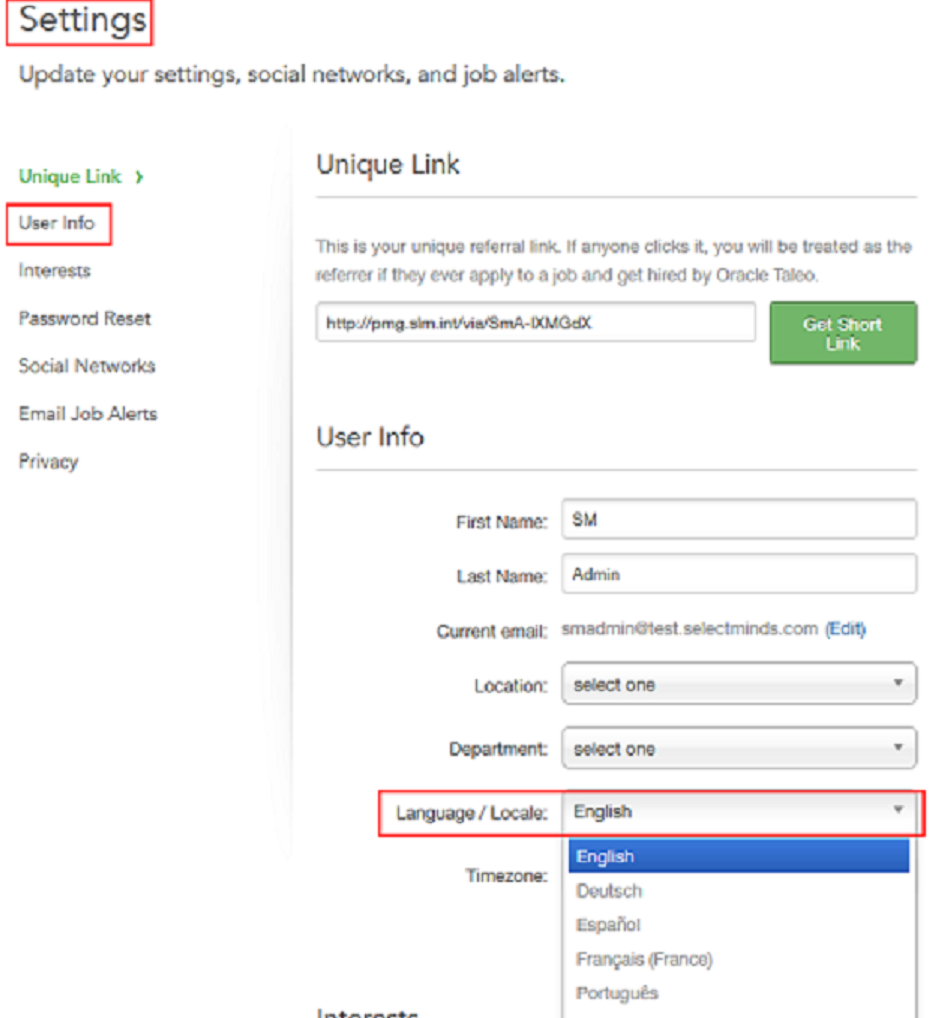
User Info
Interests
Password Reset
Social Networks
Email Job Alerts
Privacy
The Unique Link section displays your referral link, which you can send to friends and other potential candidates via email or social network(s). You can copy the full URL and share it; or you can click Get Short Link, copy the short URL and send that to friends and candidates. (Short URLs allow otherwise long web addresses to be referred to in a Twitter tweet, for example.) If a candidate uses your link to search for a job posting and start an application via Sourcing, you will automatically be listed as the referrer.
The User Info section displays your current user information, if any. Update your information by entering free text or using the dropdown menus in the fields provided. In the Language/Locale and Timezone fields you can select your country and timezone. Selecting a locale will allow you to view Sourcing in the language associated with that particular country. No updates to your account will be made until you click the Save User Info button.
Use the Interests section to tailor the jobs that are sent to you by entering your Interests, Locations and Companies. Click on the fields to view and select options in a dropdown selection list. Save your changes. Based upon your selections, Sourcing will include jobs relevant to your interests each time it generates an automated email to you.
Use Password Reset when you know your password but want to change it. To change your login credentials type in your current password, then enter and confirm a new password. Save your changes.
Administrators must enter their own password to manage the password of another user.
Use Social Networks to enter and update any Facebook, Twitter or LinkedIn accounts that you want connected with your Sourcing user account. To connect a new social channel, click Connect next to the desired social channel icon. This opens a modal from which you can authorize the connection. Click Disconnect for any currently connected social channel to rescind authorization for the connection with Sourcing.
Use Email Job Alerts to choose whether or not to receive email Job Alerts from the system. Click the checkbox to receive email Job Alerts and clear it to opt out. If you opt in, you can receive Job Alerts at the email address tied to your account or another preferred email address. Save your changes.
Use Privacy to choose whether or not you want your account to appear in the Activity Feed and the Top Referrers section. Select the checkbox to allow publishing of your activity to the Activity Feed and Top Referrers section. Clear the checkbox to opt out. Save your changes.
On the Settings page you can also view the Top Referrers and Activity Feed boxes.
Invite a Recruiter
Administrators can use this feature to open a modal from which you can invite a colleague to sign up for Sourcing. Enter an email address, click Send, and the system will generate an invitation email. Your colleague will be able to click a link in the email to register for a Sourcing account with recruiter privileges.
Manage My Channels
Use the Manage My Channels link to open the page of the same name. From this page you can manage your connected social channels (e.g., Facebook, Twitter, Linked or Weibo).
Sign Out
The Sign Out feature is for a logged in user to end their session and log them out of Sourcing.
User Language Settings
Sourcing is available to customers in several supported languages. The default language, and language activation for your organization's implementation, are configured by an administrator. Individual language preference is set by each user.
All supported language translations are loaded into the system as a default. Administrators configure the default language locale for Sourcing, and the active languages/locales available to users of the application. Each Sourcing locale has a corresponding Recruiting language. Sourcing will display the locale names in the local language, e.g. English, Deutsch, Espanol, etc. Depending upon the configuration, all or a subset of the supported languages may be available to users. Users can set their language preferences during registration, and with their user settings.
Language Toggle
There is a language toggle available on all pages of Sourcing that allows all users to clearly see the languages available to them and to change that language in their user interface. This language toggle only displays if there are two or more languages, or locales, enabled in the system. If there is only a single locale, there are not different locale choices, so the language toggle does not display in the UI.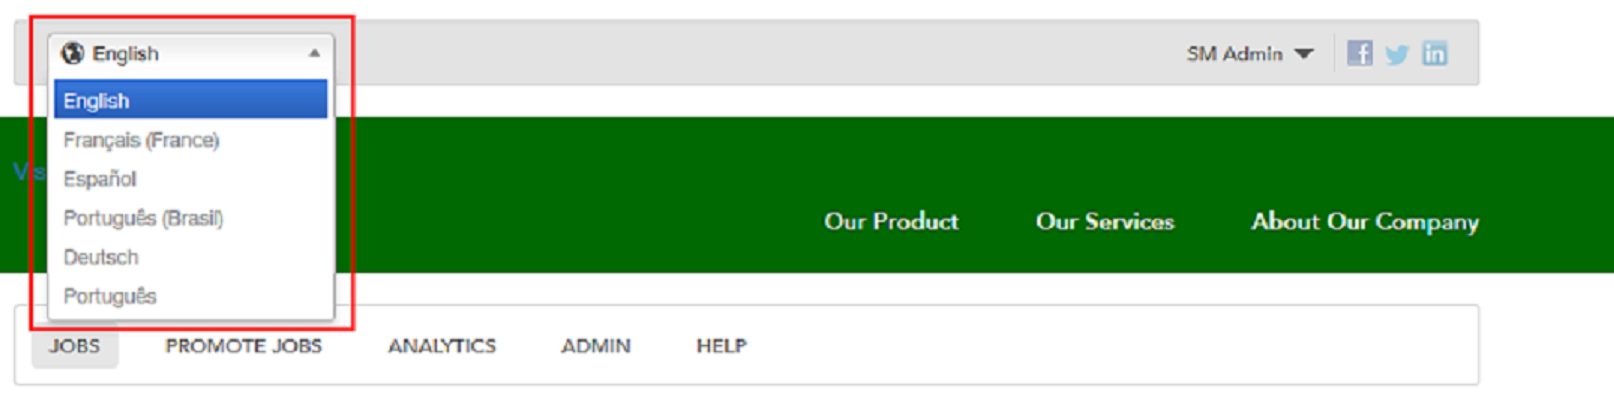
On the Job Details page, the locales enabled on the language toggle are limited to the languages that are enabled on that specific requisition. If there is a delta between the number of locales enabled in Sourcing and the number of languages enabled on this requisition in Recruiting, a message indicating this displays next to the language toggle.

Browser Language Determines Session Language
Sourcing automatically presents the Sourcing site in the users expected language using their browser language. This allows users to experience Sourcing in their expected language without having to change the language with the newly introduced language toggle.
Language Settings for Users
Language-related user settings and functions are listed in the following table.
| Language Setting or Function | ||
|---|---|---|
| Name | Description | Location |
| Language Locales in Registration | Administrators can control the display of the Locale field when a user is registering on Sourcing. It is off by default. Turning it on adds Locale to the user registration page. When registering, the user indicates their preferred language locale (country) to view Sourcing in the language associated with that particular country. | [Sourcing] Initial user login > Registration modal |
| Language/Locale | End-users can choose their preferred language locale to view Sourcing in the language associated with that particular country. If a user selects a language, the application will display in that language. | [Sourcing] Users login (all) > [Home page] Settings (Name) > Settings > User Info |
| Job Language Indicator (Globe icon) | When multiple languages are used for a job requisition, a Globe icon is displayed. A user can hover their mouse over the icon to display the languages activated for the requisition. When only one language is used for a requisition, the name of the language is displayed and there is no Globe icon. | [Sourcing] Administrator or other user login > [Home page] Jobs |
Manage My Channels
Administrators and recruiters use the Social Channels page to manage connections from Sourcing to their Facebook or Twitter social channels, from a single location. This is similar functionality to that for the Send Jobs to Fans and Followers page in Social Jobs Distribution.
Access functionality to install the Facebook Jobs Application.
In the Manage My Social Channels section add or remove pages, edit privacy settings, and view your pages. (Connected pages are presented on cards.)
You can also view your Profile block and the Activity Feed.