Advanced Branding
Branding refers to the different colors, fonts, images, logos, content, etc. that appear on a site. Generally speaking, established, well-known organizations have some colors and fonts that we tend to associate with them. For a newer organization that's trying to establish their brand, brand consistency is key; something that their customers come to identify them with. For this reason, it's recommended that some time and consideration be spent on branding.
Each site is controlled and configured independently which means that branding can be customized from site to site; each site can have its own unique look, feel and branding. This should be taken into consideration upon beginning to build your sites using the Site Builder. Something as simple as the font color can help identify an organization and either differentiate or assimilate brands.
There are two different places in Site Builder that you're able to edit your site branding: Edit Site Branding and Edit Site which are both accessed from the Configuration > Site Builder menu.
Edit Site Branding
When accessing Edit Site Branding from the Site Builder, there are 5 areas of customization available: Content Colors, Navigation Colors, Button Colors, Category Tiles Colors and Fonts.
Path: [Sourcing] Login as Administrator > Configuration > Site Builder > Edit Site Branding (paint brush icon)
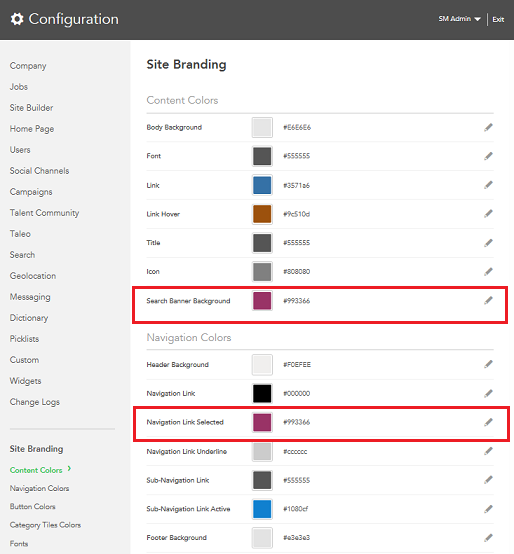
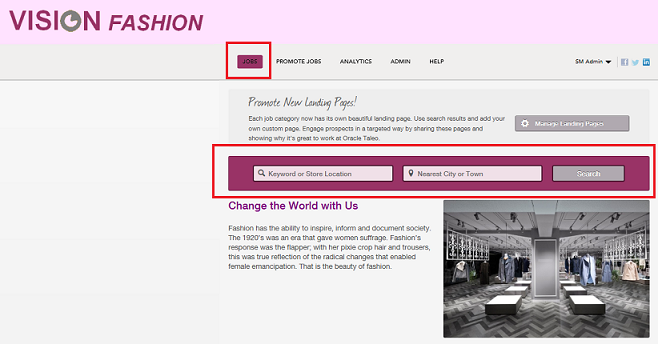
In the image above, you can see that the Search Banner Background and Navigation Link Selected are Vision Fashion's signature magenta shade in the Site Branding. Each of these settings are site-specific allowing companies to use different colors and fonts for each site. The desired colors should be entered as a hexadecimal value. In the image below, you can see how those color choices translate on the site.
Edit Site
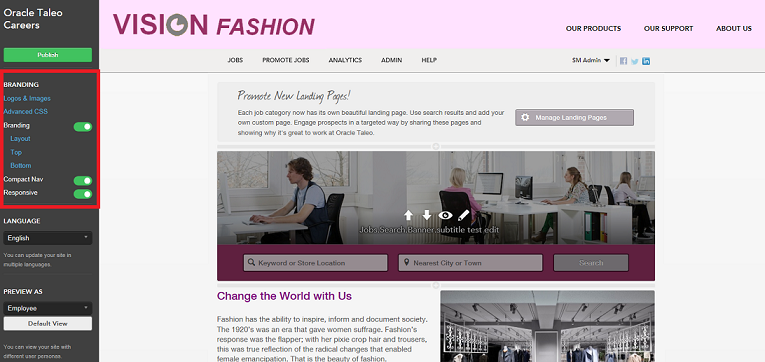
When you open a site in Site Builder, you're presented with a Branding section. The elements contained within this section work together and affect each other.
Path: [Sourcing] Login as Administrator > Configuration > Site Builder > Edit Site (screen icon)
Advanced CSS
The Edit Site Branding described in the previous section is the user-friendly way of updating your style sheets. If you want something beyond what's delivered, then you have the option of entering HTML here in the Advanced CSS section of the Branding area in Site Builder. This allows the ability for Administrators to use their own buttons, fonts, etc. that are not delivered in Edit Site Branding. A list of custom styles can be created and then must be referred to in the Branding HTML.
Uploading Custom Fonts
Administrators can upload custom fonts in the same way they upload images. To upload a custom font:
-
Temporarily insert a content block using a template that has an image.
-
Click the image button to select an image to upload. Instead of uploading an image, upload a font.
-
Delete the temporarily inserted content block.
-
Add advanced CSS to configure the custom font family.
The following code should be used as a guide and added to the Advanced CSS panel in Site Builder (Site Builder > Edit Site > [Branding] > Advanced CSS):
@font-face {
font-family: 'FONT NAME HERE'; (example, "Arial", "MyFont", "Helvetica")
src: url('FONT_URL.eot');
src: url('FONT_URL.eot?#iefix') format('embedded-opentype'),
url('FONT_URL.woff') format('woff'),
url('FONT_URL.ttf') format('truetype'),
url('FONT_URL.svg#FONT_NAME_HERE') format('svg');
-
For the path to the uploaded fonts, ensure the path set in the Advanced CSS matches the path in the CKFinder window. This can be confirmed by right-clicking on an existing image file (in the same folder) in CKFinder and selecting View, then right-clicking on the image and selecting Open in New Tab.
-
Configure custom font as Body Text Normal. Save the Advanced CSS and publish the site.
-
Navigate to Edit Site Branding for your site and add your font name to the Fonts section under Body Text Normal.
Your custom font is available to use in the Edit Site Branding area of Site Builder.
Logos and Images and Compact Nav
The Logos and Images section of the Branding area is where images are uploaded, stored and managed for the site; your default site will be pre-populated with images, but any image can be uploaded to be made available in the navigation on the site. Also stored here are the images that are attached to social media outlets. For example, if you share a Landing page URL on Facebook, you can upload an image here that will display with the URL. Logos and Images works in conjunction with the Compact Nav setting. If an organization is satisfied with the default images and logos and does not wish to include their logo in the Branding header, then the logo will display in the same area as the navigation. In this case, the Compact Nav setting should be disabled as when the Compact Nav is enabled, the logo does not display in the navigation area.
The image below shows the header of the default site with the Compact Nav setting disabled and no HTML entered into the Branding Top area:
![]()
Now let's look at what happens when we enable the Compact Nav setting, again with no HTML entered into the Branding Top area:

Notice that in the image above, the logo is gone and the navigation is on the same line as the user login and social media icons reducing the area of real estate that the header takes up on the page. This is to lend a bit more space on the header to allow an organization to brand the header with their own colors, logos and images.
The image below is the result of branding the default site to use Vision Fashion's brand:

To display the logo as it is in the header above for Vision Fashion, Compact Nav was enabled and HTML was entered into the Top Branding area.
Layout, Top and Bottom
When the Branding setting is enabled, Layout and Top, Side (if you choose a layout that includes a Side) and Bottom display. Layout determines how your site displays its content. You can choose to have just a Top (Header) and Bottom (Footer) or a layout that has a Top, Bottom and Side.
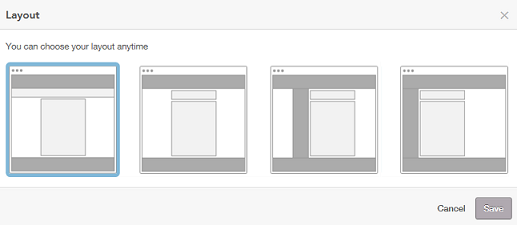
Vision Fashion uses a layout with only a Top and Bottom:
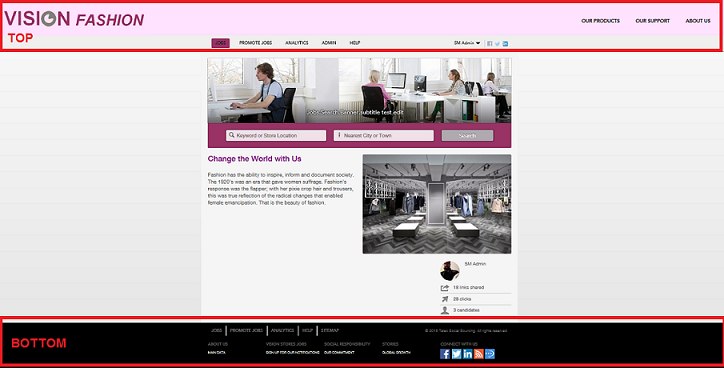
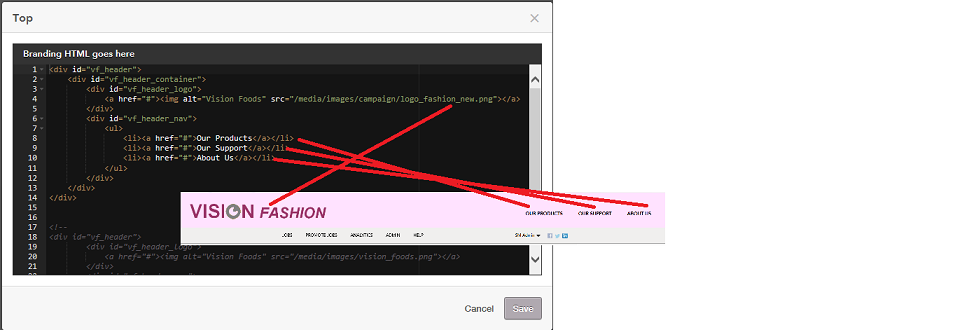
When you select Top, Side or Bottom under Branding, a Branding HTML window opens allowing Administrators to enter branded HTML for the Top (Header), Side and Bottom (Footer) of their sites. The image below shows how what's entered into the Top Branding HTML translates into the header for the Vision Fashion site.
Responsive
Sourcing optimizes its rendering no matter the device used to access it. The Responsive toggle allows the Administrator to indicate whether Responsive Design HTML was used when branding the site. If Responsive Design was used then the Responsive setting should be enabled. If Responsive Design was not used then the setting should be disabled to allow Sourcing to compensate and render the branding appropriately on the different devices.