Site Overview
Each implementation of Sourcing includes a single default site. A site in Sourcing is a website, your Career Site, which for clarity we'll refer to simply as, "site". It is important to note the difference between your site and your Career Sections (CS). Career Sections reside in Recruiting and contain your job requisitions. Career Sections from Recruiting are integrated with Sourcing and tethered to your sites; your site will contain one or more Career Sections.
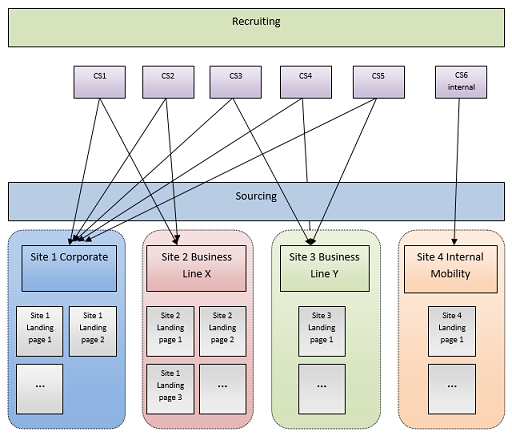
A Sourcing site can be used in addition to a company's Recruiting site, or in place of, and can provide an experience that may be different and more personalized than what is possible using their core Recruiting product alone. A site attracts many different types of populations and generally contains content for those populations whether someone is looking for an internship, internal jobs, external jobs or is interested in a particular line of business, brand, location, etc. A site is broad and contains general information as its goal is to attract as many users as possible.
Sourcing offers several features that will help you to compose your site. The architecture of your site should be based on your individual business needs. Before working on your site architecture using Site Builder, you should review the functional business cases you would like to support. Following is a list of considerations:
-
Should your employees access the application and share jobs in order to provide referrals?
-
Do you want to support internal mobility and allow employees to apply?
-
Do you need to segregate your job offers and create several sites?
-
Do you need to support several brands that use their own graphics?
-
What languages are you planning to support?
-
Do you want a different interface per country?
-
Would you like to highlight specific job categories or job locations on the Home page?
-
Do you want to add branded content about your entire company or just for some business lines?
-
Do you want to bolster your brand ?
Once you will have defined your needs you will be able to select the elements you need and will want to use to create your site or sites.
Site Maintenance and Accessing Site Builder
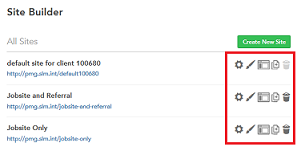
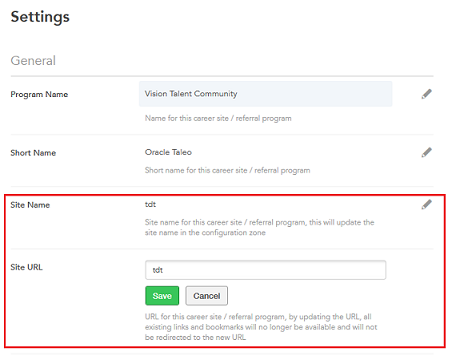
By default, a single site is created for each client and this default site persists and cannot be deleted. Administrators can create new sites using this instance, or can clone the default site. Individual sites can be deleted within Site Builder by clicking the trash can icon. Once an individual site is deleted, all incoming links that formerly went to the deleted site will be rerouted to the default site. Site names and URLs can be edited in the Site Settings of the Site Builder. Clicking the pencil opens up the Site Name and Site URL fields for editing. Once the changes are saved, the changes are reflected both in the Site Settings and on the Site Builder main page (Site Builder - All Sites).
Path: [Sourcing] Login as Administrator > Configuration > Site Builder > Edit Site Settings
Whether a site is deleted, or the Site URL is changed, the original URL is stored. If an Administrator attempts to add a site with the same name as a deleted site, a warning message displays informing the user the URL is one of a previously deleted site, which means that the links and the bookmarks to the former URL will now go to the new URL. Users will receive this same warning message when they change a site's URL within the Site Builder's Site Settings.
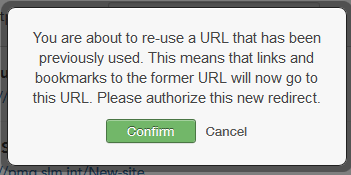
Users going to the original URL are redirected to the new URL. In the case of a deleted site, users will be taken to the default URL.
Listed in the table below are the different entry points of editing when accessing the Site Builder.
| Setting | |
|---|---|
| Name | Location |
|
[Sourcing] Administrator login > User Settings (Name) >
Configuration > Site Builder
|