Configuring the Create Requisition Assistant
When Recruiting Center users create a requisition, the Create a Requisition assistant guides them through the creation. Fields displayed in the assistant depend on several elements configured by system administrators.
Screen 1: Requisition Type
Recruiting Center users may have the ability to select a requisition type when creating a requisition. The following requisition types may be displayed: Professional, Hourly, Campus, Executives, Contingent, Pipeline - General, and Pipeline - Executive.
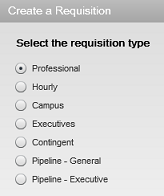
The “Select the requisition type” window is visible if there is more than one requisition type available to the user. If only one requisition type is available, it is selected by default and the “Select the requisition type” window is not displayed.
To allow users to select a requisition type, you must:
Activate requisition types under Configuration > [Recruiting] Administration > Requisition Types. Requisition types are displayed to users in the order you activated them.
Grant users permissions to give them access to different requisition types. The “Select the requisition type” window displays only the requisition types to which users have access according to these permissions.
| User Type Permission | Location |
|---|---|
| Allow access to professional requisitions | Configuration > [SmartOrg] Administration > [Users] User Types > Recruiting > Requisitions |
| Allow access to hourly requisitions | Configuration > [SmartOrg] Administration > [Users] User Types > Recruiting > Requisitions |
| Allow access to campus requisitions | Configuration > [SmartOrg] Administration > [Users] User Types > Recruiting > Requisitions |
| Allow access to contingent requisitions | Configuration > [SmartOrg] Administration > [Users] User Types > Recruiting > Requisitions |
| Allow access to executive requisitions | Configuration > [SmartOrg] Administration > [Users] User Types > Recruiting > Requisitions |
| Allow access to pipeline - general requisitions | Configuration > [SmartOrg] Administration > [Users] User Types > Recruiting > Requisitions |
| Allow access to pipeline - executive requisitions | Configuration > [SmartOrg] Administration > [Users] User Types > Recruiting > Requisitions |
If the Contingent Functionality Activation setting is set to No, the Contingent requisition type will not be displayed in the “Select the requisition type” window.
If the Candidate Pipeline Functionality Activation setting is set to No, the Pipeline - General and Pipeline - Executive requisition types will not be displayed in the “Select the requisition type” window.
Screen 2: Requisition File
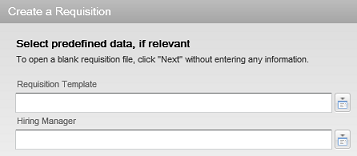
The “Select a requisition file” window is visible only if more than one requisition file variation is selected in the user's configuration profile (Configuration > [SmartOrg] Administration > [Users] Configuration Profiles > Requisition File Creation).Screen 3: Requisition Template, Hiring Manager, Department, Position, Job Role
There are a number of combinations of fields you can choose to display to Recruiting Center users after they select the requisition type. For example, these combinations may include Requisition Template only, meaning the user will select an existing requisition template, like Accounting, and then some of the fields will automatically be completed, based on how the requisition template was set up. Requisition Template and Hiring Manager so even more information can be automatically completed on the new requisition.
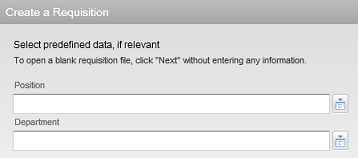
The Create a Requisition Assistant will present Recruiting Center users one or two fields based on the following preference sequence:
Job Role* (if activated) else Position (if activated) else Requisition Template
Department (if activated) else Hiring Manager (if activated) else nothing
To enable these fields, you must either enable a setting or make the field available to Recruiting Center users.
| Field in the Create Requisition Assistant | Enabled by |
|---|---|
| Position | Enable Position setting (Configuration > [Recruiting] Settings) Position field (Configuration > [Recruiting] Administration > Fields > Requisition) |
| Department | Enable Department setting (Configuration > [Recruiting] Settings) Department Autofill Activation setting (Configuration > [Recruiting] Settings) Department field (Configuration > [Recruiting] Administration > Fields > Requisition) |
| Hiring Manager | Hiring Manager field (Configuration > [Recruiting] Administration
> Fields > Requisition) Note that the Hiring Manager field will be prefilled automatically if the user has selected a Default Hiring Manager " in his/her user preferences (Resources > My Setup > Preferences). |
| Job Role | Job Role field (Configuration > [Recruiting] Administration > Fields > Requisition) |
| Requisition Template | Nothing to configure |
Depending on which settings and fields are enabled, fields in the Create a Requisition Assistant are displayed accordingly.
| Fields Displayed in the Assistant | "Enable Position" setting | "Enable Department" setting | "Hiring Manager" field | "Job Role" field |
|---|---|---|---|---|
| Requisition Template | No | No | No | No |
| Requisition Template and Hiring Manager | No | No | Yes | No (or if template mandatory) |
| Requisition Template and Department | No | Yes | Irrelevant | No (or if template mandatory) |
| Position and Hiring Manager | Yes | No | Yes | No |
| Position and Department | Yes | Yes | Irrelevant | No |
| Job Role and Department | Irrelevant | Yes | Irrelevant | Yes |
| Job Role and Hiring Manager | Irrelevant | No | Yes | Yes |
The Hiring Manager field may be automatically filled if configured as such.
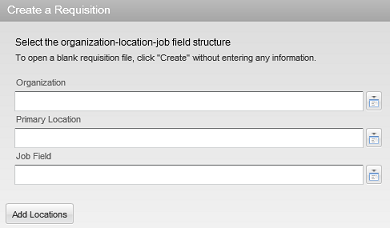
Screen 4: Organization-Location-Job Field
The last set of fields presented in the Create a Requisition Assistant are Organization, Location, and Job Field. The Location and Job Field fields are always visible. The Organization field is visible only if the Structure block in the requisition file has the property “Display the Organization fields”.
Note that Location or Organization can be defaulted to the department value and made read-only based on the following settings:
| Setting | Description | Default Value | Location |
|---|---|---|---|
| Link Requisition Location to Department Location | This is a protected setting that can be activated
by Oracle Support. If the setting is set to Yes, if there is a department selected for the current requisition, then the location of the requisition will be changed for that of the department, and the Location field will be read-only. If the setting is set to Yes, when a department is selected for the current requisition, if this department has NO location specified, then the requisition location will stay unchanged and will be editable. |
No | Configuration > [Recruiting] Settings |
| Link Requisition Organization to Department Organization | This is a protected setting that can be activated by Oracle
Support. If the setting is set to Yes, if there is a department selected for the current requisition, then the organization of the requisition will be changed for the one of the department, and the Organization field will be read-only. If the setting is set to Yes, when a department is selected for the current requisition, if this department has NO organization specified, then the requisition location will stay unchanged and will be editable. |
No | Configuration > [Recruiting] Settings |
Other Information Regarding the Create a Requisition Assistant
In the Create a Requisition Assistant, the Default Hiring Manager field may be filled automatically if the user has selected a default hiring manager in his/her preferences (Resources > My Setup > Preferences).
Screens 3 and 4 may be deactivated if the Requisition File Automatic Filling setting is enabled in the user's configuration profile. However, it is recommended to not activate this setting because the content of the requisition form depends on the selections made in screens 1, 2, 3, and 4 of the assistant.
| Setting | Default Value | Location |
|---|---|---|
| Requisition File Automatic Filling | Yes | Configuration > [SmartOrg] Administration > [Users] Configuration Profiles |