Setting Up Google+ Login if Upgrading to Release 14B.3, 15A or Higher
It is recommended that you perform this configuration shortly after the zone is delivered to minimize the time during which candidates will be unable to access the career section using their Google credentials.
1. Access the Google Developers Console (https://console.developers.google.com). You may choose to use or create a company-specific Google account rather than a personal account.
2. Create a project for your zone.
Click Projects, then Create Project.
In the Project Name field, enter the project name that will be listed in the Google account.
In the Project ID field, enter a unique project identifier for the zone you are configuring.
Click Create.
3. Generate Google credentials.
In the left panel navigation, under APIs auth, select Credentials.
In the Auth section, click the Create new Client ID button.
Under Application Type, select Web application.
Click Configure consent screen button.
4. Complete the consent screen.
Click Consent screen.
In the email address field, enter the Google email address associated with the project you created as part of step 2.
In the Product Name field, select the product name to be displayed in the Google consent screen.
In the Homepage URL field, enter the home page of the zone being configured (https://zonename.taleo.net).
Click Save.
5. Create the Client ID.
Under Application Type, select Web application.
In the Authorized Javascript Origins field, enter the full URL of the zone DNS: https://zonename.taleo.net
-
In the Authorized Redirect URIs field, enter the URL below, substituting ‘zonename>’ with your zone. https://zonename.taleo.net/careersection/RedirectOpenIdConnectResponseServlet.jss
Click Create Client ID.
6. Note the results.
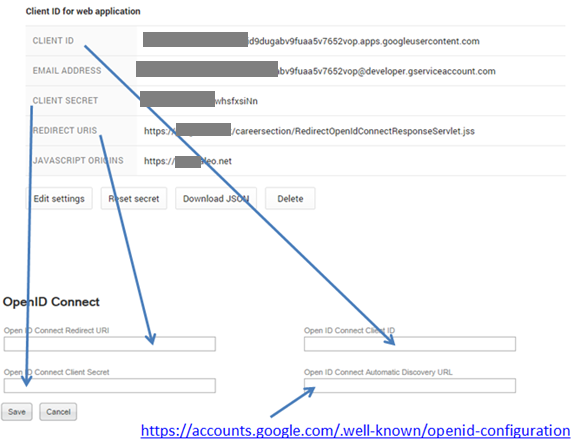
- In the Client ID for web application page, take note of the following information:
Client ID
Client Secret
Redirect URLs
7. Configure Google credentials in Taleo.
In Taleo home page, click Configuration.
In the Configuration menu, click Administration under Career Section.
Under Global Security, click OpenID Authentication Configuration.
Click the Google provider link.
In the OpenID Version field, make sure that OpenID Connect Version is selected.
Select the Enabled option.
-
In the Open ID Connect Redirect URL field, enter the redirect URL. https://zonename.taleo.net/careersection/RedirectOpenIdConnectResponseServlet.jss
In the Open ID Connect Client ID field, enter the Client ID provided by Google.
In the Open ID Connect Client Secret field, enter the Client Secret provided by Google
In the Open ID Connect Automatic Discovery URL field, enter the URL below. It is the same for all zones. https://accounts.google.com/.well-known/openid-configuration
Once the configuration is done, you should test the connectivity with Google using a testing candidate.