Setting Up Separate Approvals for CbCR
If you use Country by Country reporting, you must create a separate Scenario to enable you to consolidate and lock both your Current Provision and CbCR cubes individually, without locking them both at the same time.
Two scenarios must be created:
- For the Consol cube, book accounts, FX rates, and tax rates are stored in a Tax Provision scenario, for example, Actual.
- For the CbCR cube, CbCR-specific data is stored in a CbCR Scenario, for example, Actual_CbCR. The scenario name is the Current Provision scenario name with the _CbCR extension. For example, Actual_CbCR or Forecast_CbCR.
Note:
The Actual_CbCR scenario will be automatically generated once you have attached the Has CbCR Scenario custom attribute to the Tax Provision scenario (Actual).
You enter data, FX rates, and tax rates in the Consol scenario for current provision. Only CbCR data needs to be entered for the CbCR Scenario. Do not load book account data, or FX rates, or tax rates in the CbCR scenario because that data is already loaded against the Actual Scenario member.
Note:
There is one upgrade consideration. If there is historical data in the scenarios for which the user wants to enable the separate approval process for CbCR, then a Migration of data would be required. This migration will copy all historical data to the new CBCR scenario member.To set up the separate approval process:
-
From Home page, select Navigator, then Create and Manage, and then Dimensions.
- From Dimension, select Scenario.

-
Select an existing current provision Scenario (for example, Actual) to generate the CbCR scenario, and then click Edit
 .
.
-
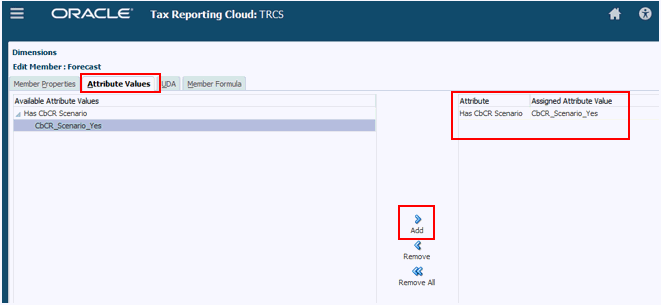
On the Edit Member screen, select the Attribute Values tab.
-
Under Available Attribute Values, expand the Has CbCR Scenario custom attribute.
- Select CbCR_Scenario_Yes, then click Add to move the attribute to Assigned Attribute Value, and then click Save.

-
On theDimensions tab, view the new Scenario, for example, Actual_CbCR. The new scenario is created in both the Consol and CbCR cubes. Verify the name and then click Save.
Note:
You cannot select a specific cube. Under Cube, just select All Cubes. - Click Refresh Database
 to refresh all cubes.
When the database is refreshed, click Finish. Valid intersections are created to manage which Scenario member is applicable to which cube.
-
From Navigator, under Applications, click Valid Intersections,
-
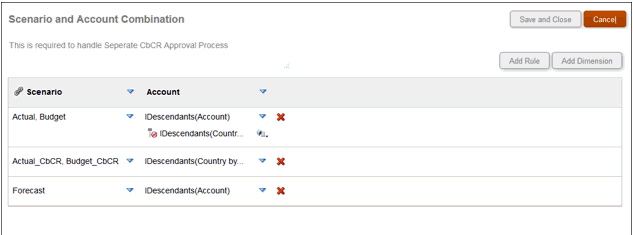
Select Scenario and Account Combinations to verify the created valid intersection, and then click Cancel to exit. The valid intersections restrict data entry to invalid scenario members in the cube. The Valid Intersection is read-only.

-
Optional: If you have existing data in the scenario, migrate the existing CbCR data stored under existing Scenarios to the newly created CbCR Scenario members, as follows:
- From the Home page, click Application, and then Configuration.
- Click CbCR Data Migration for Separate Approval Process.
- From the CbCR Data Migration for Separate Approval Process dialog box,
click Launch. The migration impacts the status for
all intersections where data migration has taken place. This job may take a
long time, depending on the amount of data.
Note:
Run Compute Rates rule for the Scenario, Year and Period where translation is required. -
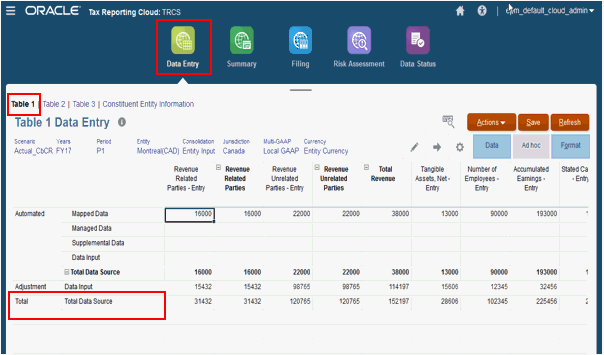
To view migrated data, from the Home page, select CbCR, then Table 1. Edit to select the newCbCR_ Scenario, and then Apply. The data is displayed.
- To consolidate historic data:
- From the Home page, select CbCR, then Data Entry, and then Table 1.
- Select the POV for the CbCR scenario.
- On Table 1, from Actions, select Consolidate_CbCR.
- Click Launch.
- Review the consolidated results. The Totals are displayed.

- To translate the currency for the scenario:
- From the Home page, select CbCR, then Data Entry, and then Table 1.
- Select the POV for the CbCR scenario.
- On Table 1, from Actions, select Translate_CbCR.
- Verify the Point of View, and then click Launch.
- Verify the translated results.
Note:
FX rates used for translation is same as used for Tax Provision in Consol scenario. For example, when running translation for Actual_CbCR, the FX rate will be used from the Actual scenario. - After consolidating, translating, and verifying data, users can lock the CbCR Scenario data. The
original scenario remains unlocked, and can be consolidated and verified
independently of the CbCR Scenario.
Note:
When separate CbCR is enabled, entity(s) in CbCR cube should be unlocked to run consolidation on consol cube.