Creating Currencies

You can create members in the Currency dimension for each currency needed in your application.

When you create currencies, you can specify properties such as the symbol, thousands separator, decimal separator, and how to display negative numbers.

From a list of Scale values, you can specify how to enter and display the currency, and also set a Precision value for the number of digits to the right of the decimal place.

NOTE: When you use scaling, errors in the totals may occur. For example, the below example shows scaling applied, and an incorrect total in the last column.
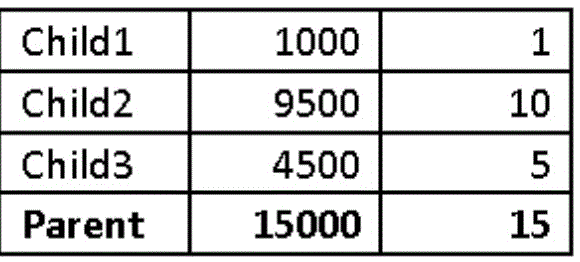
Currency rounding eaxmple

In this case, a best practice is to use a rounding method based on your requirements. For example, you can use a Scenario, Custom or Data source member and write rules. You can use higher level versus lower level rounding adjustments (summarized versus detail view of the statement), and crossfooting adjustments (such as foot across periods or across Entities in addition to Accounts).

To create a currency, select from a list of predefined values or create your own. You can specify these properties:

  • The three-letter code

  • The symbol

  • A description of up to 256 characters

  • The scaling factor to use when values are displayed

  • The currency precision (number of digits to the right of the decimal place)

  • The alias table to use to display aliases

  • Whether it is a reporting currency

  • Number formatting, including thousands separator, decimal separator, negative sign, and color

Note:

The Triangulation currency to use for currency conversion is set from the application currency.

To create currencies:

  1. Click the Navigator icon Navigator icon.
  2. Under Create and Manage, click Dimensions.
  3. Select Currency.
  4. Click Add.
  5. From Create Currency:
    • To add a predefined currency, select Select standard Currencies.

    • To create a currency, select Create new currency and specify properties:

      • For Code, enter an abbreviation or identifier of up to three characters.

      • Optional: For Description, enter a name, such as Japanese yen.

      • For Symbol, enter a symbol or select a symbol from the list.

      • Optional: For Scale, select how to enter and display the currency. For example, 3 yen represents 3000 yen if scaling is set to Thousands.

        For Forms, scaling works as expected when Consolidation on Save is enabled on the form.

      • Optional: For Alias Table, select the alias table to use.

      • Optional: For Alias, enter a name for the currency alias.

  6. Optional: Select Reporting Currency.
  7. Optional: For Thousands Separator, select how to display the thousands separator (it must differ from the decimal separator).
  8. Optional: For Decimal Separator, select how to display numbers with decimal values (it must differ from the thousands separator).
  9. Optional: For Negative Sign, select how to display negative numbers:
    • Prefixed minus: -1000.

    • Suffixed minus: 1000-

    • Parentheses: (1000)

  10. Optional: For Negative Color, select the display color.
  11. Optional: Select the type of Data Storage.
  12. Optional: Select Two Pass Calculation.
  13. Optional: Select the Data Type.
  14. Optional: Select a Smart List.
  15. Click Save.