Introduction
HCM Data Loader (HDL) supports a flexible, pipe-delimited file format that allows you to provide just the business objects, components and component attributes that are required for your use case. Full sets of data can be loaded, or just incremental changes. To achieve this flexibility, each file must specify which of the business object components and attributes are included in the file.
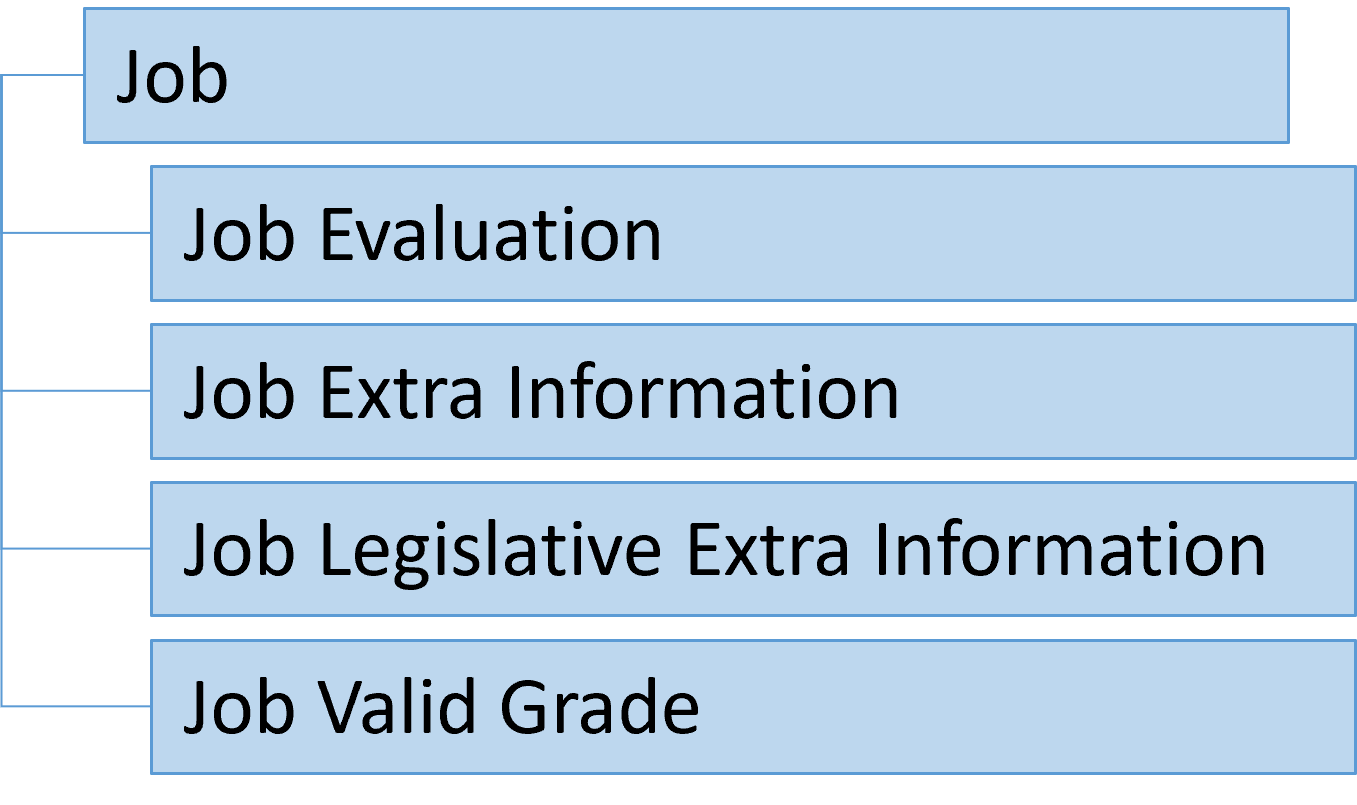
Oracle HCM Cloud business objects can be complex and are usually hierarchical, allowing for multiple child records to be created for a business object, e.g., multiple phone numbers for a Person, or multiple valid grades for a job.
Each delimited file will contain the data for a single business object hierarchy. The file will be named for the business object and have a .dat file extension. For example, Worker.dat contains data for workers, Job.dat contains data for jobs and ElementEntry.dat contains data for element entries.
When you supply data to be processed by HDL, you must uniquely identify each record in the file. For new records, two mechanisms are supported:
- User Key - a combination of user-friendly attributes that can be found on the user interface, which uniquely identify the record. For example, the JobCode and SetCode for a Job, the PersonNumber for a Worker.
- Source Key - a combination of two attributes, SourceSystemId and SourceSystemOwner, are used to uniquely identify the record. The SourceSystemId value can be any value, but is often the identifier on the source system, or a value generated by an algorithm. The SourceSystemOwner ensures the source key is unique when multiple source systems exist.
Note:
The source key is the recommended solution as user key values can change over time and can often be translated. The source key doesn't change during the life of the record. You can use the source key to reference the record from other objects too. Source keys are particularly useful when the user key attribute is auto-generated by Oracle HCM Cloud, such as PersonNumber.Objectives
In this tutorial you will:
- Create and load user key and source key files.
- Reference parent and foreign objects by their source keys.
- Update existing records and add new child records to an existing object.
- Delete individual records and complete objects.
- Supply reporting and reconciliation information.
Prerequisites
To complete this tutorial, you will require:
- Access to import and load data using HCM Data Loader.
- Access to Setup and Maintenance to update a lookup type.
- A text editor to create your files.
- A file compressor to zip your business object data files.
Task 1: Create Your First File
In this step, you will create a simple file to load new job families using user keys to uniquely identify each record.
- Create a new file, using any text editor and enter the following:
- The first value on any HDL file line is always the File instruction, in this case METADATA.
- All files must include METADATA lines to define which attributes are included in the file and the order in which their values are supplied.
- The string immediately after the METADATA instruction is known as the File Discriminator and identifies the component in the object hierarchy the attributes are for, in this case JobFamily.
- The values that follow the File Discriminator are the names of the attributes available on the JobFamily component which you'll include values for in this file.
- The File Instruction, File Delimiter and all attribute names are delimited by the pipe '|' character by default.
- Add this MERGE line to your file, below your METADATA line:
- The MERGE instruction tells HDL to create the record if it doesn't already exist or update it if it does.
- The File Discriminator immediately after the MERGE instruction identifies this is a JobFamily record. The values that follow are the values for the attributes named in the corresponding METADATA line.
- The File Instruction, File Delimiter and all attribute values are delimited by the pipe '|' character by default.
- Attribute values must be provided in the order defined by the corresponding METADATA line.
- Supply dates using the format YYYY/MM/DD.
- The effective end date is optional, the value will default to 31-Dec-4712, which means there is no end to this record.
- Add these additional MERGE lines to your file:
MERGE|JobFamily|CLERICAL|Clerical and Administration|2000/01/01|4712/12/31
MERGE|JobFamily|MANAGERIAL|Managerial|2000/01/01|4712/12/31
You must uniquely identify each record. For job family records the user key is a single attribute JobFamilyCode, i.e., CLERICAL and MANAGERIAL.
Tip:
Before loading this file, you may want to add your initials to the job family code values to ensure they're unique and not already created in your database. - Save your file, naming it JobFamily.dat. Alternatively, you can download and edit the JobFamily.dat file.
Tip:
Name the data file for the object hierarchy being loaded. It must have a .dat file extension. Business object file names are case-sensitive. - Compress (zip) the JobFamily.dat into a filename of your choice, but it must have a .zip file extension.
METADATA|JobFamily|JobFamilyCode|JobFamilyName|EffectiveStartDate|EffectiveEndDate
Note:
You can only supply one METADATA line for each component of the object hierarchy in the same file. i.e., There can be only definition of which attributes are included for a component in the object hierarchy.Tip:
Ensure your text editor is using UTF-8 encoding.MERGE|JobFamily|SALES|Sales|2000/01/01|4712/12/31
This MERGE line creates a job family identified by the job family code SALES, which has the name Sales and starts on 1-Jan-2000.
Note:
As the job family name can be translated you should supply it in the base language for your environment, usually US. HCM Data Loader loads the data using an elevated user, whose session language is the base language, which may be different to that of the session user.
Tip:
Use the View Business Objects task to the file name and file discriminators for the object hierarchy you are loading data for.Task 2: Importing and Loading Your File
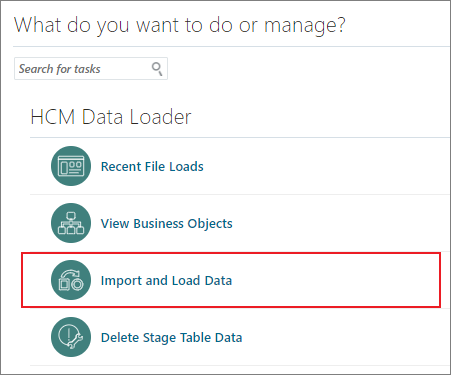
- In the application, on the home page, click My Client Groups > Data Exchange
- Click Import and Load Data
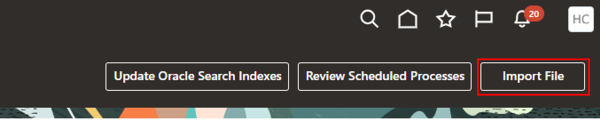
- Click Import File on the page header.
- Drag and drop your .zip file from your file explorer to the Choose File button. Alternatively, click the Choose File button to search and select your file.
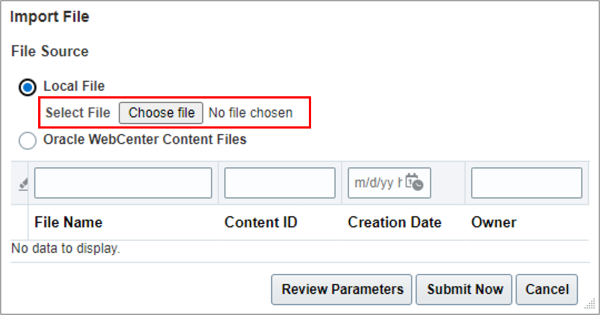
- Click Submit Now. You don't need to change the default parameter values.
- Click OK on the Submitted confirmation page.
- Click Refresh to see your data set information.
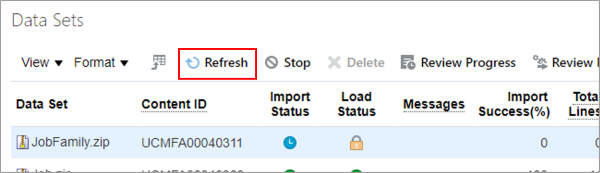
Tip:
Data sets have the same name as your zip file.- The Import Status indicates if the data in your file is imported into the staging tables.
- The Load Status indicates if the data is successfully loaded into the Oracle HCM Cloud application tables.
Tip:
Hover over these icons to understand their meaning.- There are various counts:
- Total Lines indicates the number of data lines found in your file. There were 3 MERGE lines in your file.
- Total Objects indicates the number of objects found in your file. In this simple file the 3 lines create 3 job family objects, so the Total Objects should also be 3.
- Failed Objects indicates the number of objects that failed to load successfully. This should be zero for your file.
Tip:
Most objects have complex hierarchies, and you need to supply multiple file lines to create one object. For these objects, the Total Lines count will be much larger than the Total Objects count. - There are various counts:
- Click Refresh again until your data set has completed loading.
Tip:
There are other columns available in this table. Click View > Columns and select which columns to display.Task 3: Creating a Simple File using Source Keys
We always recommend supplying source keys to uniquely identify your records.
Defining your Source System Owner
Before you can load a file that uses source keys, you must first register your source system owner value.
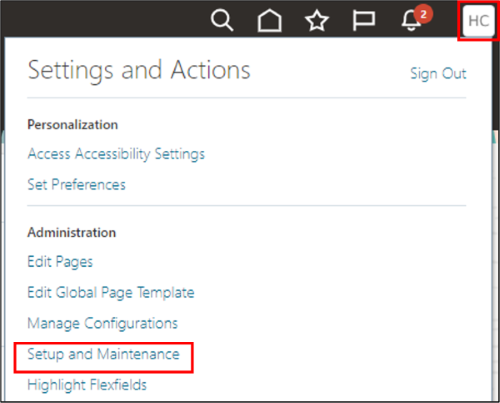
- Log into the application with a user who can access Setup and Maintenance.
- Navigate to My Enterprise > Setup and Maintenance.
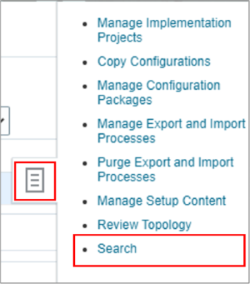
- Click on the side drawer icon and click Search.
- Search for and select the Manage Common Lookups task.
- Search for the Lookup Type HRC_SOURCE_SYSTEM_OWNER
- Click the Add icon in the Lookup Codes table
- Specify VISION in the lookup code and meaning, specify a Start Date of 01/01/2000.
- Click Save.


Creating a Simple Source Key File
In this step, you’ll create a simple source key file to load grades.
- Create a new file and enter the following METADATA line:
- Add the following MERGE lines to your file:
- Save your file, naming it Grade.dat. Alternatively, download and edit the Grade.dat file.
- Don't upload this file. This will be loaded together with the file you create in the following step.
METADATA|Grade|SourceSystemOwner|SourceSystemId|GradeCode|SetCode|GradeName|EffectiveStartDate|ActiveStatus
The SourceSytemOwner and SourceSystemId attributes are included on the METADATA line, along with the attributes specific to the Grade object.
Tip:
The user key attributes that uniquely identify a record are often required when creating new records, even when the source key is supplied. However, when you supply both source keys and user keys, the source key is used to uniquely identify each record.MERGE|Grade|VISION|IC1|IND_CON_1|COMMON|Individual Contributor 1|2000/01/01|A MERGE|Grade|VISION|IC2|IND_CON_2|COMMON|Individual Contributor 2|2000/01/01|A MERGE|Grade|VISION|IC3|IND_CON_3|COMMON|Individual Contributor 3|2000/01/01|A MERGE|Grade|VISION|MG1|MANAGER_1|COMMON|Manager 1|2000/01/01|A MERGE|Grade|VISION|MG2|MANAGER_2|COMMON|Manager 2|2000/01/01|A
These file lines will create five grades, each identified by a source key:
| Source System Owner | Source System ID | Grade Code | Grade Name |
|---|---|---|---|
| VISION | IC1 | IND_COND_1 | Individual Contributor 1 |
| VISION | IC2 | IND_COND_2 | Individual Contributor 2 |
| VISION | IC3 | IND_COND_3 | Individual Contributor 3 |
| VISION | MG1 | MANAGER_1 | Manager 1 |
| VISION | MG2 | MANAGER_2 | Manager 2 |
Tip:
The SourceSystemId value can be anything. A value that differs from the GradeCode is used in this example to make it clear which value is supplied in the next task. You may want to add your initials to the SourceSystemId values to ensure they're unique.Task 4: Reference Foreign Objects using Source Keys
In this step, you’ll create a source key file to upload jobs which reference job families by their user key and grades by their source key.
- Create a new file and enter the following METADATA line:
- Add the following MERGE lines to your file:
- Add the following METADATA line:
- When you provide data for child records you must name the parent record it relates to. In this example this is achieved with the parent surrogate ID attribute JobId.
- As source keys are used to identify the job, the JobId attribute is followed by the string (SourceSystemId). Anything in brackets after an attribute name is a hint. This hint tells HDL that the source system ID value is going to be supplied to reference the foreign (or parent) object that's identified by the surrogate ID attribute.
- The reference to the grade also uses the source key, the source system ID value must be supplied to the foreign surrogate ID attribute that references the Grade; GradeId adding the (SourceSystemId) hint.
- In this example the source system owner for the grade source key is inherited from the SourceSystemOwner attribute. If, however, the source system owner value is different you can supply this using the foreign object's surrogate ID attribute with the (SourceSystemOwner) hint. For example, GradeId(SourceSystemOwner).
- Add the following MERGE lines to your file:
- Provides a unique identifier, by defining a source key with attributes SourceSystemOwner and SourceSystemId.
- Identifies the parent job, using the parent surrogate ID attribute JobId(SourceSystemId) and supplying it with the SourceSystemId value supplied on the parent Job record. For example, SCN is the SourceSystemId for the Sales Consultant job, so the JobId(SourceSystemId) attribute on the valid grades for the Sales Consultant job must also be SCN.
- Identifies the grade, using the foreign surrogate ID attribute GradeId(SourceSystemId).
Tip:
If you added your initials to the SourceSystemId values in your grade file, to the same here. - Save your file, naming it Job.dat. Alternatively, download and edit the Job.dat file.
- Compress (zip) the Grade.dat and Job.dat files together using a filename of your choice, ensuring it has a .zip extension.
- Use the steps described in Importing and Loading Your File to upload your grades and jobs.
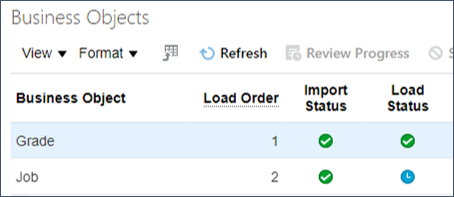
- Review the Business Objects table for your data set. An entry will exist for each business object file included in your zip file.
METADATA|Job|SourceSystemOwner|SourceSystemId|EffectiveStartDate|SetCode|JobCode|Name|JobFamilyCode|ActiveStatus|FullPartTime|RegularTemporary
The SourceSytemOwner and SourceSystemId attributes uniquely identify each job. The reference to the job family uses the JobFamilyCode user key attribute.
MERGE|Job|VISION|SCN|2000/01/01|COMMON|SALES_CONS|Sales Consultant|SALES|A|FULL_TIME|R
MERGE|Job|VISION|ADM|2000/01/01|COMMON|ADMIN|Administrator|CLERICAL|A|FULL_TIME|R
MERGE|Job|VISION|MGR|2000/01/01|COMMON|MANAGER|Manager|MANAGERIAL|A|FULL_TIME|R
Tip:
If you changed the job family code in your first file, you’ll need to make the same updates to this file.These three file lines will create three jobs. Each job belonging to a different job family that you created in Task 1.
| Job Name | Job Family |
|---|---|
| Sales Consultant | SALES (Sales) |
| Administrator | CLERICAL (Clerical and Administration) |
| Manager | MANAGERIAL (Managerial) |
METADATA|JobGrade|SourceSystemOwner|SourceSystemId|JobId(SourceSystemId)|GradeId(SourceSystemId)|EffectiveStartDate
A job can have multiple valid grades. The JobGrade component is used to create the valid grades and is a child of the Job component within the Job object hierarchy.
Tip:
Use the View Business Objects task to identify the parent and foreign surrogate ID attributes for a business object.MERGE|JobGrade|VISION|SCN_IC1|SCN|IC1|2000/01/01 MERGE|JobGrade|VISION|SCN_IC2|SCN|IC2|2000/01/01 MERGE|JobGrade|VISION|SCN_IC3|SCN|IC3|2000/01/01 MERGE|JobGrade|VISION|ADM_IC1|ADM|IC1|2000/01/01 MERGE|JobGrade|VISION|ADM_IC2|ADM|IC2|2000/01/01 MERGE|JobGrade|VISION|ADM_IC3|ADM|IC3|2000/01/01 MERGE|JobGrade|VISION|MGR_MG1|MGR|MG1|2000/01/01 MERGE|JobGrade|VISION|MGR_MG2|MGR|MG2|2000/01/01
These file lines create valid grades for each of the three jobs. Each valid grade record:
Tip:
You can supply multiple business object .dat files in the same zip file. HCM Data Loader will import them in parallel, but then load them sequentially. Ensuring referenced data is loaded to the Oracle HCM Cloud before it's referenced by a subsequent business object file.Task 5: Updating Records
In this step, you'll learn how to update individual records and add new child records.
Tip:
Use the View Business Objects task to determine if an object supports updates.Create an Object to Update and Delete
In this step you'll create a question with answers. This question is then updated and deleted in the tasks that follow.
- Create a file with these lines:
- Save your file, naming it Question.dat. Alternatively, download and edit the Question.dat file.
- Compress (zip) the Question.dat file using a filename of your choice, ensuring it has a .zip extension.
- Before loading this file, you'll need to create the Category Code:
- Navigate to My Client Groups, under Quick Actions click Show More.
- Search for and click the Questions quick action.
- Change the Subscriber to Recruiting.
- Click the Add icon and specify a Folder of Feedback.
- Click OK.
- Use the steps described in Importing and Loading Your File to upload your question.
- Review the question and its answers using the Questions task.
METADATA|Question|SubscriberName|QuestionCode|QstnVersionNum|QuestionText|Status|QuestionType|PrivacyFlag|ResponseTypeName|CategoryName
MERGE|Question|Recruiting|FEEDBACK_1|1|How satisfied are you with the training?|A|MULTCHOICE|N|Check Multiple Choices|Feedback

METADATA|Answer|SubscriberName|QuestionCode|QstnVersionNum|AnswerCode|LongText|SequenceNumber|Score
MERGE|Answer|Recruiting|FEEDBACK_1|1|FEEDBACK_1ANS11|Yes, I'm satisfied.|5|151
MERGE|Answer|Recruiting|FEEDBACK_1|1|FEEDBACK_1ANS21|No, I'm not satisfied.|3|151
MERGE|Answer|Recruiting|FEEDBACK_1|1|FEEDBACK_1ANS31|I have no opinion on this.|2|151
Update the Object
- Create a file with these lines:
- Save your file, naming it Question.dat.
- Compress (zip) the Question.dat file and import and load it.
- Review the question text using the Questions task.
METADATA|Question|SubscriberName|QuestionCode|QstnVersionNum|QuestionText
MERGE|Question|Recruiting|FEEDBACK_1|1|Are you satisfied with the training?
You must uniquely identify the record to update. This example uses the user key attributes; SubscriberName, QuestionCode and QstnVersionNum.
Tip:
Use the View Business Objects task to determine the user key attributes used to uniquely identify each component.Tip:
If using source keys to identify the record, use these attributes instead; SourceSystemId and SourceSystemOwner.This file only updates the question text, so the only other attribute included in the file is QuestionText.
Update and Add Child Records
- Create a file with these lines:
- The Question record isn't updated, so only includes the attributes used to identify the question the answers are for.
- The first Answer in the file is an update to an existing record.
- The second Answer in the file is new for this question.
- Save your file, naming it Question.dat.
- Compress (zip) the Question.dat file and import and load it.
- Review the answers using the Questions task.
METADATA|Question|SubscriberName|QuestionCode|QstnVersionNum
MERGE|Question|Recruiting|FEEDBACK_1|1

METADATA|Answer|SubscriberName|QuestionCode|QstnVersionNum|AnswerCode|LongText|SequenceNumber|Score
MERGE|Answer|Recruiting|FEEDBACK_1|1|FEEDBACK_1ANS11|Yes, I'm very satisfied.|5|151
MERGE|Answer|Recruiting|FEEDBACK_1|1|FEEDBACK_1ANS41|Yes, I'm somewhat satisfied.|4|151
The Question is included in the file to group related answers, ensuring they're processed together.
Tip:
Use the MERGE instruction for both creating new records and updating existing records. You don't need to know if a record already exists, HDL will determine whether to create or update your data.Tip:
When supplying child records remember to always provide a unique reference to the parent record, in addition to uniquely identifying the record being created or updated.Task 6: Deleting Records
In this step, you'll learn how to delete individual records and complete objects.
It's assumed that you completed Task 5 which creates the question being deleted in this step.
Tip:
Use the View Business Objects task to determine if an object supports delete.Delete an Individual Child Record
- Create a file with these lines:
- The DELETE instruction tells HDL to delete the record.
- Only supply the attributes that identify the record to delete.
- Save your file, naming it Question.dat.
- Compress (zip) the Question.dat files using a filename of your choice, ensuring it has a .zip extension.
- Import and load your file.
- Review the question using the Questions task to confirm that it now only has 3 answers.
METADATA|Question|QuestionCode|QstnVersionNum|SubscriberName
MERGE|Question|FEEDBACK_1|1|Recruiting

METADATA|Answer|QuestionCode|QstnVersionNum|SubscriberName|AnswerCode
DELETE|Answer|FEEDBACK_1|1|Recruiting|FEEDBACK_1ANS31
This file will delete the answer identified by the AnswerCode FEEDBACK_1ANS31.
Tip:
It's recommended that you include the parent in the file with the MERGE instruction. This will group all related records ensuring they're processed together. A few object hierarchies, such as Question enforce that you include the top-level record in the file when updating or deleting child records.Delete the Complete Object
- Create a file with these lines:
- Save your file, naming it Question.dat.
- Compress (zip) the Question.dat files using a filename of your choice, ensuring it has a .zip extension.
- Import and load your file.
- Use the Questions task to confirm the question no longer exists.
METADATA|Question|QuestionCode|QstnVersionNum|SubscriberName
DELETE|Question|FEEDBACK_1|1|Recruiting
Tip:
For most objects you don't need to delete the child records first, deleting the top-level record cascades the delete to remove all child records too.Task 7: Supply Reconciliation Data
Data loaded by HCM Data Loader is held in generic staging tables, the values supplied for a business object will not always be stored in the same database column.
WARNING:
You should not attempt to read data directly from the HDL staging tables. Instead, supply attribute values that you want to report, total, or reconcile on, to the source reference attributes.Source reference attributes are displayed in the Object Status page of the Import and Load Data user interface and can be extracted using HCM Extracts and OTBI reporting.
In the METADATA line you specify prompts for each of your source reference columns using this format:
SourceRef001={source-column-001}|SourceRef002={source-column-002}|SourceRef003={source-column-003}
For example:
METADATA|ElementEntry|...|SourceRef001=PersonNumber|SourceRef002=ElementName|SourceRef003=Amount
MERGE|ElementEntry|...|892334|Travel Allowance|200
Tip:
You can supply up to ten source reference values.- Create a file with these lines:
- Save the file naming it ElementEntry.dat. Alternatively, download and edit the ElementEntry.dat file.
- Compress the ElementEntry.dat file.
- Upload your compressed file using HCM Data Loader
- Click Refresh until your data set has completed processing. It will have Load errors.
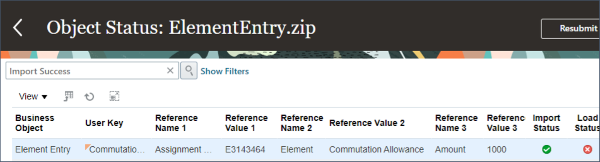
- Click the Total Objects count.
- The first three reference names and values are displayed along with the source key, concatenated user key and import and load status.
METADATA|ElementEntry|LegislativeDataGroupName|AssignmentNumber|ElementName|EffectiveStartDate|MultipleEntryCount|EntryType|CreatorType|SourceRef001=Assignment Number|SourceRef002=Element|SourceRef003=Amount
MERGE|ElementEntry|Vision Corp|E3143464|Commutation Allowance|2019/04/01|1|E|H|E3143464|Commutation Allowance|1000
METADATA|ElementEntryValue|LegislativeDataGroupName|AssignmentNumber|ElementName|EffectiveStartDate|MultipleEntryCount|EntryType|InputValueName|ScreenEntryValue
MERGE|ElementEntryValue|Vision Corp|E3143464|Commutation Allowance|2019/04/01|1|E|Periodicity|Periodically
MERGE|ElementEntryValue|Vision Corp|E3143464|Commutation Allowance|2019/04/01|1|E|Amount|1000

Next Steps
The following tutorials will further expand your HCM Data Loader knowledge:
Related Links
Acknowledgements
- Authors - Ema Johnson (Senior Principal Product Manager)
More Learning Resources
Explore other labs on docs.oracle.com/learn or access more free learning content on the Oracle Learning YouTube channel. Additionally, visit education.oracle.com/learning-explorer to become an Oracle Learning Explorer.
For product documentation, visit Oracle Help Center.
Create and Maintain Data with HCM Data Loader (HDL)
F85001_01
August 2023
Copyright © 2023, Oracle and/or its affiliates.