1Label and Document Designer
Label and Document Designer
The Oracle® Fusion Cloud Warehouse Management Label Designer allows you to create custom labels and documents in a simplified interface.
When you are creating a new label or document, you need to do this in QA, UAT, or PP before making the same changes into Production.
The label designer data grid can now be setup to use metric measurements in addition to imperial measurements, which will be helpful in countries using metric.
Supported Documents and Labels
The following Labels and Documents are supported in Label Designer:
Supported Labels:
- Blind Container
- IB Container
- Item
- Location
- OB Container
- Order
- Task
- Shipping
- IB Shipment Label
- Serial Number
- Webservice Addon Label
- OBLPN Contents
- Work Order
- Price Labels
Supported Documents:
- Order Packing PDF Report
- Packing report for Outbound LPN
Disabling Buttons While Loading
The buttons at the top making a new page, document, text, barcode, box, or line, etc. Are grayed out and disabled while it is loading.
Uploading an Exported Template
Select Standard Templates drop down and then select Upload Template. Now browse for your template on your hard drive it should be a json file. Then select the upload button. Your new template will appear in your list of current templates.
Action Bar
The Action Bar contains all of the menu functions you will need to create, edit, and configure settings for your labels and documents.

The following are descriptions of all of the action bar functions:
| Action Bar Item | Function |
|---|---|
| Grid |
Turns on the Grid for Imperial Units for easier alignment and placement of elements on the template. |
| Upload Image |
Allows you to upload an image to be assigned to an image placement element. |
| Export Template |
Allows you to export a template into a json format that can be stored and backed up. Plus this allows for a template to be developed in one environment then be transferred to another environment. |
| Upload Template |
Allows you to import a template that you have previously exported. This will generate a new template in the template drop down. You will find this in the Standard Templates drop down. |
| Standard Templates |
Allows you create entire standard templates for different types of labels to help save you time and headaches. You can also learn from tricks by looking at these templates. |
| Clone Template |
Allows you to make a copy of your current template so that you can modify it for some other purpose. |
| Clone Page | Allows you to make a copy of your current page. |
| Print Preview |
Creates a pdf of the mapping of your template to give you a better idea of how the template is going to be printed. |
Creating and Editing Boxes
To create a new box, complete the following steps:
- From the Label Designer tab, click Box.
- To edit a box, from the Label Designer tab, click Box, then Edit Box at the top of the edit panel.
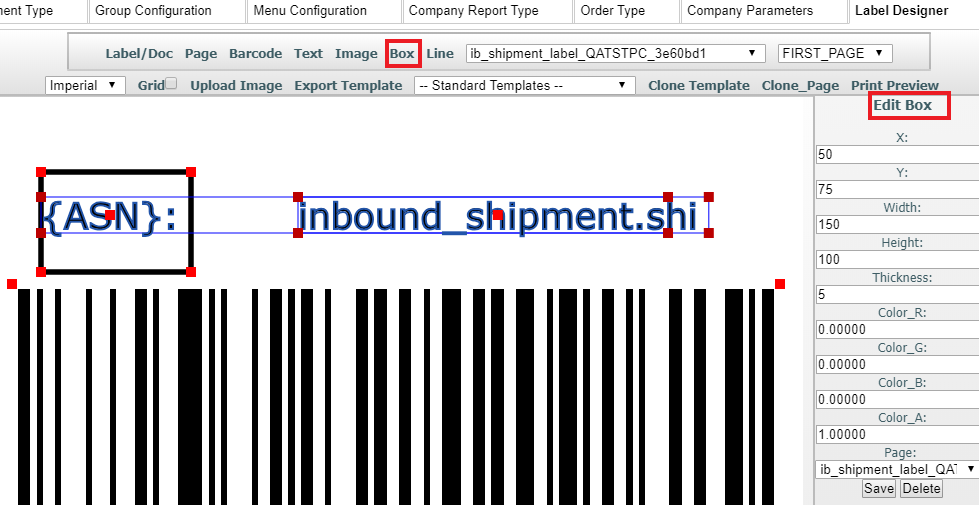
- Change the value you want to change and then click Save.
To move a box, click on it and then drag the box to where you want it to be positioned. The box will automatically save its position when you are done dragging.
You can also enter X and Y coordinates to move a box. X and Y starting points are at the top left corner of the page. Width and height adjustments begin at the far right corner. You can adjust your box size by dragging and pulling or entering the number you want for positioning it. After dragging, click outside of the box to set changes and after entering values, tab to move to the next field.
If you want to make any color specifications, add a 1 in the corresponding field to indicate Red, Green, or Blue. To save your changes, click Save.
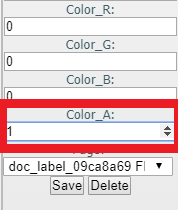
The following are descriptions for the different box settings:
| Box Specification | Description |
|---|---|
| X |
Position the Box on the X-Axis based on the number of dots of ink or thermal burning on a page. |
| Y |
Position the Box on the Y-Axis based on the number of dots of ink or thermal burning on a page. |
| Width |
How wide your box is. |
| Height |
How tall your box is. |
| Thickness |
The thickness of the line that makes up the box. |
| Color R |
How much red you want your box to be. Range is 0 - 1.0 |
| Color G |
How much green you want your box to be. Range is 0 - 1.0 |
| Color B |
How much blue you want your box to be. Range is 0 - 1.0 |
| Color A |
How much alpha/transparency you want your box to have. Range is 0 - 1.0 |
| Page |
Set what page this box will appear on. |
| Disabling Buttons While Loading |
The buttons at the top making a new page, document, text, barcode, box, or line, etc. Are grayed out and disabled while it is loading. |
Editing Label Lines
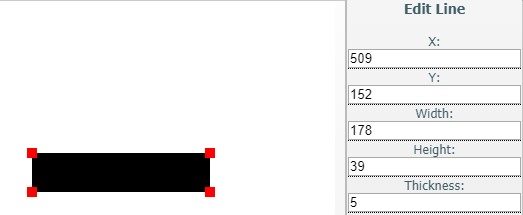
When you click on a line, the Edit Line option appears in the right pane, which will allow you to set your line specifications.
To make changes, change the value you want to change and then click Save.
If you want to create white text against a black background, you can use the Line feature to do this. You can create a line, then enlarge the meet the size requirements for your label.
Creating a Line
Click the Line at the top of screen in order to create a new Line.
Move Line
You can move a line by clicking on it and then dragging the line to where you want it to be positioned. The line will automatically save its position when you are done dragging. Another way to move a line is by entering its x and y coordinates. X = 0 and Y = 0 is the top left corner of the page. The bottom right corner are X = page width and Y = page height. So by entering the number you want for positioning, it will allow you to put the line where you want it. After you type a number and then tab or click out of the edit line, the line will move to that location. In order to save your changes, click Save.
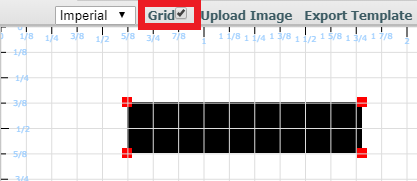
You can also select Grid to view imperial and metric measurements to assist you with sizing your line accurately:
Document Label Line Definitions
| Label Line Item | Description |
|---|---|
| X
|
Position the Line on the X-Axis based on the number of dots of ink or thermal burning on a page.
|
| Y
|
Position the Line on the Y-Axis based on the number of dots of ink or thermal burning on a page.
|
| Width
|
How wide your line is.
|
| Height
|
How tall your line is.
|
| Thickness
|
The thickness of the line.
|
| Color R
|
How much red you want your line to be. Range is 0 - 1.0
|
| Color G
|
How much green you want your line to be. Range is 0 - 1.0
|
| Color B |
How much blue you want your line to be. Range is 0 - 1.0
|
| Color A |
How much alpha/transparency you want your line to have. Range is 0 - 1.0
|
| Page |
Set what page this line will appear on.
|
| Disabling Buttons While Loading |
The buttons at the top making a new page, document, text, barcode, box, or line, etc. Are grayed out and disabled while it is loading.
|
Calculating Pixels for Precise Label Design
Calculating pixels can be very useful for precise label and document design. Exact placement for labels and documents allows timely approval and will help you to avoid unnecessary costs.
To create precise design, you will want to set Dots Per Inch (DPI) specifications with numbers rather than dragging to adjust the item. In most cases, you will be converting imperial measurements to metric.
Example One:
You have a Zebra printer with 203 DPI which is standard, (that is the most common DPI for a Zebra printer), you will divide 203 / 2.54 = 79.92125. There are 10 mm in a cm, so that means roughly 8 dots or pixels will go into a mm.
If you need to be over by 5 mm then multiple 5 * 8 = 40, you can move your element of text or barcode to 40, and be precisely 5 mm over from the edge of the paper.
Example Two:
For a DPI of 300, you will do the same kind of calculation:
300 / 2.54 = 118.11
Divide by 10 and you get roughly 12 pixels per mm.
Creating Labels and Documents
Label Designer allows you to configure settings for Labels and Documents. To configure your settings, complete the following steps:
- To create your label from the Label Designer, click Label/Doc.
A pop-up window appears notifying you that your label has been created.

- Select the label you just created from the User Defined Templates drop-down:

- Select your type (label or document) from the Type drop-down.
 Note: You can’t have Document Type and Label Type selected at the same time because your template will either need to be a document or label template.
 - Select your Label Type.
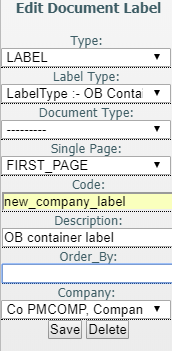
- Enter your label name in the Code field.
- Add a description for your label in the Description field. This is particularly useful to help you identify labels if you manage multiple labels.
The Order By field allows you to order the data as it comes in from the database. There is also a company drop-down if you are managing templates for multiple companies.
- Once you have finished adding specifications for your Label or Document, click Save.
Note about ZPL Zebra Labels
In some instances, underscores have caused printing issues when processing the ZPL (printer language) for Zebra Labels. To avoid data being looked up as unicode for ZPL Zebra labels inside the printer, Document and Label Designer will convert _ to the - character before doing language unicode encoding for unicode characters to print the correct characters on paper labels.
Column Calculation for Text Elements
Document Label Designer allows you to design customer specific label templates for various label types. You can sub-total a field in the details section of a label. This allows you to consolidate and display numeric fields while designing any label or document.
The Column Calculation drop-down for text elements allows you to consolidate quantities in numeric fields. An example of this would be to consolidate quantities in a field per SKU in a pallet, irrespective of the number of LPNs present on the pallet.
The following options are available in the Column Calculation drop-down:
- Count
- Sum
- Avg
- Min
- Max
When you are populating the fields from the Edit Text menu, once the Column Name field is populated and the data type is populated with Dynamic Repeating, the Column Calculation drop-down will enable a list of options:

Once you have created your label with a column calculation option, you will be able to see the quantities by SKU in the label.
You can design the label and fetch the total quantity of a SKU for a pallet with multiple LPNs with the same SKU (Single SKU Pallet) or Multiple SKU LPNs with different SKUs. Column Calculation is supported for all templates and all labels and documents in Document Label Designer.
Example
The following scenario explains how quantities would display for a pallet label based on the option selected from the Column Calculation drop-down:
Let’s say you have a pallet label with 10 containers on a pallet. Each container has the same three items but each item has varying quantities. You also configure the item code to display on the pallet label along with the inventory current quantity as part of the same table name.
The following quantity would display based on the respective drop-down item:
| Column Calculation Drop-Down Selection | Quantity Displayed in Pallet Label |
|---|---|
| Count | Quantity of 10 displays for each of the three items. |
| Sum | The sum of the quantities displays for each of the item’s current quantities across all of the containers per item code. So you will see the sum for each of the three item codes.
|
| Average | The average quantity displays for each of the item’s current quantity across all of the containers per item code. So you will see averages for each of the three item codes.
|
| Min | The minimum quantity displays for each of the item’s current quantity across all of the containers per item code. So you will see a minimum value for each of the three item codes. |
| Max | The maximum quantity displays for each of the item’s current quantity across all of the containers per item code. So you will see a maximum value for each of the three item codes.
|