Cross-Dock Configuration
To allocate orders for cross-dock, two conditions must be met:
- The order must have the appropriate order type configured;
- The ordered SKU and quantity must exactly match the contents of the LPN being received.
- The ordered SKU detail must have the “Required LPN” field populated with the LPN number for the LPN being received.
Step 1: Create the Cross-Dock Order Type
- Go to the “Order Type” screen and click the Create button to create a new order
type. Make sure that the “Flowthrough” and “Partial allocation” flags are
checked.
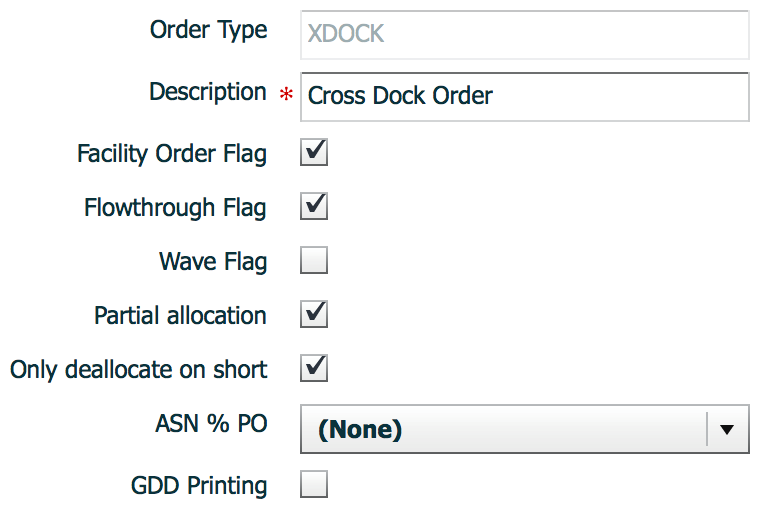
- Click “Save”.
Step 2: Adding the RF Screen for Cross-Dock Receiving
The next step is to add a receiving RF module specific to Cross-Dock.
- Go to “Screen Configuration”.
- Click on “Generate Screens” and select one of the following:
- “RF-Text: Recv {lpn} Load” if receiving via Loads.
- “RF-Text: Recv {lpn} Shipment” if receiving via ASNs.
- Press “Save” when you have finished.
- Once the RF screens are added, the cross-dock specific functionality must be enabled within its parameters. To access the module’s parameters, select the module and click on Details.
- Within the parameters, select the “xdock-mode” module parameter and click Edit.
Select the appropriate cross-dock mode from the drop-down.
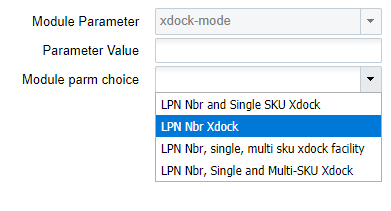
Cross Dock Parameter Description
- None: Cross dock functionality is disabled.
- LPN Nbr, single or multi sku xdock: Cross dock functionality is enabled for single and multi-SKU LPNs. Cross dock orders do not need to populate the “Required Container Number” in the Order detail record.
- LPN Nbr Xdock: Cross dock functionality is enabled for single and multi-SKU LPNs. It will only work if its cross dock orders have the “Required Container Number” populated in the Order detail record. *Auto creation of cross dock orders is not possible with this option.
- LPN Nbr and single-SKU Xdock: Cross dock functionality is enabled for single SKU LPNs. Cross dock orders do not need to populate the “Required Container Number” in the Order detail record.
- Click “Save”.Note: Cross-dock functionality is supported through the below RF screens based on the configuration of the xdock-mode screen parameter.
- RF Receive IB Shipment
- RF Receive IB Load
- RF Distribute LPN
- RF Putaway
Company Parameter Configuration impacting Cross-Dock Functionality
| Company Parameter | Valid Values | Functionality | Additional Comments |
|---|---|---|---|
| XDOCK_ORD_INV_ATTR_CHECKS |
|
Controls if LPNs allocated through cross-dock should have inventory attributes matching that on order details.
|
From the Company Parameters UI, search for the XDOCK_ORD_INV_ATTR_CHECKS parameter key. Click Edit to set the parameter value |

Allocate a Multi-SKU LPN to more than one Order for the Same Destination
Also, with the Cross-Dock parameter (xdock-mode), you can allocate a multi-SKU LPN to multiple orders for the same destination if the company parameter MULTISKU_LPN_XDOCK_ONE_ORDER_ONLY is set to “No.”
From the Company Parameters UI, search for the MULTISKU_LPN_XDOCK_ONE_ORDER_ONLY parameter key. Click Edit to set the parameter value.
Executing Cross-Dock
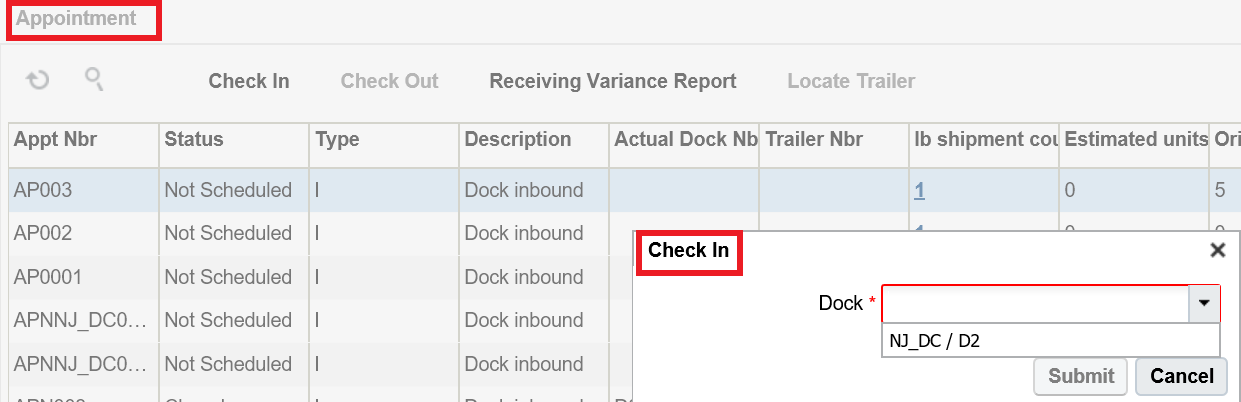
- Before the ASN can be received, it must be checked into a dock door.
- If you are using appointments, go to the “Appointment” screen, select the appointment, select a dock door from the drop-down, and click “Check In”.
- If appointments are not used, go to the “Inbound Loads” screen, select the Inbound Load, select an appointment, click “Check In”.
- Select a dock door from the drop-down, and click “Submit”.
- After the ASN is checked in, you may now receive merchandise with the RF. Go to the
“Receive ASN XDock” RF module. Scan the dock door – the Shipment and Trailers, if
specified, will auto-populate. If the trailer is not populated, the user must enter
the trailer number and press tab to proceed.
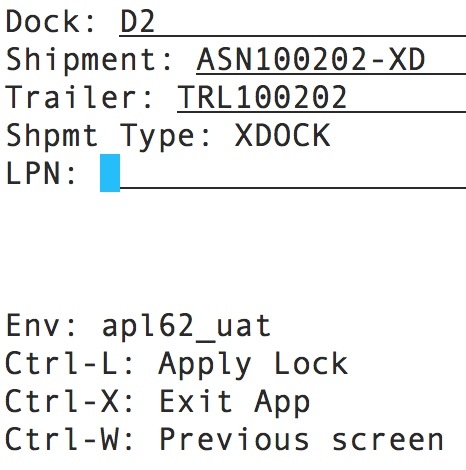
- Scan the LPN number.
- If the LPN number is specified in the ASN, Oracle WMS Cloud recognizes the LPN’s contents and displays a message. Press Ctrl-A to proceed.
- If the LPN number is not specified in the ASN (blind receipt), the RF will
then prompt the user for the SKU and quantity.
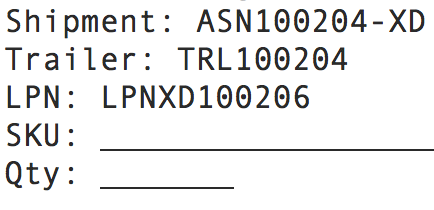
Enter the Item Code and quantity. Press Ctrl-E to close the LPN.
- If everything was done correctly, the RF will display the message “XDock allocation succeeded”. Press ctrl-A to proceed.
Cross-Dock Receiving with Auto-Order Creation
If some information about the to-be-cross-docked LPN is known beforehand, there is an option to receive such shipments without having to manually create an order. This requires the use of the ASN interface with specific fields populated.
Step 1: Configure the Oracle WMS Cloud for cross-dock
To enable automatic creation of cross-dock orders during receipt, two facility parameters must be modified.
- Go to the “Facility Parameters” screen.
- Select parameter key “AUTOCREATE_XDOCK_ORDER_TYPE” and click edit. For the value, type in the cross-dock order type code. Click “Save”.
- Select parameter key “AUTOCREATE_XDOCK_SHIPMENT_TYPES” and click edit. For the
value, type in the cross-dock shipment type code. Click “Save”.
- If the shipment type has not been created, go to the “ASN Types” screen
and use the Create button to create one.

- If the shipment type has not been created, go to the “ASN Types” screen
and use the Create button to create one.
Step 2: Create the Cross-Dock ASN file
Open the “ISSR” interface file.
Populate the basic ASN information. See example below:

When creating the ASN file for cross-dock, three fields are required in order for this process to work:
- Shipment_type (column H): the ASN type for cross-dock shipments.
- lpn_nbr (column D): the LPN number for the cross-docked merchandise. If the LPN number is not known, this method will not work.
- recv_xdock_facility_code (column AA): the facility (warehouse) that is
receiving the ASN. Enter the appropriate facility code.
Once the ISSR file is complete, upload it to Oracle WMS Cloud. From the “Input Interfaces” screen, select the “Inbound Shipment” from the drop-down.
- Click “Upload Files”, select the ISSR file, and click OK.
- Click “Run Interface” to process the file. If everything was done correctly, Oracle WMS Cloud will display the message “Interface completed”.
- For receiving, receive this ASN like any other cross-dock flow. During RF receipt, the system will automatically create a cross-dock order for the received LPN.
Cancel Orders after Shipment Verification
Oracle WMS Cloud allows you to cancel unallocated order details. You can cancel order details that have the “Required Container” field populated with the Inbound LPNs that were not received. This is controlled in the Shipment Type UI with the “Unallocated order details to cancel on ASN Verify” mode. The “Unallocated order details to cancel on ASN Verify” mode has the following options:
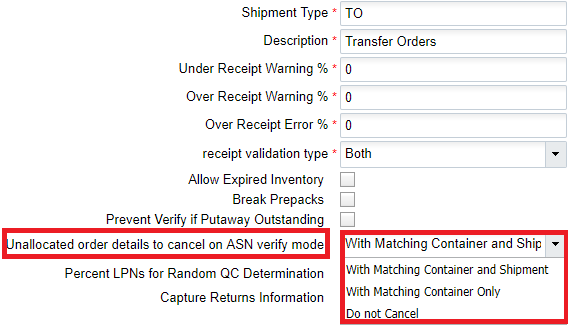
- With Matching Container and Shipment: When a shipment is verified, the application cancels unallocated order details that have the “Required Container” field populated with the Inbound LPNs that were not received, provided that the ‘Shipment Number’ order detail field is also populated.
- With Matching Container Only: When a shipment is verified, the application cancels unallocated order details that have the ‘Required Container’ field populated with the Inbound LPNs that were not received, regardless of whether the ‘Shipment Number’ order detail field is populated or not. This is useful for customers dealing with cross-dock orders that do not have the ‘Shipment Number’ order detail field populated.
- Do Not Cancel: No unallocated order details are cancelled.