Working with Multi Field Barcode Classes (Application Identifiers)
The following few sections review steps for working with Multi Field Barcode Classes. To define your data setup, you will be using a delimiter and you will use expressions in Document Label Designer to compose them. Your Multi Field Barcode configuration will define how the data gets broken up from the text that gets scanned in from the barcode.
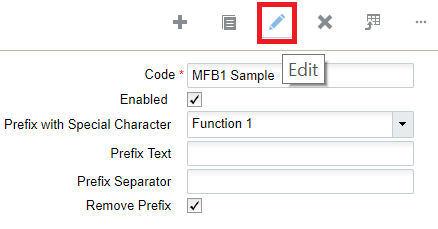
Multiple classes can be defined and enabled or disabled. To edit barcode details such as enabling a class or define a prefix with special character, complete the following steps:
- From the Multi Field Barcode screen, select the barcode you would like to edit.
- Click Edit. Edit the barcode details and then click Save.
You can also click Create to add a new Multi Field Barcode and specify details.
To edit Multi Field Barcode Class fields, complete the following steps:
- From the Multi Field Barcode tab, select the multi field barcode you would like to edit.
- Click Details.
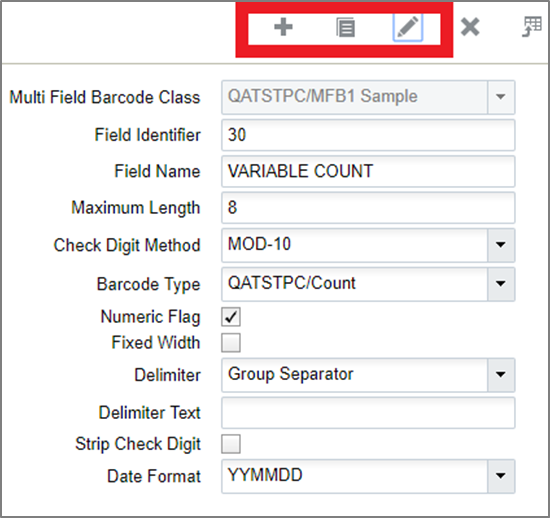
- Select the Field you would like to edit. In the following example, the Variable
Count field is selected.
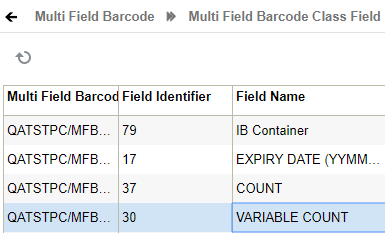
- Edit the Multi Field Barcode Class details and click Save
The application has a default multi-field barcode class that is a subset of the GS1 spec, including fields (AI's or application identifiers in GS1 terminology) that are frequently used in warehouse management. Each field is associated with a standard barcode type.
| Sl No | Column Name | Description |
|---|---|---|
| 1 | Company Code | Company Code to which the barcode is defined |
| 2 | Code | Code for the multi-field barcode |
| 3 | Enabled | User can enable or disable the multi-field barcode using this flag. By Default the flag is set to false |
| 4 | Prefix with special Character | User can select a prefix with special character from this drop-down, including Function 1 or Group Separator. |
| 5 | Prefix Text |
You can define the prefix for the multi-field barcode. This prefix enables the system to automaticatically identify the scanned data as a multi-field barcode based on the text that has been prefixed in the multi-fied barcode. You can use any alphabets or a combination of alphabets and special characters supported by GS1 as prefix text. For example: ]C1 - It is the GS1 Data Bar extended. But there are flavors according to the Laser Gun and design of the Barcode. For example ]C3 ]Q1 - It is the GS1 QR Code - But there are flavors according to the Laser Gun and design of the Barcode. For example ]Q3 ]d1 It is the GS1 Data Matrix – But for all the different real barcodes we have collected, no one have this code. We have always, in particular for pharmaceutical products the flavor ]d2 |
| 6 | Prefix Seperator |
If you want to define multiple prefix text, you can define it in the “Prefix Text” column seperated by a special character. Inorder for the system to identify the special character, user can define the special character in this column. You can use any special characters supported by GS1 as prefix text. |
| 7 | Remove Prefix | If you to remove the prefix from the mult-ifield barcode, you can enable the flag. By default the flag is set to false |
Individual fields within a multi-field barcode are prefixed by a code (Field Identifier) which in GS1 is a two digit (or more) number, followed by the value of the field. The field may be fixed with or variable field. If it is variable, it is ended with a delimiter.
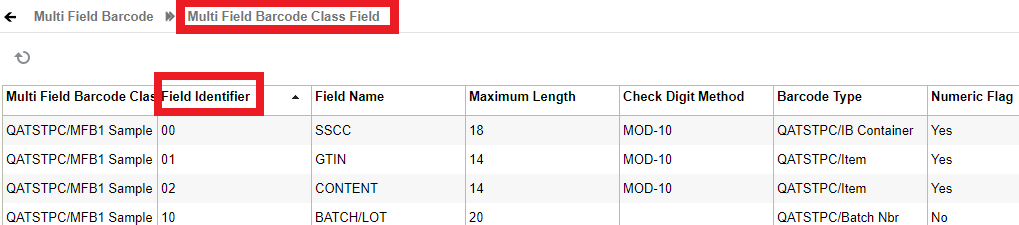
From the Multi Field Barcode tab, click details to view the Multi Field Barcode Class Field.
The following table provides details for Multi Field Barcode field definitions, including WMS Barcode Types that are supported:
| Sl No | Column Name | Description |
|---|---|---|
| 1 | Field Identifier | Individual fields within a multi-field barcode are prefixed by a code. User can define that code as field identifier |
| 2 | Field Name | Field name |
| 3 | Maximum Length | Max length of the field, not including field name but including check digit. |
| 4 | Check Digit Method |
The last digit of all fixed-length, numeric GS1 Identification Keys is a check digit that ensures the integrity of the key. All GS1 ID Keys need a check digit, except Component/Part Identifier (CPID), Global Individual Asset Identifier (GIAI) and Global Model Number (GMN). |
| 5 | Barcode Type |
The following are the barcode types supported:
|
| 6 | Numeric Flag |
To define whether the field is numeric or not. If the field is number, then user can enable the flag Default False. |
| 7 | Fixed Width |
To define whether the field length is fixed or not. If the field length is fixed, then user can enable the flag Mutually exclusive with delimiter_id/text. Default False. |
| 8 | Delimiter | Delimiters are used to specify the boundaries between separate regions in a scanned data string. When you are entering delimiters, note that the Separation Delimiter field is required, but the Start Delimiter and End Delimiter fields are optional. |
| 9 | Delimiter Text | If the field is variable length, user should define delimiter text so that system can identify the field from the multi-field barcode |
| 10 | Strip Check Digit | Some fields have a check digit defined. This check box applies only in these cases and it will remove the last digit from that field and only use the remaining for processing. You may want to define a check digit depending on how you are using the values in the fields. |
| 11 | Date Format |
Many different date formats are supported. The following are some examples of date formats: MMDDYY as %m%d%Y example output: 09012015
MM-DD-YY as %m-%d-%Y example output: 09-01-2015
MM/DD/YY as %m/%d/%Y example output: 09/01/2015
DD/MM/YY as %d/%m/%Y example output: 01/09/2015 DD MM YY as %A %d %B %Y example output: Monday 01 September 2015 Refer to the following url for a full listing of option characters for date and time formatting:
|
All RF screens can now recognize multi-field barcodes based on the prefix.
For example: ]C101IBLPNRGN2951800102RGITM003~^~0310~^~
- Once a certain class is detected, it extracts all the component fields and they are used within the current RF operation. For example, if a receiving option expects an LPN number, manufacturing date, SKU, and count via entry fields (that may be on multiple screens), and a barcode containing the LPN number, manufacturing date and SKU is scanned, all three values will be extracted and used automatically.
- The application validates all three fields automatically and moves to the next scan.
- A new RF parameter mfb-restrict-to-curr-fld has been added to certain RF modules like Cycle Count, which can be configured to restrict multi-field barcodes to just apply to the current field and not to extract all fields: