Output Interfaces
- ASN verification
- Parcel Manifest shipment confirmation
- LTL Shipment confirmation
- OBLPN Shipping Info
- LPN Inventory
- Wave Pick Info
- Inventory Summary
- Inventory HistoryNote: For more details on each interface, please refer to the Interface Specifications.
Remove Empty Element Flag
You have the option in Oracle WMS Cloud to share information to external systems through output interfaces (for example, inventory history, shipment confirmation payload). In certain scenarios where some of these output interface payloads is exposed to rest api endpoints, can be pretty huge depending upon the data present or you would not have used all the data elements for the corresponding entity involved.
In such case, you can configure the Remove Empty Elements flag for removing empty data elements that will help you reduce the payload size, which reduces the load on the integration layer and for systems that are subscribing to the relevant output.
- To reduce the payload size, the system has an ability to remove empty fields or empty data elements. You will be able to enable the feature based on configuration in the Output Interface Config Web UI.
- You can enable or disable the empty data elements by output interface type. This gives you the flexibility to disable empty data elements for Shipment Confirmation file and have empty data elements for LPN Inventory Interface types for example.
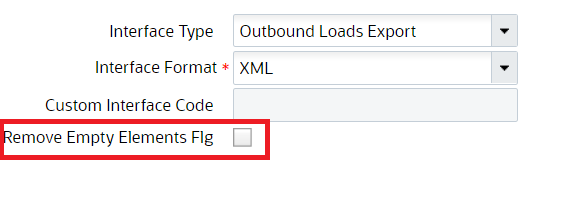
- Removal of empty data elements is applicable for interface format of type “XML”. If the interface type is not XML, then the configuration option will be disabled.
- Navigate to the Output Interface configuration screen.
- Click on the edit pane and select the interface format “XML” and select the
field Remove empty elements flag.
Configure Output Interfaces Generation In UI Through Output Interface Configuration Screen
You can configure Output Interfaces generation and targets in UI through Output Interface Configuration Screen
- Container Outbound Load Export
- Custom Inventory Summary Export
-
Data Extract
-
Distribution Info
-
Iblpn Info
-
Iblpn Report
-
Inbound Shipment Verifications Export
-
Inventory History Export
-
Inventory Summary Export
-
LPN Inventory
-
OBLPN Shipping Info
-
Order Outbound Load Export
-
Order Verification Export
-
Outbound Loads Export
-
Outbound Manifest
-
Output Item Export
-
Output Item Facility Export
-
Pallet Shipping Info
-
Route Instruction
-
Wave Pick Info
-
Web Report
SOLUTIONS:
Considerations - 1
On completing this configurations, WMS will automatically send the interface to all output target(s). In Output Interface Configuration screen, you have the option to select the following Interface Formats (if available for the interface type):
- Header/Detail
- Hierarchical
- One Line
- XML
- JSON
Once an interface is generated, you can check the delivery status in Output Interface screen, download, or re-send it.
Consideration - 2
Send output payloads to an external SFTP:
1. Go to Output Interface Configuration UI screen
2. Select the Interface Type that you wish to configure
3. Click on the “Output Interface Target” icon which is located next to the search icon at the top-left.
- Sequence Nbr:1
- MHE System: blank
- Interface Protocol *: External SFTP
- URL: blank
- FTP Host: Your SFTP Host
- FTP Port: Your SFTP Port
- Target Directory: The SFTP directory you want the output payloads to be located
- Username: Your SFTP user
- Password: Your SFTP password
- Encrypt File: unchecked
- Encrypt Recipient: blank
- Send Acknowledgment Email: unchecked
- Max Retries: 3
- Retry Delay (Seconds): 10
- Send Failure Email: Check if you want to receive an email when it fails
- Custom Integration: unchecked
- Enabled: checked
5. Repeat steps for other interface types
Consideration -3
Send output payloads through REST Web Service
1. Go to Output Interface Configuration UI screen
2. Select the Interface Type that you wish to configure
3. Click on the “Output Interface Target” icon which is located next to the search icon at the top-left.
4. Select the only line available and click on the “Edit” icon. Complete as shown below:
- Sequence Nbr:1
- MHE System: blank
- Interface Protocol *: External SFTP
- URL: Web Service URL
- FTP Host: blank
- FTP Port: blank
- Target Directory: blank
- Username: Your Web Service user
- Password: Your Web Service password
- Encrypt File: unchecked
- Encrypt Recipient: blank
- Send Acknowledgment Email: unchecked
- Max Retries: 3
- Retry Delay (Seconds): 10
- Send Failure Email: Check if you want to receive an email when it fails
- Custom Integration: unchecked
- Enabled: checked
5. Repeat steps for other interface types
Consideration - 5
Output Interface Criteria
Here, you can configure criteria to make WMS select an output target depending on the interface’s content. For example, you can have an interface delivered to TARGET-A (SFTP) if the interface contains ITEM-A, or TARGET-B (Web Service) if the interface contains ITEM-B.
1. Go to Input Interface Configurations screen.
2. Select the required interface and click on “Output Interface Target”.
3. Configure more than 1 target with difference sequence numbers (as explained in previous steps).
4. Click on each and click on “output_interface_target_criteria”.
- Column name: Shipment Type
- Sql operator: =
- Column value: SHIPMENT-A
6. Configure criteria for other targets.
Extract Output Data in Output Interface Configuration UI
After configuring the Data Extract interface type, you can specify a target directory from the “Output Interface Configuration” detailed UI. All the CSV files generated by the scheduled jobs reflects on the specified target directory configured in the output interface target screen.
- Select "Data Extract" type from the Interface type drop down on the “Output Interface Configuration” UI screen.
- The Interface Format field displays only the "Extract flat files" option on
the drop down.Note: The current copy files schedule job works as is. The existing users should be able to continue using this job for copying files from the Output interface to the targeted SFTP directories, but you need to configure the GET SFTP files job to access the files generated by the Copy files job.
- Select the Interface Type and click the detailed icon. The Output Interface Target opens.
- Provide a valid SFTP credentials and the SFTP target directory Data Extract file interface type via CRUD operations.