Pick Cart
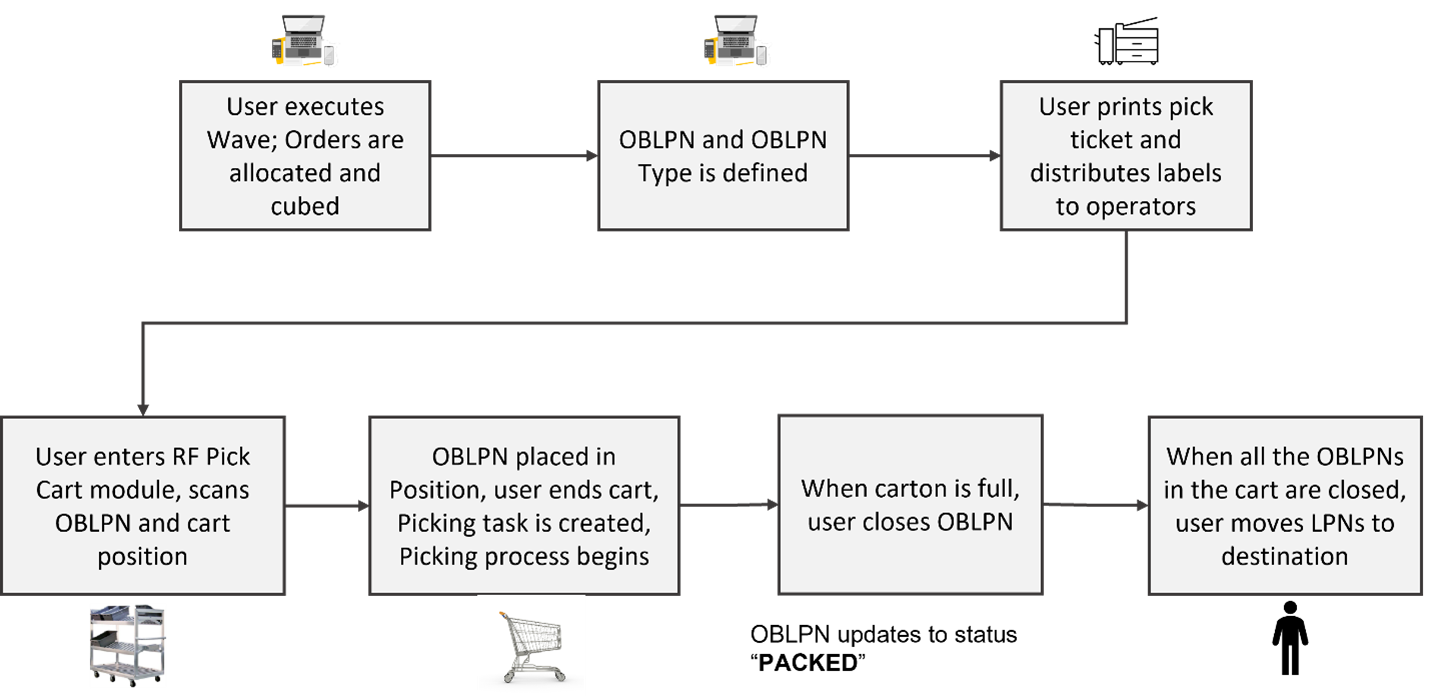
Pick Cart is a form of batch picking where you use a cart to pick and pack multiple orders on a single trip through the warehouse. A generic Pick Cart process in WMS is displayed below:

Pick Cart allows you to pick multiple orders concurrently into the final shipping container. The pick cart transaction may only be used to pick orders which are cubed into OBLPNs during the waving process. As OBLPNs barcodes are scanned onto the pick cart, the WMS automatically creates picking tasks. These tasks are then executed by warehouse employees who build the pick cart.
- Allocations for all OBLPNs on the pick cart will be sequenced by the pick sequence defined on the locations.
- To alert the pickers while performing RF Pick Cart (rf.outbound.cwrfpickcart) transaction, if the scanned OBLPN has replenishment dependent allocation(s), the system displays a warning message “Available Qty to Pick is insufficient for %OBLPN. Do you want to proceed?”. Before ending the cart in the transaction, the system displays the error message multiple times within the transaction, if you are scanning multiple OBLPNs with replenishment dependent allocations.
Configuring Pick Cart in the UI
Depending on the Cubing Mode, you can set your configuration starting with Allocation Mode:
Configure the Allocation Mode
- Go to the “Wave Template” screen and click on the “Allocation Mode” button.
- Create an allocation mode from Allocation Mode screen and click “Save”.
- Select the record and go to details (
 ) icon to access the
“Allocation Mode Sequence” screen.
 - Create allocation sequence for the selected record.
Add Cubing Rules
- Go to the “Cubing Rules” screen and create a new cubing rule.
- Select this record and click on “Ordering Criteria”.
- Create a new breaking criterion with the Create button; select the field you want to break the cubed container by (for example, “Order Number, Break By Count = 1” – this translates to “create a new carton for every order that is allocated in the pick cart wave”).
Define the OBLPN Types
The Outbound LPN Types are pre-determined carton types that are frequently used in the warehouse for packing. In WMS, these OBLPN Types are used for cubing during waving. OBLPN Types must be created for cubing to occur.
- Go to the “OBLPN Types” screen.
- Click the Create button to create a new OBLPN Type.
- Populate all of the fields.
- Code: refers to the OBLPN Type code.
- Prefix: refers to the prefix of the LPN number when the container is created.
- Max Volume/Weight, Length, Width, Height, and Empty Weight: populate the dimensions of the box type. These values will be considered during cubing.
- Use for cubing: users can enable/disable OBLPN Types for cubing1. Check this box to use the current OBLPN Type.
Create the Pick Cart Wave Template
The last step in the configuration is to create a wave template.
- Go to the “Wave Templates” screen.
- Click the Create button to create a new template.
- Populate the necessary fields. Refer to figure below as an example. Note that a Task Template is not needed.
- Click “Save”.
Pick Cart Via RF
| Parameter | Module Param Choice | Definition |
|---|---|---|
| default-reasoncode-onshort | Text |
Determines if reason code should be prompted in event of shortage during picking process
|
| show-total-qty-info-for-location-sku | None|Yes|No |
Displays the total units that are picked from a location for your whole cart when the parameter is set to Yes. On scanning the location, the system displays “ Total quantity/Remainder quantity”
|
| opportunistic-summary-count | Text |
On configuring a valid summary count screen name, the system enables the Opportunistic summary count functionality. By default, the field is blank, and the Opportunistic summary count functionality will be disabled. When inventory in a location goes below threshold value post picking, the summary count screen will be launched. NOTE: Threshold value can be configured for active and reserve locations. |
| prompt-pick-to-zero | None|Yes|No |
|
| task-ordering | NA | Allows you to define the description of Task Ordering which is defined in the 'Column Ordering UI'. When configured, system orders the task details based on the sequence defined in column ordering detail. |
|
pick-confirmation
|
OB LPN Position Null
|
|
|
allow-multi-alloc-types
|
Yes No
|
|
|
extra-item-property-disp
|
|
|
|
item-barcode-scan
|
Scan each SKU Prompt SKU
|
Set the parameter value:
|
|
dest-task-zone
|
N/A
|
The system prompts for a drop location belonging to the task zone configured at the end of the picking. When the drop zone specified in the parameter is an induction point, the system automatically generates MHE messages.
|
|
required-validations
|
None Expiry Batch All
|
Displays valid Batch Number and Expiration Date when completing the picking process.
|
|
task-type-description
|
N/A
|
Provides you with option to configure specific task type descriptions for Pick Cart Tasks which are created from the RF Screen (default is Pick Cart).
|
|
max-OBLPNS-in-cart
|
N/A
|
Enter the max upper limit number of OBLPNs for user to scan to the same Pick Cart.
|
|
UPDATE_INVN_ONSHORT
|
Yes No
|
Option to immediately correct location inventory levels for shorted quantity if set to Yes.
|
|
Prompt_rsncode_onshort
|
Yes No
|
Option to require users to input a reason code when shorting a pick if set to Yes.
|
Creating Pick Cart Tasks
You can create pick cart tasks using the following steps:
- Prior to picking process, scan a pick cart to begin assigning OBLPNs to a Pick Cart task.
- Upon scanning each OBLPN during picking, the system will assign a Position Number to the cart that helps you in directing a product to the correct OBLPN.
- Press CTRL+E to close the Pick Cart (or you can scan until you reach the maximum
allowed OBLPNs). This will create a Pick Cart task. Note: The Task Details will be sequenced by Location Pick Sequence.

Executing Pick Cart Tasks
- Picks are executed on the task based on Location Pick Sequence.
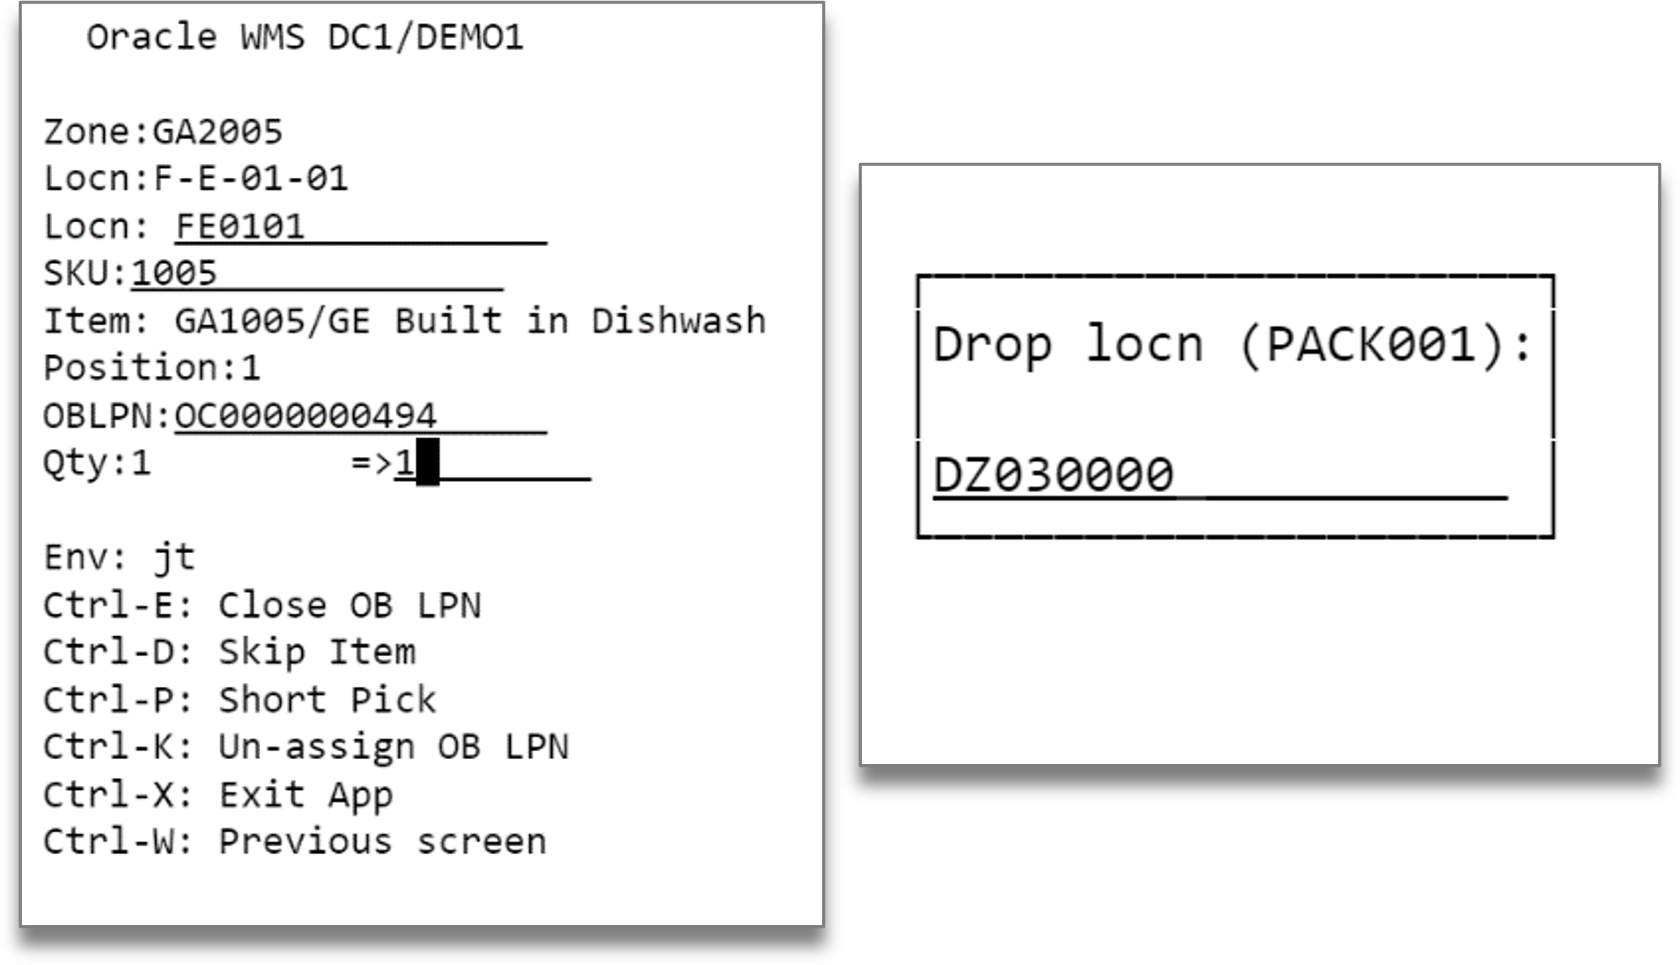
- You will be prompted for Location, Item, and Quantity based on screen parameters you configure.
- You can confirm picks by scanning the OBLPN barcode or the Position Number based on screen parameters.
- After all picks are complete, you can locate the Pick Cart and all OBLPNs to a
drop zone location, if necessary.

- Upon completion, the task Status is updated to Completed.
Displaying Total Quantity in RF Pick Cart
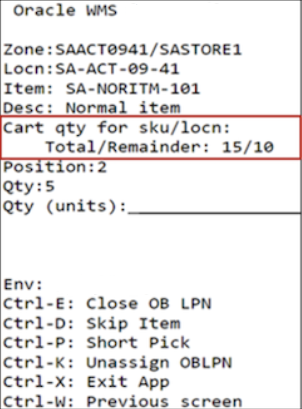
The “Show-total-qty-info-for-location-SKU” parameter displays the total units that are picked from a location for your whole cart.
After configuring this parameter, you can save time especially in scenarios where you can pick multiple quantities at a time and distribute them across all the bins in your cart. Knowing the total quantity of items to be picked from a location reduces your movements during picking and this improves your productivity.
Also, knowing the total number of units needed to be placed in the cart improves productivity and speed because the system displays the total units picked and the number of units expected to be placed in each bin.
For example:
Let’s say, you built a pick cart with multiple containers on your pick cart, and the total to be picked from the location/SKU is 15 units. All 3 orders require 5 units of USB cables.
To enable the show-total-qty-info-for-location-sku parameter:
- Navigate to the RF Pick Cart Module > Screen Parameter.
- Select show-total-qty-info-for-location-sku > set the parameter choice to Yes.
- Click Save.
- After configuring the parameter, run the RF Pick Cart transaction. The RF Pick
Cart screen displays the total quantity to be picked from the location all at
once.
“Total” indicates the total number of units to be picked from a location and “Remainder” indicates how many units are pending to be placed in the bins on the pick cart. To begin with, both these numbers are the same and you are prompted to place 5 units in Position 1. After you place 5 units in position 1 and confirm, “Remainder” is reduced by 5 units, and you are prompted to place 5 units in Position 2.

- The transaction continues until you place all of the units in different positions of the cart as directed by the RF screen. That is, you can walk to the location only once to pick the total units and you place the units in different positions as directed by RF Pick Cart.