Creating and Assigning Facilities and Companies to Users
After user and group setup is complete, you must create facilities and companies in WMS.
Step 1: Create Companies
- Go to the “Companies” screen.
- Click the Create (+) button.
- Populate the company’s information such as the Code, Name, and Address. Note that the first company will be the parent company in the environment by default. To verify this, see the “Parent Company” column.
- Click “Save”.
Step 2: Create Facilities
Facilities are controlled at the company level. This means, that every company has its own set of facilities. This link is defined in the “Parent Company” column in the “Facilities” screen. By default, all parent and child company facilities are displayed.
- Go to the “Facilities” screen.
- Click the Create (+) button.
- Populate the facility’s information such as the Code, Name, and Address.
| Field | Description |
|---|---|
| Default Ship Via Code | This field is used when ‘ship via’ codes are activated through the company’s “PACKING_ROUTING_MODE” parameter. The system will default to this ship via value if the order header does not have a ship via code specified. |
| Parent Company | Indicates the company that the facility belongs to. |
| Accept Transfer Shipment | If checked and if this facility is a warehouse in WMS, this facility will accept ASNs from other facilities configured in the environment. |
| RF Inactive Timeout in Minutes | Enables set up a time limit for inactive timeout in minutes. This parameter works along with the timeout settings on the customer's network (for example: configuring keep alive/time-to-live in PuTTY). So if the time-to-live configuration is less than the WMS screen parameter, the session will end on the network side before the wms parameter time limit. |
| Priority | Set the priority for the facility. The Facility Priority value takes precedence for orders created from Order UI having priority value as blank |
| Time Zone | Choose the time zones of the facility from the drop-down. |
| Bonus Amt Per User |
You can provide incentive to warehouse employees to increase their productivity. This configuration is provided for WMF users. |
| Cust field 1-5 | Fields to enter more information. |
| Latitude | Enter the latitude component of the facility geo coordinates to calculate distance between facilities, stores and sites or identify routing logic and so on. You can enter more than 8 decimals in the field. |
| Longitude | Enter the longitude component of the facility geo coordinates to calculate distance between facilities, stores and sites or decide routing logic and so on. You can enter more than 8 decimals in the field. |
Oracle WMS Cloud supports spatial awareness of locations through different levels of location information - Area, Aisle, Bay, Level, Position and Bin. In addition, the system also supports fields on location for spatial awareness such as:
- X Coordinate - This field will hold the x-axis value of the location in a 3 dimensional space. The data type of this field will be same as the length field in location.
- Y Coordinate - This field will hold the y-axis value of the location in a 3 dimensional space. The data type of this field will be same as the length field in location.
- Z Coordinate - This field will hold the z-axis value of the location in a 3 dimensional space. The data type of this field will be same as the length field in location.
Location Coordinate Base UOM
The Location Coordinates Base UOM field holds the UOM of X,Y,Z coordinates of location such as kms, meters, yard, feet, miles that belong to DIMENSION UOM class.
- Select the facility record from the Facility UI.
- Click Location Coordinates UOM button. This will open the dialog box with
following fields:
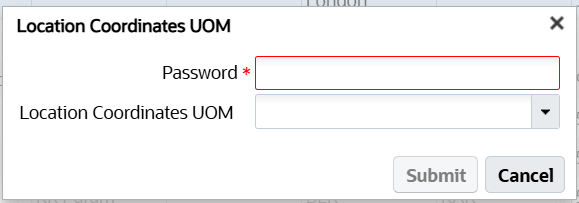
- Password: This is a required field and needs admin’s password to proceed.
- Location Coordinates UOM: Select the Location Coordinates UOM from the
drop-down list. This list the UOM descriptions of all UOM Codes where
UOM Class Code is DIMENSION.
If a value is already selected from the drop-down list and user attempts to save with a different UOM, the system display confirmation message "Existing Data will not be converted. Proceed with changing UOM?
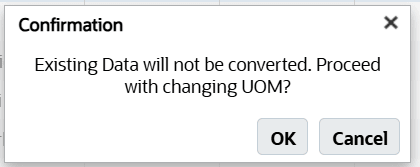
- Click OK to proceed.
Set Decimal Setting for Location Coordinates
You can set the max decimals allowed for the coordinate values for your facility through the Decimal Setting Location Coordinates action button.
- Select the facility record from the Facility UI.
- Click the Decimal Setting for Location Coordinates action button. This will open
the dialog box with following mandatory fields: Note: This button is permission controlled. You need to enable the "Facility/Change Facilities" to access this button.
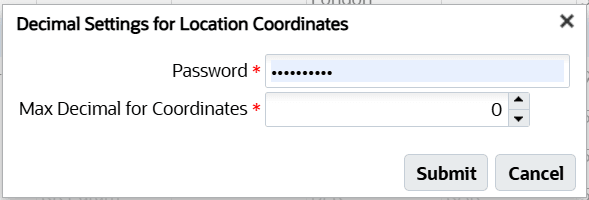
- Password: Enter user password to proceed.
- Max Decimal for Coordinates: Set the maximum decimal coordinates ranging between 0-25.
- Click Submit. If the new value configured is less than the existing value, then system display confirmation message "The decimal setting will be applicable only to new data. Existing data will not be changed".Note: Whenever you change the decimals coordinates, the system keylogs in the facility UI. For example, if the current value of Max Decimals for Location Coordinates is changed from 2 to 5, the system logs a message "Max Decimals for Location Coordinates changed (2 to 5) by <login_id>".
For information on how to set WMS managed, refer to Transfer Inventory between WMS Managed Facilities
For information on how to set UOM Configuration, refer to Configuring Unit of Measure (UOM) in WMS
For information on how to set and unset printing audit history for a facility, refer to Printing History
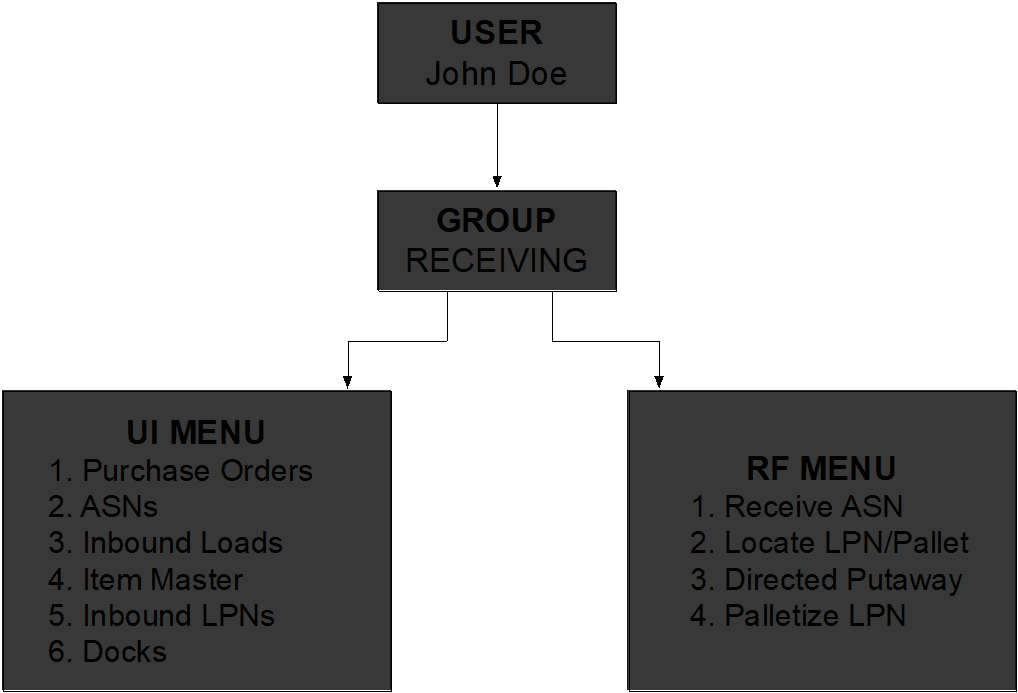
Step 3: Assign Facilities to Users
Once you have created the Companies and Facilities, the next step is to assign them to users. This step defines the list of companies and facilities that you will have access to.
- Go to the “Users” screen.
- Select the user to modify.
- Click on “Eligible Facilities”.
- Using the Create (+) button, add the Facilities that this user will have access to.
- Repeat steps three and four for adding Companies (using the “Eligible
Companies” button).

The following is an example of a User/Group set up:
Edit Message Configuration for Facilities
In the Message UI > Edit Message Facility Message Configuration
section, you can select ‘*’, option from the Facility drop-down menu to
update the settings for multiple location in One-Go. This option will automatically
update the change to all eligible facilities you manage, eliminating the need for
repetitive updates. 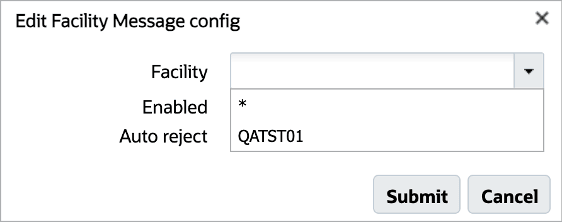
- Navigate to the Message UI.
- Select Edit Message Facility Message Config option.
- In the Facility Drop-down, select the * to apply changes across all your eligible facilities.
- Click Save.. On success, a confirmation dialog appears for you to confirm the changes applied to all eligible facilities.
- Confirm the action to proceed. Upon saving, the system will automatically update
the message configuration for every eligible facility linked to your
account.
NOTE: Enable and Auto Reject check boxes are blank by default. You can adjust these settings accordingly to enable or disable messages, and set auto rejection rules.