Expense Destination Items on Inbound Orders
Inbound orders destined for stocking locations or specific requestors outside of a warehouse are received in WMS and delivered to the respective locations or requestor. This is possible with purchase orders that are meant for expensed destinations for receipt in Cloud WMS and immediately be consumed upon receipt.
For example, the Healthcare industry deals with consumable items like syringes, cottons, and medicines that are often received at the warehouse and then distributed to respective locations such as operation theatres, stores, or pharmacies. In these scenarios, warehouses might require a mechanism to receive and consume these expensed inventories periodically for every PO detail marked with the expensed flag.
To distinguish an expensed PO sent from Inventory Management, you need to enable the “Expensed destination” flag at the PO detail level. If this flag is checked, it implies that the corresponding PO detail is meant for an expensed destination and is treated for auto consumption upon receipt. The corresponding inventories will not be considered or accounted to the warehouse inventory.
To Enable Expense Destination Receipt
- Go to Purchase Order PurchaseOrderHdrView > Purchase order Details UI.
- Click create/edit icon.
- Check the Expensed destination checkbox.Note: Any ASN created from the POs with the flag (enabled/disabled) will replicate the value on the ASN.
- Enter the requestor name in the Requestor Name field.
- Enter the requestor’s address in the Requestor Address.
These fields are optional. However, these columns are available on the ASN details Receiving UI, ASN detail flat view UI grid field, and IBLPN Label Designer UI. If the ASN has the PO reference or a PO detail is fully or partially converted to an ASN, then the values are fetched from the PO detail. The "requestor_name" field is available on the PO detail UI, ASN detail UI, and ASN detail flat view search fields.
When the receiving expensed destination, the system displays a confirmation message with the requestor name, “Expensed inventory received in %LPN and to be delivered to %Requestor name”. This helpsyou to deliver the expensed inventory to the right point of contact.Note: These fields can be edited in the PO detail only via UI and JSON format. These fields are not exposed in the existing PO interface formats (XML, CSV, PSV). - Click Save.
For more information, please refer to Receive Expense Destination Items On Inbound Order.
Perform Expensed Destination Receipt Action Button
You can receive expensed destination receipt through the action button “Perform Expensed Destination Receipt”. This helps you to receive PO details record from the PO Detail screen and is disabled, by default. On selecting one or multiple PO details with the Expensed Destination flag set to Yes, the system enables the “Perform Expensed Destination receipt” action button.
To perform expensed destination receipt, do the following steps:
- Navigate to Purchase Order > Purchase Order Details UI. Note: The Perform Expensed Destination Receipt action button is access controlled and requires enabling the permission “permission “purchase order hdr/Allow Expensed Destination Receipt” to perform the transaction”.
- Select the PO details with expensed destination flag = Yes, to perform Expense
Destination receipt.
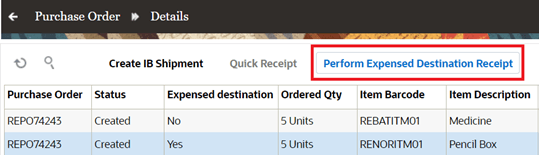 You can now multi-select PO details that are enabled with the Expensed destination flag and can perform the Expensed destination receipt from the PO detail UI screen. This action is enabled only for receiving expensed destination PO details.Note: The Perform Expensed Destination Receipt action button is access controlled and requires enabling the permission “purchase order hdr/Allow Expensed Destination Receipt” to perform the transaction.
 - A Perform Expensed destination receipt window pops-up, enter information for the
following fields:

- Cartonize per Dtl: Enabling this checkbox allows you to create
one LPN per PO detail.
Disable/uncheck will create a single LPN per receipt (all selected PO details go into single LPN). However, the auto-generated LPN are auto consumed.
- Printer Name: Select the printer’s name to print the LPN labels
after receipt.
Here, the LPN will be received first, followed by LPN label generation, and then auto consumption.
-
Number of Copies: Enter the number of copies.
These fields are non-mandatory. You can proceed with receiving without providing the values in the above fields.
- Cartonize per Dtl: Enabling this checkbox allows you to create
one LPN per PO detail.
- Click Submit.
AUTO-CONSUMPTION OF INVENTORY FROM ASN DETAIL RECEIVING
- Perform Detailed Receiving
- Receive Entire Shipment
- Receive LPN
RF ASN RECEIVING And RF LOAD RECEIVING
- RF ASN Receiving
- RF PO Receiving
- RF Load Receiving
On performing RF Receiving- ASN/Load, or PO, the system restricts mixing of expensed or non-expensed inventories in a single IBLPN.
The system auto consumes before the corresponding LPNs are picked by flowthrough or Xdock in case there is a matching order available. When LPNs are received and consumed for expensed details, the system displays new message “LPN % received and consumed to expensed destination”. If requestor_name is populated at LPN level, the system displays “Expensed inventory received in %LPN and to be delivered to %Requestor name”.
For more information, please refer to the 24C What's New.