Customer Managed Keys for Oracle Break Glass
By default, your Warehouse Management environments are protected by Oracle-managed encryption keys. By subscribing to the Oracle Break Glass service, you are offered the customer-managed keys feature that allows you to provide and manage the encryption keys that protect your environments. You can also purchase this option as an add-on subscription.
Warehouse Management leverages the OCI Vault service to enable you to create and manage encryption keys to secure the data stored at rest in your production and non-production environments. You can set up keys on your environment either during environment creation or you can add the key to an existing environment.
For best practices in setting up and managing vaults and keys, click here.
IMPORTANT: Production-to-test refreshes where the test environment uses customer-managed keys will also consume key versions. Therefore, frequent P2Ts will reduce the number of remaining key versions more quickly in a vault.
For an overview of setup tasks and roles, click here.
Setup Tasks for the Tenancy Administrator
- Create the Security Administrator Group
It is recommended that you create a distinct Security Administrator group to limit access to the security features of your environments.
The policy for the Security Administrator group allows the group to manage vaults and keys but does not allow deletion. The policy is:allow group <group-name> to manage keys in tenancy where request.permission not in ('DELETE_KEY') allow group <group-name> to manage vaults in tenancy where request.permission not in ('DELETE_VAULT') - Add Permissions for the Applications Administrator
The Applications administrator needs
readpermissions for vaults and keys. Thereadpermission enables the Administrator to:- Choose the vault and key during configuration.
- Verify key rotation.
- View the vault and keys in the OCI Vault service for troubleshooting.
To add the permissions for the Applications Administrator:
- See the section Adding Oracle Cloud Users with Specific Job Functions, which describes creating the Applications Administrator role.
- Add the following statements to the Applications Administrator role,
if not already
present:
Allow group <your-group-name> to read vaults in tenancy
Allow group <your-group-name> to read keys in in tenancy
- Add the System Policy to Enable Customer-Managed Keys in Your Tenancy
IMPORTANT: This policy must be added before you add the vault and key to your environment. If this policy is not added, your environment will not complete provisioning (if added during environment creation) or will not complete the maintenance cycle (if added to an existing environment).
define tenancy saas-ocwms as ocid1.tenancy.oc1..aaaaaaaaloqmqzqpv47kk6afzmxl2njlvstu5cqgeukhjlrutsffjxixk25q
define dynamic-group saas-ocwms-dg as ocid1.dynamicgroup.oc1..aaaaaaaammjkmgv2tzdhlt3vcazewcqyyoonatjjhwejs6hfqxpsimvz5i5a
define group Administrators as ocid1.group.oc1..aaaaaaaad6hvivl2kbndzcrn2x6xqarsmzlyout4pm37k6gvhpdcs5ulu47q
admit dynamic-group saas-ocwms-dg of tenancy saas-ocwms  to use vaults in tenancy
admit dynamic-group saas-ocwms-dg of tenancy saas-ocwms  to use keys in tenancy
admit group Administrators of tenancy saas-ocwms  to use vaults in tenancy
admit group Administrators of tenancy saas-ocwms  to use keys in tenancy
allow service keymanagementservice to manage vaults in tenancy
If you create vaults and keys in multiple compartments, create a policy for each compartment. Alternatively, you can create the policy to allow access to the tenancy, which allows access to all compartments.
Setup Tasks for the Security Administrator
The Security Administrator sets up the vaults and keys and gives the information to the Applications Administrator to add them to the environment.
- Create Vaults for the Environments
Follow the procedure Creating a Vault in the Vault documentation.
- Create Keys
Follow the procedure Creating a Master Encryption Key in the Vault documentation.
You must make the following selections when creating keys for Applications:
- For Key Shape: Algorithm, select AES (Symmetric key used for Encrypt and Decrypt (you must select this option for Applications customer-managed keys).
- For Key Shape: Length, select 256 bits.
It is recommended you create one key in the production vault for your production environment and one key for each non-production environment in your non-production vault.
- Give the Vault and Key Information to the Applications Administrator
After you create the vault and keys give the vault compartment name, vault name, and key name (and key compartment name, if different) to the Applications Administrator.
Setup Tasks for the Applications Administrator
The Applications Administrator adds the customer-managed keys to the environments. This can be performed either during environment creation or after the environment has already been created.
Prerequisites:
- The subscription has been added to the environment family. If the subscription has not been added, you won't see the option to choose customer-managed key.
- The Security Administrator has created the vault and key
- The Tenancy Administrator has set up the system policy to enable customer-managed keys in your tenancy.
- The Tenancy Administrator has created a policy for the Applications Administrator to read vaults and keys and associate them to Applications environments.
Replicate Vault
- Click Vault.
- Click the Replicate Vault.
- View Replication Details and confirm if the vault is replicated.
Adding Customer-Managed Key During Environment Creation
On the environment creation page:
- Click Show advanced options.
- Click the Encryption tab.
- Select Encrypt using customer-managed keys.
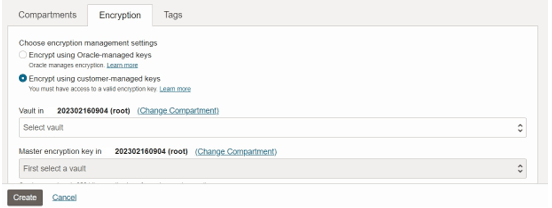
If you don't see this option, the subscription has not been added to the environment family.
- Select the Vault. If your vault is not in the same compartment that you are creating your environment in, you need to click Change Compartment and choose the appropriate compartment.
- Select the Key. If your key is not in the same compartment that you are creating your environment in, you need to click Change Compartment and choose the appropriate compartment. Only AES-256-bit keys are displayed.
After you complete all the steps to set up the environment, the provisioning process begins. Adding the customer-managed key adds time to the provisioning process. While the key is being enabled, you'll see a message alerting you that the environment is unavailable.
Adding a Customer-Managed Key for an Existing Environment
To enable a customer-managed key for an existing environment:
- Navigate to the environment.
- On the Applications tab of the Console, click Oracle Warehouse Management. On the Environments menu option, and then click the environment name.
- On the Environment details page, click the Encryption tab.
- By default, the Type is Oracle-managed. Click Manage to add your
vault and key.
If you don't see the Manage option, either you have not purchased the option, or the subscription for customer-managed keys has not been added to the environment family.
- Select Encrypt using customer-managed keys.
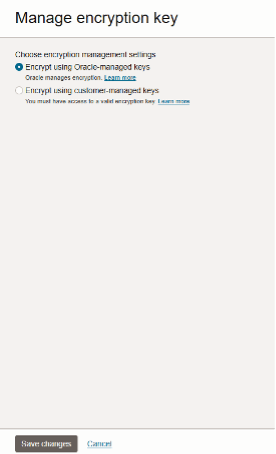
- Click Save changes.
For more info on managing Oracle Cloud Users with specific job functions, click here.
Adding a Tenancy Administrator
This procedure describes how to add another user to your tenancy Administrators group. Members of the Administrators group have access to all features and services in the Oracle Cloud Console.
This procedure does not give the user access to sign in to the application service console. To add users to your application, see your application documentation.
To add an administrator:
- On the Oracle Cloud Console home page, click Add a user to your tenancy. The list of Users in the Default domain is displayed.
- Click Create user.
- Enter the user's First name and Last name.
- To have the user log in with their email address:
- Leave the Use the email address as the username check box selected.
- In the Username / Email field, enter the email address for the user account.
OR
To have the user log in with their user name:
- Clear the Use the email address as the username check box.
- In the Username field, enter the user name that the user is to use to log in to the Console.
- In the Email field, enter the email address for the user account.
- Under Select groups to assign this user to, select the check box for Administrators.
- Click Create.
A welcome email is sent to the address provided for the new user. The new user can follow the account activation instructions in the email to sign in and start using the tenancy.
For more info on using compartments to group resources for job roles, click here.
Add a User with Specified Access for a Job Role
For users that shouldn't have full administrator access, you can create a group that has access to specific applications environments in the Oracle Cloud Console, but can't perform other administrative tasks in the Oracle Cloud Console.
To give users permissions to view your applications environments and subscriptions in the Oracle Cloud Console, you need to:
- Create a group.
- Create a policy that grants the group appropriate access to the resources.
- Create a user and add them to the group.
The following procedures walk you through creating a group, policy, and user. The default administrator can perform these tasks, or another user that has been granted access to administer IAM resources.
Create a group
- From the Oracle Cloud Console home page, under Quick actions, select Add a user to your tenancy. This action takes you to the list of users in the current domain.
- Under the list of resources on the left, select Groups.
- Select Create group.
- Enter the following:
- Name: A unique name for the group, for example, "environment-viewers". The name must be unique across all groups in your tenancy. You cannot change this later.
- Description: A friendly description. You can change this later if you want to.
- Advanced options - Tags: Optionally, you can apply tags. If you have permissions to create a resource, you also have permissions to apply free-form tags to that resource. To apply a defined tag, you must have permissions to use the tag namespace. For more information about tagging, see Resource Tags. If you are not sure if you should apply tags, skip this option (you can apply tags later) or ask your administrator.
- Select Create.
Create the policy
Before you create the policy, you'll need to know the resources you want to grant access to. The resource (or sometimes called resource-type) is what the policy grants access to.
- Navigate to the Policies page of the Default domain:
- If you are still on the Groups page from the preceding step, click Domains in the breadcrumb links at the top of the page. On the Domains page, click Policies on the left side of the page.
- Otherwise, open the navigation menu, under Infrastructure, click Identity & Security to expand the menu, and then under Identity, click Policies. The list of policies is displayed.
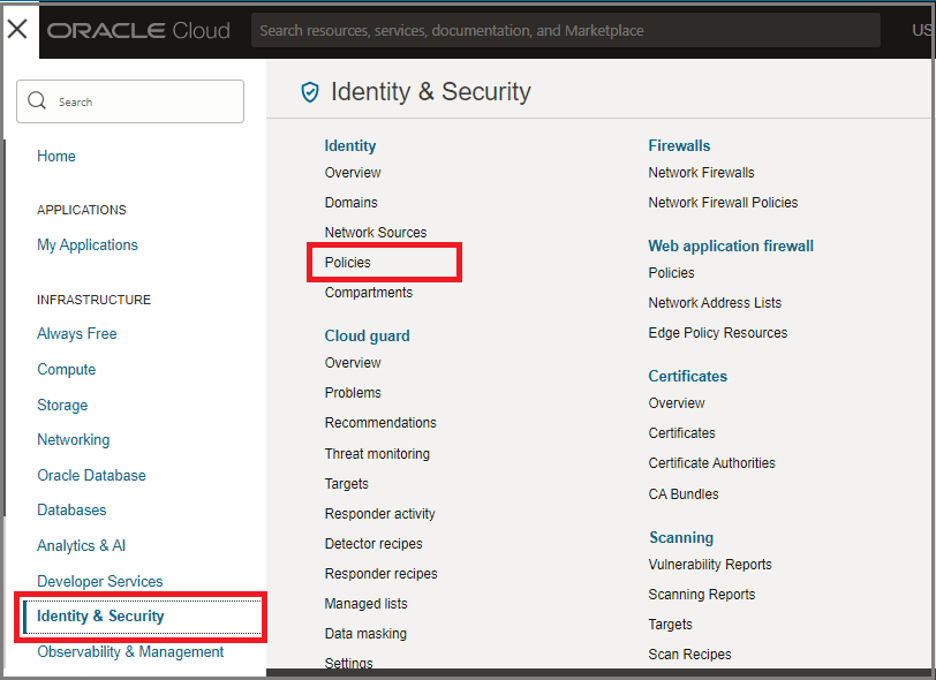
- Click Create Policy.
- Enter the following:
- Name: A unique name for the policy. The name must be unique across all policies in your tenancy. You cannot change this later.
- Description: A friendly description. You can change this later if you want to.
- Compartment: Ensure that the tenancy (root compartment) is selected.
- On the Policy Builder, toggle on Show manual editor to display the text box for free-form text entry.
- Enter the appropriate statements for the resources you want to grant access
to.
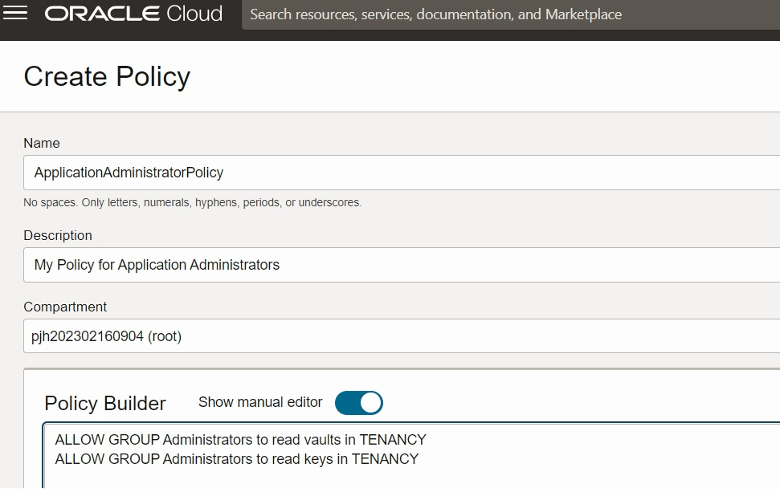
- Click Create.
Create a user
- From the Oracle Cloud Console home page, under Quick Actions, click Add a user to your tenancy.
- Click Create User.
- Enter the user's First name and Last name.
- To have the user log in with their email address:
- Leave the Use the email address as the username check box selected.
- In the Username / Email field, enter the email address for the user account.
OR
To have the user log in with their user name:
- Clear the Use the email address as the username check box.
- In the Username field, enter the user name that the user is to use to log in to the Console.
- In the Email field, enter the email address for the user account.
- To assign the user to a group, select the check box for each group that you want to assign to the user account.
- Click Create.