RF Create IBLPN
Before you begin to assign an inbound load to an outbound, create an LPN as shown in the following steps:
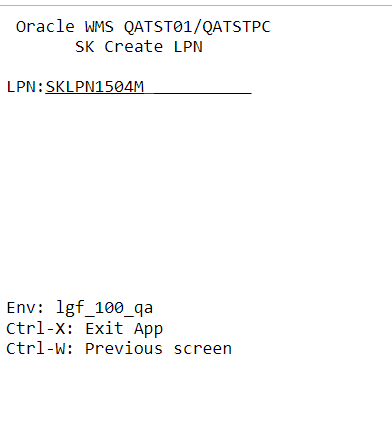
Steps:
- Login to WMS Mobile using your credentials.
- Create an LPN for the order. To do that, select the Create LPN transaction. After
invoking, create a new LPN and enter the LPN number. For example: LPN: SKLPN1504M.
- From the next screen, enter the following information:
- LPN: Enter the LPN Number.
- Items: Enter the items that you created through the items UI.
- Qty: Enter the quantity.
- You can also check the LPN status in the IBLPN UI. Go to the IBLPN UI > Search for the LPN number > the status displays as “Received” when items are successfully consumed.
- After consuming all the items, press Ctrl-X to exit from the current page.
Capture Pallet Images During Create LPN
You can capture images in real time during the Mobile Create LPN transaction. The image is linked to the LPN created and can be used to review or validate container condition.
Before you start, ensure you have:
- Access to the Mobile Create LPN transaction.
- Camera access enabled on the mobile device.
- capture-lpn-image screen parameter configured.
Note: You can capture new images only. Existing images from
the device can't be attached.
To enable and capture images, do the following:
- Go to the Create LPN module.
- Open Parameter > Screen Parameter.
- Select capture-lpn-image. Set the value:
- Yes: Show image capture screen when ending the LPN.
- No/Blank: Continue normal Create LPN flow without image capture.
- Click Save.
- Now, open Mobile Create LPN and enter or scan the required LPN details.
- Press CTRL-E to end the LPN.
- On the Image Capture screen, capture the image.
- Upload or confirm the image.